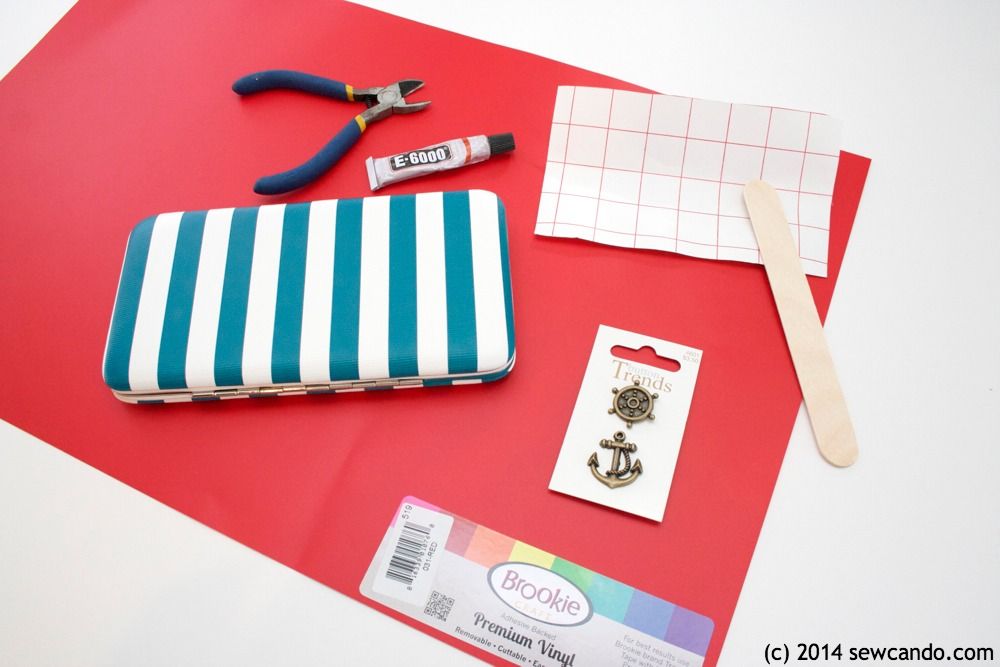
Showing posts with label Embellishing. Show all posts

Tuesday, March 18, 2014

Make A Cute Nautical Clutch in Just 5 Minutes


Did you know March is National Craft Month?  It's the ideal time to try your hand at new projects and supplies.  A great place to get ideas & see new trends is the Jo-Ann Fabric and Craft Stores®  spring crafting inspiration website.  I've been loving the nautical trend & thought I'd create a project that celebrates this theme and make it really easy to do: a Nautical Clutch Wallet.  If you've got 5 minutes, you can make one too!


Materials:
- Clutch wallet
- Vinyl
- Transfer Tape
- Anchor button
- Wire Cutter/Button Shank Remover
- E-6000
- Optional: Cutting machine like a Cricut or Silhouette

I found all my supplies at Jo-Ann, including the cute striped clutch.  Jo-Ann makes spring crafting easy during National Craft Month with a $5 off $25 or more purchase coupon. So you can make something new & get a deal;)


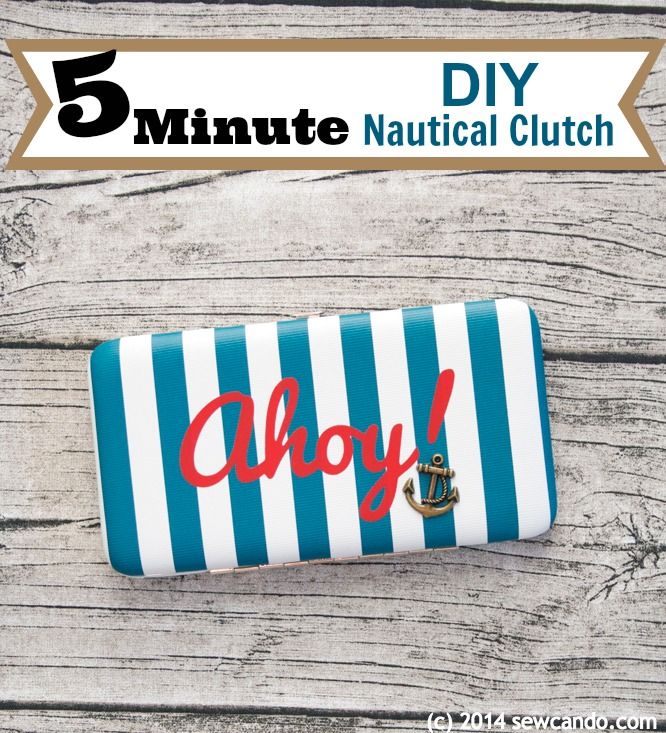
Start by making the "Ahoy!" lettering out of vinyl.  I used the Pacifico font and made mine about 1.5in high by 5in wide and cut it out on my Cricut machine using the settings 3-2-3.  If you don't have a cutting machine, make a stencil by printing your lettering out on card stock and cutting it out with a utility knife.  Then use that to trace cut out the vinyl.


Remove all the negative vinyl away from the lettering (aka weeding).  Also remove the dot from the exclamation point.


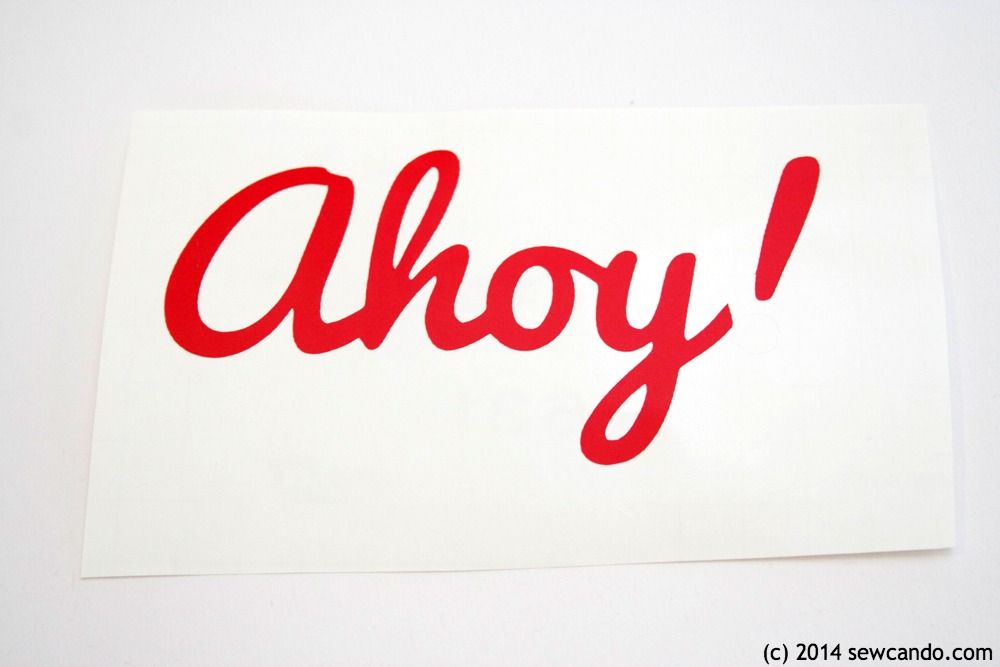
Peel the paper away from the transfer tape and place the tape over the vinyl, burnishing it with something hard like this stick that came with the transfer tape. Pull the backing away and the lettering should stick to the tape (if it doesn't, keep burnishing).


Center the lettering on the clutch and then burnish into place.  Since this wallet was padded, I also pressed & smoothed the lettering down with my hands after removing the transfer tape to make sure it was attached well.


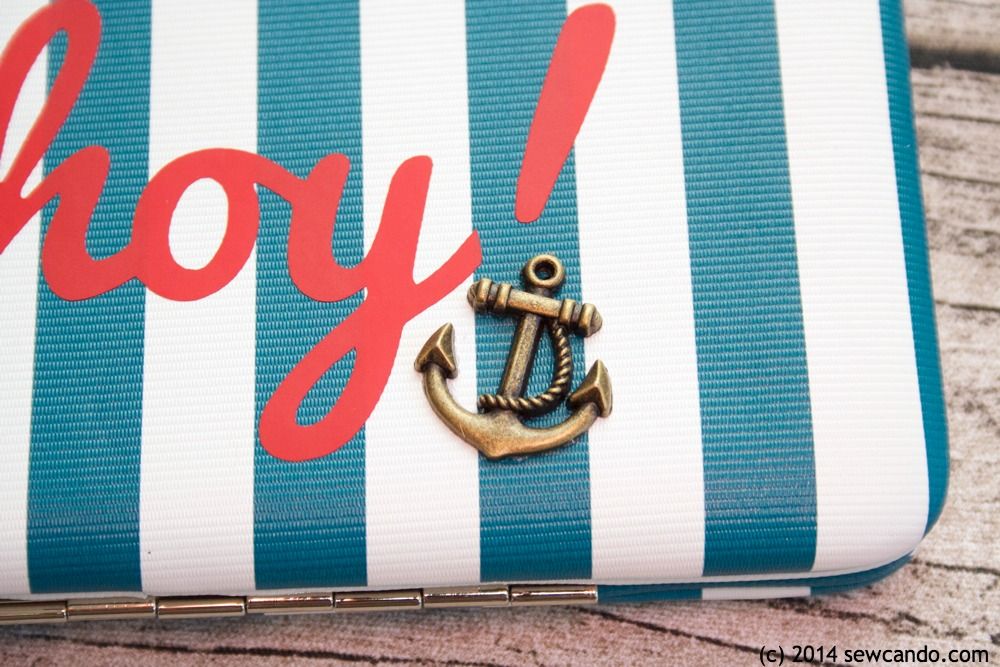
Clip off the shank on the back of the button with cutter.


Use the E6000 glue to attach button to clutch just under the exclamation point:


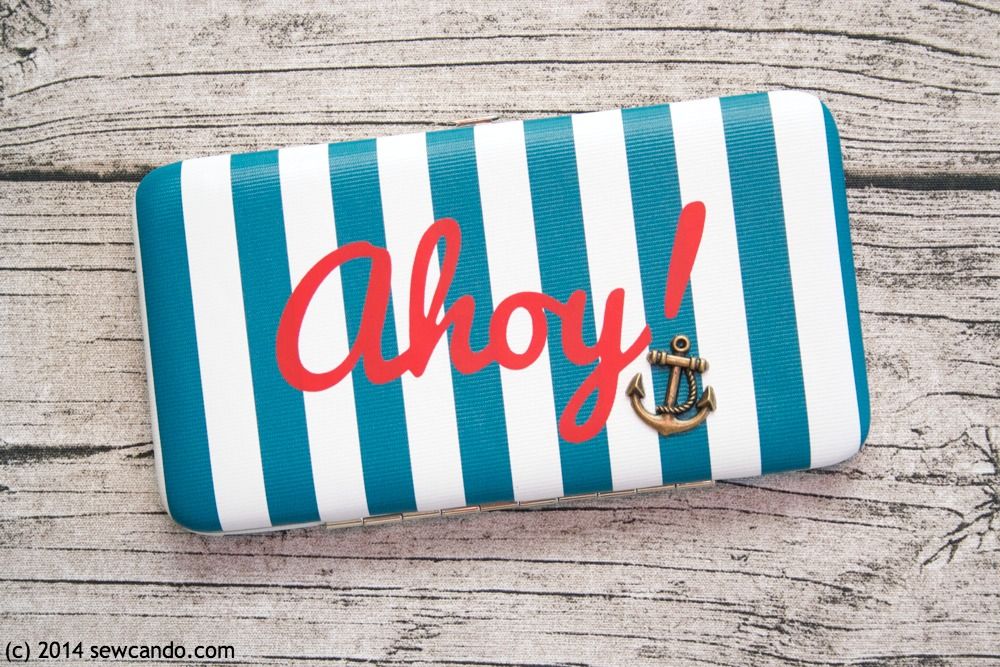
Now you've got a cute, nautical-style clutch and it only took minutes to make!


I'm also sharing this with my FAVE LINK PARTIES.
Click HERE to check them out!

I was not financially compensated for this post.  I received a Jo-Ann gift card from Jo-Ann Fabric and Craft Stores® to use to make a project of my choosing for their National Craft Month Campaign.  The opinions are completely my own based on my experience.  For my complete disclosure policy, click here. 

Wednesday, September 11, 2013

Make Your Own Mod Melts-Style Embellishments From Glue!


Today I'm sharing my experience using Mod Melts products to make resin-style embellishments and how to make your very own knock-off versions using hot glue instead (for a fraction of the price!).  We're gonna DIY a DIY product - how meta is that?


So what the heck are Mod Melts?  Made by Plaid (the makers of Mod Podge), Mod Melts are meltable sticks to use in your hot glue gun and melt into small-sized corresponding silicone molds.  These make resin-style embellishments for to use in various crafts, scrapbooking, jewelry, hair accessories, etc.  They started making the rounds on many a craft blog this year as a hot new crafting product.


I was really intrigued by them - especially because you could paint them using a variety of finishes to make them custom colored, metallic, glittery, etc.  No more buying big assortments of resin shapes just to get a few in a certain color or shape.  And just making what you need, when you need it, sounded good.  


I had to wait until they finally came to my local craft store to buy some (I don't have the spare money or time to fly myself cross country to the big craft supply shows to get preview access to stuff like this).  I'd wanted to get the sea glass clear sticks, but all that was left was the white.  There were a few cute molds to choose from, but still kind of limited.

The concept was pretty simple.  Just heat a stick in a high temp glue gun and trigger the melted goo into the molds.  After 10 minutes they're hardened and ready to paint.  I learned you have to work super fast - the stuff sets in seconds, so it's a bit tricky to get into the little crevices in the detailed shapes and to avoid air bubbles.  Opposite to the directions (that said to start in the middle), I started in the nooks and crannies after a few dud results.  


They started turning out better (although nearly impossible to get completely bubble free), but I noticed I went through a lot of the material pretty quick.  16 mini sticks cost about $6.99 and each mold was $5.99.  4 sticks made about 2 dozen pieces, but obviously not all turned out useable, so it does add up.


The big surprise for me was that they weren't super hard like resin shapes, more rubbery, like dried hot glue.   And that got me thinking...why not try that?  

So I did.  And guess what?  It worked just as well, if not better.  I just used my high temperature sticks & glue gun.  First plus was that the glue took a little longer to start to set, so it was easier to fill in the shapes and knock out any air bubbles.  Second was that it didn't take a full 10 minutes before it could be popped out - I did about 5 minutes, so I could get painting right away.


Left: Mod Melt nest, Right: hot glue nest

And they painted up great - I actually noticed the paint coverage seemed better on the hot glue shapes.  Can you spot a major difference between them?    


Left: Mod Melt material, Right: Plain Old Hot Glue
I also noticed painting with many coats and using textures like glitter helped hide imperfections on both the Melts & glue varieties.


Here's plain matte acrylic paint on Mod Melts from a Mod Melts mold.  Ok results, but not quite as nice a finish:


I also noticed the molds weren't all that different than any other shallow silicone molds.  The point of being able to make your own custom embellishments seems kind of negated when everyone is using the same 4 molds to make shapes, so I tried using different silicone molds too.  I used this folk design fondant mold, which had a bigger assortment of shapes and more varying sizes:


The results were just as good with the glue. 


Hot glue molded leaf

I made a bunch from this mold with the Mod Melts sticks too:


Mod Melts material with a Wholeport silicone mold

Of course there's probably some proprietary ingredients in the Mod Melts that makes them last longer or maybe their molds have slightly more details, but so far I'm just as happy with my hot glue & favorite mold combos.  And price-wise, the regular glue sticks work out to be about 1/4 of the cost, so I can go crazy making embellishments and still keep it cheap.  I thought this little discovery was worth sharing, so you can go DIY Mod Melts too!


I'm also sharing this with my FAVE LINK PARTIES.
Click HERE to check them out!

Tuesday, November 13, 2012

A Special Project Feature: Wedding Party Invitation Boxes


Today's post is a special craft project made by my lovely sister. She's getting married next summer and thought of a beautiful way to ask me and my daughter to be part of the wedding. I thought this was so cute & clever I had to share it: Wedding Party Invitation Boxes!
She & her fiancé started with unfinished wooden boxes and stenciled, painted and embellished them with paper flowers in her wedding colors.  She also added a personalized name plate to each too.  

When I opened mine, this was the surprise inside:
The inside lid had an invitation to the wedding stamped on it: 
 
And a beautiful handmade request for me to be her Matron of Honor:
As well as some sweet treats, beauty goodies and color swatches, all in her wedding colors:
Inside my little girl's box were some sweet treats, a little wedding dress and some Disney Princess  goodies:
 And this beautiful little note asking her to be a flower girl:
I love how she carpeted the bottom of my daughter's box with flowers.  She's so enchanted with it, she calls it her treasure box.
I was enchanted with it too - it looks like something from a fairy tale.  And besides the honor of being asked to be part their wedding, she's also asked me create the flower girl dress for my little girl.  I'm so looking forward to making something special and this sweet surprise will definitely help inspire me!


Thursday, August 30, 2012

Luxury On A Dime: The Getting Gathered Pillow Tutorial


Want to rival the luxurious throw pillows in high-end catalogs for a fraction of the price? And have the added bonus of serious durability?  It's easy with my new Getting Gathered Pillow Tutorial. It's perfect for accenting a chair or couch, or adding extra style to a bedroom. And it's able to withstand whatever gets thrown at it.  Literally.  With 3 kids in my house that could be just about anything.  I don't dare have anything laying around that isn't washable these days. It's nice to have something that is and gives a little taste of luxury in the house!
To Make Your Own You'll Need:
- Square Pillow form (I used a 12"x12" size) 
- 1/2 yard Luxury Fabric (I used 300 count Cotton)*
- 1 yard Decorative trim or ribbon 
- 13 buttons (3 for back closure, 10 decorative for front)
Sewing Notions (shears/rotary cutter, ruler, disappearing marker/chalk, pins, iron, hand sewing needle, thread & sewing machine)

*What is 300 thread count cotton?  A 100% natural long staple Indian Cotton which, as the name says, has a thread count that's higher than most by-the-yard fabric (normal quilting cotton is just 100-200 thread count).  This is the material used in good quality bedding & sheets.  It has a nice sheen and feels butter soft, yet it's very practical since it's machine washable and really hardwearing.  Being 54 inches, wide the yardage is ideal for home accessories too, as they usually have larger widths than other projects.
Start with a length of fabric that is at 3 times as wide as the pillow form and 1 inch taller.  For my 12"x12" pillow I did 37 inches wide by 13 inches high.  Then mark into thirds, widthwise, with disappearing marker:
Cut the two back pieces, the first being 13 inches in width by 12 inches high and the other being 13 inches in width by at least 3 inches in height:
Fold over one length side of each of the back pieces by 1/4 inch and press.  Then fold over again 3/4 of an inch and re-press.
 Topstitch fold and sew 1/4 inch from fold on each piece.
On the smaller back piece, draw evenly spaced lines for buttonholes just below the topstitching:

Stitch buttonholes and cut open.  I used some silk thread for my topstitching & buttonholes.  It feels softer and has a little extra shimmer to add a nice fancy touch.

With right sides facing up, overlap the back pieces so that the folded top of the smaller piece is 3/4 inch over the bottom fold of the larger piece and pin together on either side:
On front fabric baste 1/4 inch from top and bottom raw edges and over the 3 marked lines.  Gather all rows by pulling up the bobbin threads and adjust gathers to be 13 inches across (measure with ruler to check the width and even the gathering):
Cut two pieces of decorative trim and pin along the two middle gathers and topstitch into place:
With right sides facing, pin front and back together and stitch .5 inch from edge all the way around:
Trim raw edges and clip points off corners and turn right side out.  Hand sew on buttons and place pillow form inside.
Now the pillow is ready to add a little luxury flair!


Sharing this with my FAVE LINK PARTIES too-
Click HERE to check them out!

LinkWithin

Related Posts with Thumbnails