Showing posts with label Decor. Show all posts

Wednesday, September 19, 2018

DIY Giant Thread Spool Canister: The Perfect Craft Room Decor!


Looking for a cute accent for your craft space?  Extra storage that is fun & functional? Make a handy Giant Thread Spool Storage Canister!  

I came up with this project as a party decoration for the Sewing Themed Birthday Party I put together for my daughter:


A giant faux spool of thread (aka cotton reel for my UK friends) was a super cute table accent: 


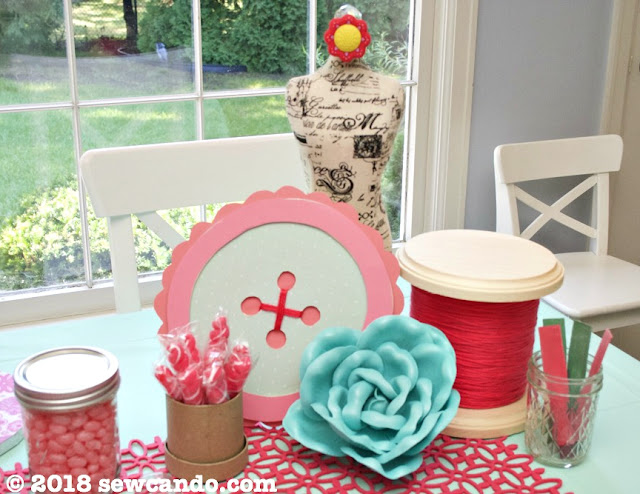
Not only was it the perfect table decoration, but it's become totally practical after the party, thanks to its great hidden storage for small notions and accessories:


Now let's make one the easy way!


Materials:
- Yarn
- 2 wood circles (beveled edge is ideal)
- Cardboard canisters - mine were nesting
- Tacky glue, hot glue

I got all my supplies at the local big box craft store, so easy to find.  I gathered my yarn, wood circles and cardboard can to get started:


I totally lucked out and found a skein of yarn in the exact shade of pink that matched our other party decorations (and my craft room for its later residence) in the clearance bin:


For the canister I used the largest of the nesting 3 container set, but the lid from the middle size so the top edge of my finished container would fit into it to stay on.  If you don't have a smaller top to use, you could probably roll a strip of cardboard into a circle slightly smaller than the base or use a lid from something else.  


I started by giving the entire canister a good coat of tacky glue using a foam brush.


I put a dab of hot glue at the edge to tack down the start of my yarn and then began winding it around the canister in a single row, fairly close together:


It was ok there were some small gaps in this layer since another layer was going over it.


I wound a second later back down, keeping it pretty taut so it would stay even:


I put another dab of hot glue to attach the tail end to the bottom edge.  Hot glue works ideally because you don't have to wait for it to set:


Then it was time to attach it to the base.  A round squiggle of hot glue on the top of one wood circle was all that was needed and then stuck the canister on it:


To do the top I did another round squiggle of glue on the other wood circle, but this time it was on the underside and put the smaller canister lid on it.  


Boom - All done and ready to fill with all those crafty supplies!


Wednesday, March 22, 2017

Spring Decor the Easy Way: Using HedgeScapes.com


Spring has arrived and with it the excitement of decorating for the new season.  I've been so eager to have green plants, sunny flowers and lovely color after a dreary grey winter. The weather around here, however, can't make up its mind.  One day it's 60 and sunny, the next 20 and snow, followed by several mid-30s and rainy.  This can last through mid-April around here, which means real plants are pretty iffy, but my new spring table has never looked better or more verdant:


Putting it together was so easy, which is key since I've had barely any free time lately.  I used a 1/4 yard of minky fabric as a plush pastel table runner.  The pretty wooden Easter egg tree was an heirloom from my grandmother.  It was on her table every Easter and I'm happy to keep the tradition going.

I did want to add a bit of nature to the table, but I didn't want fake flowers & wasn't sure how well the real thing would fare for the next few weeks.  I got this pair of moss bunnies from HedgeScapes.com.  They're thick & solid and the size is ideal.  Way nicer than the typical thin, hollow plastic or flocked cardboard variety.  They're a couple of pounds each in weight, so no chance of tipping.  The lively pose & detailed shape are just perfect:   


I added a velvet ribbon to each one's neck and a few faux eggs to the bases.  


On either side of my festive tree, they really make my spring tablescape work: 


Hedgescapes.com asked if I would pick one of their products to use and review and it was tough to decide.  There were so many choices that all looked good, but these bunnies caught my eye.  They offer all sorts of artificial boxwood hedges - from topiaries to screens, custom shapes, indoor and outdoor, temporary or permanent, home or business use.


I have a few real boxwood shrubs outside and they're still slowly growing.  8 years and the solid hedge I imagined when I bought them is still a ways to go.  The idea of having an instant privacy hedge or way to camouflage outdoor eyesores like air conditioners seems really appealing.  Ideal for outdoor weddings and parties too.  And they aren't all traditional boxwood either.  Being able to pick the size, style and variety like Azalea, Juniper, Pearl Grass, Ivy or Boxwood adds extra options:  


They use their own special PermaLeaf® technology that makes their faux greenery both weather and UV resistant so they hold up & stay looking like the real thing too.  No fading fake looking leaves with these.  I still can't believe this isn't real:


I was really pleased with the items I tried and look forward to exploring more of their artificial options.  With hedges, typical topiaries and unique animal designs, there's something for every style.  My kids would LOVE the idea of one of these animal topiaries in our backyard! I'm pretty sure I would too;)


I was not financially compensated for this post.  I received these items from Hedgescapes.com, to review & use as I desired.  The opinions are completely my own based on my experience.   For my complete disclosure policy, click here.

Thursday, August 11, 2016

DIY Exotic Sunroom Back Porch Makeover


I don't do a lot of home makeover type posts, even though I love seeing them.  Full room DIY has never been my strong suit.  This summer I'm happy to say I've transformed a full room and done it myself.  It's my Sunroom Porch Makeover!


A bit of new furniture, some slipcover action and some DIY pillows & wall art have renovated it from ugly drab to Moroccan-style fab!  Now, it's got chic details and a matching look.  Oh, to have a room that looks put together!!


Room backstory: Our house has a enclosed back porch aka sunroom just outside our family room.  It's a 3 season room that's a combo of brick and lots of screened windows. Sadly, it tends to be treated like a shed most of the time.  These pics were taken on a really clean day too.


We have literally stored stuff in it more than used it over the years.  Patio chairs, tools, outdoor kid junk, it's usually been out there.  Besides the mess, it also looked totally mismatched and faded, which made me cringe every time I looked at it.  Definitely not a room to entertain in.


I hoped to transform it a few years ago when we got some free used rattan furniture.  The faded red floral print was awful, but I had these big ideas about re-upholstering it and making it fab.  Then reality set it when I calculated the yardage needed and the tricky areas involved. Too much hassle for what would cost almost as much as new furniture!  So I left it and the room continued looking ugh.


Much better now though!


This year I'd had enough, but I also had to be reasonable with a budget, so with some planning, a couple of hundred dollars and some elbow grease, I made it happen.

The first reality was cleaning.  I had to clear out our little backyard shed, then organize it better, to find some extra space to put our patio chairs and some of the kid stuff when not in use.  


Now it's at least manageable looking.


Next the rattan furniture had to go, but I was shocked at the prices for most outdoor couches and cushioned chairs.  Even the cheapest stuff was crazy $$$.  Then I saw this eucalyptus wood bench on another blog's patio makeover.  It wasn't even mentioned in that post, so I asked where she got it (at World Market btw) & lo and behold there was a matching chair and deep couch available there too!


Buying them all was still a bit out of my budget until about a week later when all outdoor stuff became 50% off.  I grabbed 'em along with an outdoor rug, a few solid outdoor pillows and these ultra cool lanterns.


The catch was the furniture only came with seat cushions and of course they're off white. So practical with 3 kids, right?  Not.  I scotch guarded them and plan to cover them, if needed, down the road.  The basic shape will be a lot easier than dealing with the rattan ridiculousness.  


I needed to make some extra large pillows to make the backs softer, but giant cushions can get pretty pricey.  So can a bunch of pillow forms that big.  I needed 18"x18" and 26"x26".  I bargain hunted and found some down filled forms at Ikea for under $10 each.  That, plus some home decor fabric I scored at Hobby Lobby with a 40% off coupon, allowed me to make some for between $12-15 each.  I got a pair of matching striped throw pillows at Home Goods for the same price.  
  

And since I made them zippered, I can swap the covers out as needed.  


I decided to keep the rattan coffee table and revamp it by making a slipcover out of some outdoor fabric and then setting the glass top over it.  Added bonus: it also acts as some extra hidden storage now.  


I wanted to tie my nice iron tables & bar cart in better, so I found a great little iron side table (at Kirkland's) that had a glass tile mosaic top in my new colors.   


I also bought a cheap, basic, storage cube at Ikea that I slipcovered with a cute print,


as well as finding an inexpensive new shade for my lamp and some super cheap net window panels to add an airy look.  Those were only $5 a pair!  


This beautiful seashell planter had been my grandmother's and had been hidden behind the old chair, covered with spiderwebs.  I cleaned it up and got some faux reeds to give it a new purpose.  I really love it now. 


Lastly, I needed some new wall art, but was hard pressed to find anything in the size, style or color I wanted.  Time to DIY it folks.  


I bought some cheap canvases, cool wood shapes (clearance section at JoAnn Stores), glass marbles and spray paint.


I used outdoor spray paint that has UV protection since this room gets lots of sun on the wall). 


I glued the shapes and marbles to the canvases with E6000 so they'd really stay on. 


Now I've got some great wall decor that's a perfect fit with my theme.


Adding all 3 kicked the exotic feel up a notch:


When I stand in there now I can't believe it's the same room. I'm really loving the exotic vibe, but I could easily swap out the covers on the tables & pillows and switch the wall art to do a different look without changing anything big.  Not that I'm going to want to any time soon;)  Definitely happy this got on my to-do list!   


LinkWithin

Related Posts with Thumbnails