Showing posts with label DIY. Show all posts

Thursday, December 1, 2022

Easy Folded Fabric Ornaments Tutorial


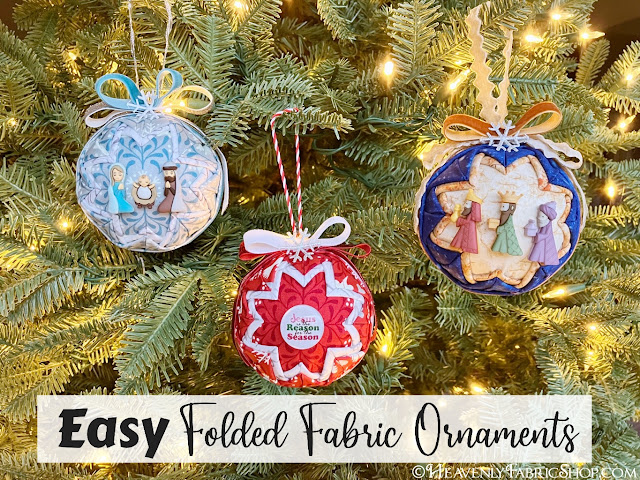
Make some show stopping ornaments to decorate the tree, or to give as beautiful gifts, using just a little bit of fabric, ribbon & embellishments and this folded fabric technique.


  I made these ornaments as a holiday project for my shop to feature fabrics & embellishments I carry there.  The original tutorial I found for this was at Think Crafts.  It's quite good and shows several design options - some using all ribbon and some with many more rows of folds.  I found this version to be the quickest & easiest, but made some of my own design tweaks and added more details in the steps to make it even easier! 


These are a great holiday craft for when you're short on time.  I actually made mine while watching tv in the evenings (since having open containers with hundred of pins out with my toddlers during the day would be a disaster).  


Both sides can be decorated too:


I used a mix of fabrics & supplies from our shop and some beautiful trims from Sugar Pink Boutique, a fellow Christian-owned small business owned by my good friend Jennifer.


Materials:

- (2) 1/2yd or FQ coordinating cotton fabrics
- (2-3) 1yd coordinating 3/8in wide ribbons/trims
- 3in Styrofoam balls
- Straight pins 
- Flatbacks
- Hot glue gun
- Ruler, rotary cutter
- Optional, but recommended: thimble


To make the exact ornaments shown here see the links below:


You can make 2-4 ornaments, respectively, depending on if you use fat quarters or 1/2yds.  The cut amounts specified below will make one ornament.

Start by cutting out (2) 3in squares and (16) 2.5in squares from the main fabric that will be your ornament's center.  Fussy cut if desired.  Also cut a single 2.5in high x 11in wide strip.


Cut (16) 2.5in squares from the second accent fabric:


Find the center of one side of the styrofoam ball (usually there is a small circle or marking that makes this easier) and place center of one of the 3in squares over it.  Pin into ball at corners of fabric square.  


Take a 2.5in accent square of fabric and fold it into quarters, creasing it with your fingers, so when it is opened it's easy to find the center and place a pin through it on the wrong side of the fabric: 


On each side of the already pinned 3in square, find the center of that side and insert the pin about 1/2in inward from the raw edge.  Fold the fabric downward:


Then bring the top corners downward to meet at the center and pin in place to create a point:


 Once all four sides are done it will look like this:


 Take remaining four squares and place those between the points to create a second overlapping row.  Pin the lower corners of these triangles if desired.  It's a little easier with them "smoothed down", but uses more pins.


 Repeat the previous two steps with the main fabric squares to complete one side:


 The result will be this lovely tiered fold effect:


 Do the same on the other side of the ball, trying to line up the placement of the folds to mirror the original side:


Take the long fabric strip and double fold.  Wrap around the center (to hide the raw edges of the folded squares), overlapping the short ends at the top of the ornament. Fold under the raw edge and pin into place.


Cut an 11in piece of 3/8in wide ribbon or trim and center over the strip.  We used a velvet ribbon to add texture:


To decorate the top and add a hanging loop, Cut a 8in piece of trim (we used metallic velvet here) center it at the top.  Cut a second piece and overlap ends to make a loop and pin through the center of both to create a bow.


Cut a 7in piece of trim to make the hanging loop and a 6in piece from another trim to create a second bow loop.  Overlap as shown and pin into first bow.


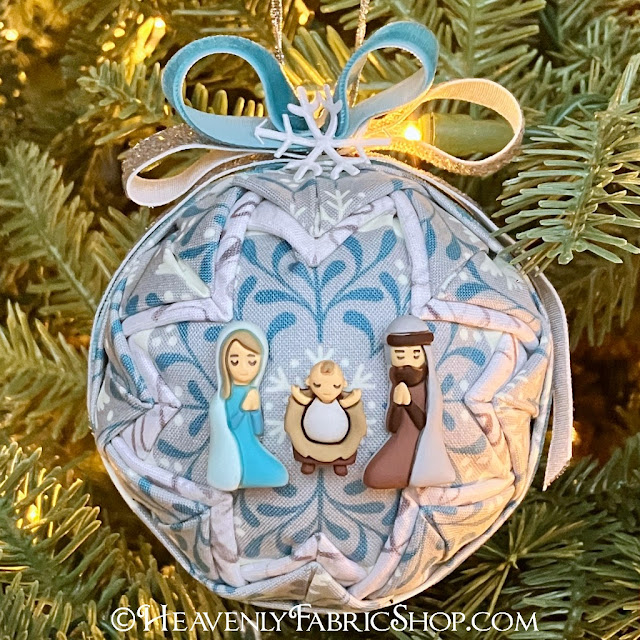
Hot glue embellishments to ornament center and to center of bow to finish.  These are so fun to make & a great way to create one-of-a-kind ornaments to treasure year after year:


Merry Christmas!


Wednesday, August 25, 2021

Easy DIY Rope & Greenery Wreath


I am ALL about the easy decor projects.  Today I'm sharing a super quick, yet still thrifty 
DIY Rope & Greenery Wreath.


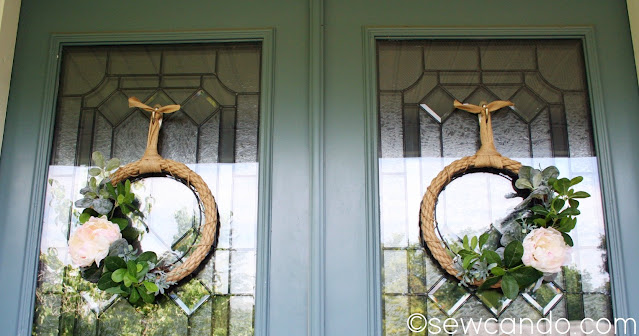
I made a matching pair to decorate my double front doors:


These wreathes are great for inside or out and very simple to put together.


They combine faux greenery & jute elements which is really on trend right now:


To be honest this project came about because I could not for the life of me find the summertime wooden signs I usually put on our front doors!  I looked in all my storage spots but just could not find them.  

I don't have a lot of time to go shopping these days or really want to spend much on expensive stuff to stick on the doors.  Having to get 2 for double doors hikes up the prices and since our house faces full sun most of the day the sunlight wears them out fast too.  Since these aren't brightly colored, any fading won't be as obvious over time.


I found two basic artificial greenery hoop wreaths at Menards.  Just a simple metal ring with some faux plants.  They were $5.99 each, but seemed too small on their own for our large doors.  


So I scrounged my craft stash and hit pay dirt.


I'd bought two 12 inch rope rings on clearance for just $2.47 each a while back but could never figure out how to use them.   


They were a perfect fit!  (Note: you could probably just cut some firm rope and hot glue the ends together if a pre-fab rope circle isn't easy to find).  Then came how to attach them.  Hmm...


I found some twine and layered them together then wound it the twine around them loosely, starting under the plants and going all the way around.  


Then I knotted the ends together on the back. 
 

It still needed "something" so I used some faux peony blooms left over from my DIY Faux Flower Hand Knit Pillow project: 


And hot glued one to each wreath right in the middle of the greenery.


I had a bit of 1 inch wide burlap ribbon on a spool, but just a yard & a half, so I cut it in 
two pieces:


Then folded each in half and looped it into a lark's knot and then knotted the open ends together.  


That gave me the ideal way to hang them on my door hooks:


I estimate each of these cost about $10 to make and took under 30 minutes to do both.  
Not a bad price and minimal craft effort too!


Now our front doors look more stylish and interesting and it didn't take much time 
or $ to do it:)


Wednesday, February 20, 2019

Easy Tutorial: DIY Inspirational Message Bookmarks


We have a house full of avid readers, but we never seem to have any bookmarks.  I got tired of using old receipts/scraps of paper and decided to make some that would be durable, easy to see, and most of all pretty!  It was time to make these Inspirational Message Bookmarks.

I feel like these are a huge step up from a bent Post-it or gas station receipts we've been using around here:


I was inspired to create them by these beautiful ethereal angel glass cabochons I started carrying in my shop.  They're just so lovely and dreamy.


The colors were a perfect match to this Heavenly Sky fabric, so some heavenly themed bookmarks seemed ideal!


They also add a little inspiration to every read by having a glittery message too:


The beautiful glass angel cabochon adds some special detail,


 and makes sure they don't slip out of place.


This is an easy project and makes a beautiful handmade gift!


Materials:
- Fat quarter cotton fabric (mine is Heaven Sent Heavenly Sky)
- Glass cabochons (mine are these& glue 
- Card stock or firm stabilizer 
- Heat transfer vinyl 
- Cricut or other cutting machine*
- Iron and/or Cricut Easy Press

* If you don't have a cutting machine you could print my files on paper and lay them over the heat transfer to cut them out by hand with an x-acto knife.

For each bookmark, cut two pieces of cotton fabric 3 inches wide by 9 inches high.  Also cut a piece of the card stock/stabilizer that's 1 3/4inches wide by 7 1/2 inches high.  


With right sides facing, stitch the fabric together on three sides with a 1/2 inch seam allowance.  Leave one short end open for turning.  Trim down the raw edges and turn right side out, poking out the corners with a knitting needle or chopstick.


Insert the card stock or stabilizer inside and fold raw edges of the open end inward and press.  I used a fusible stabilizer so it would all adhere together smoothly.  Top stitch all the way around.


To do the lettering, right click to save my file for these inspiring words & shapes:


Upload them to your cutting machine software and size so they are 1 inch high.  Mirror the image (since it's cut with the right side facing down) and cut out the heat transfer vinyl.


Weed all the material around and inside the letters:


Place a star shape on one end and then center the wording.  Adhere the HTV to the bookmark with an iron or Easy Press, following the HTV directions for time & temperature (since it can vary) pulling off the carrier sheet while still hot.  


Once cool, glue a cabochon onto the top with some glue.  I use E6000 since it's the strongest.  Let dry.


Now you have some beautiful, inspiring bookmarks to brighten the day!


LinkWithin

Related Posts with Thumbnails