Showing posts with label Projects for Boys. Show all posts

Wednesday, August 17, 2016

Sewing Clothing for Older Boys: Where To Find Patterns


When I first started blogging my 2 boys were still just toddling around.  There seemed to be no shortage of cute things to make for them to wear.  Now that they're nearly 11yrs & 14yrs it's become slim pickings. So I thought today I'd do a little spotlight on what is available to sew for bigger boys and where you can find them.

I was inspired to do this post when I started planning out a list of things to make my kiddies for this Fall.  When I looked at my list I had pages of patterns to make for my almost 7yr old daughter.  Tons of choice in my stash.  But I noticed my guys had sized out of a lot of patterns I had been counting on and looking at the pattern books at the store, it was shocking how few things there were for tween & teen boys.  Even the popular "Sewing for Boys" blog round-ups I've seen tend to forget boys over the age of 8 years.  They do get older people!  Part of why I sew clothes for my kids is that it's already tough to find stuff we like that's pre-made and now it's a become a challenge to find sewing patterns!

Here are some big boy patterns I've actually tried myself, 
that turn out nice and aren't a total bear to sew.  Read on!

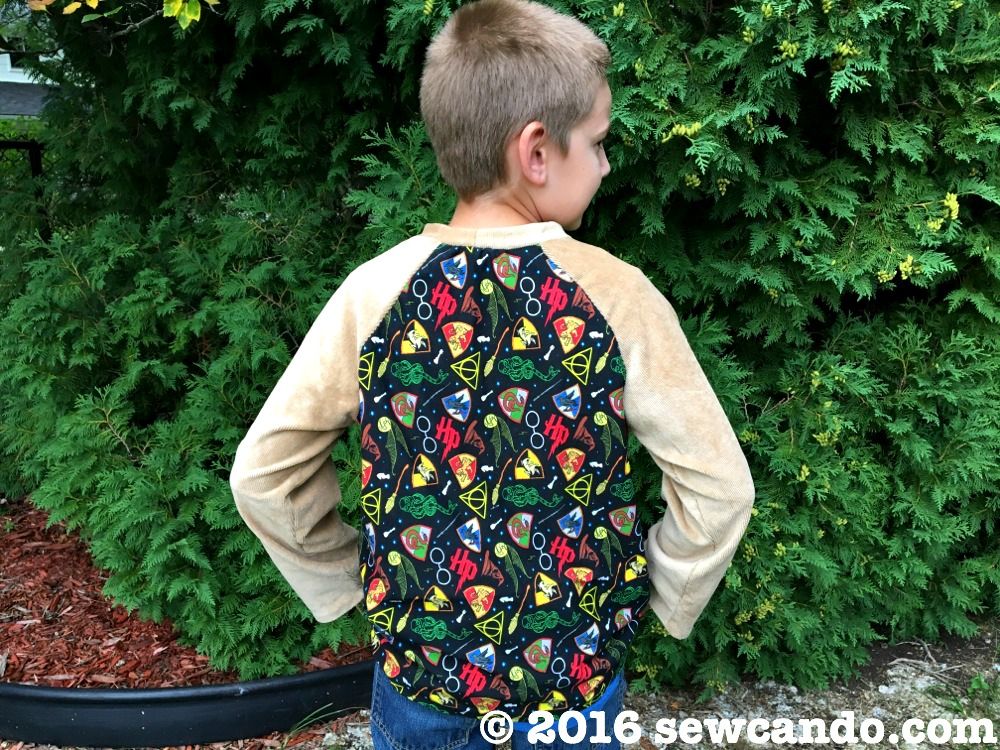
Big 4 Patterns: There aren't tons of options, but there are a few that are decent.  I recently grabbed McCalls 7379 for .99 cents on sale and I'm pleased with how it's sewn up.  There are a lot of raglan patterns out there, but some just can't seem to get the neckline right, but this one is perfect - even when I used a rib velour for the neck & sleeves:


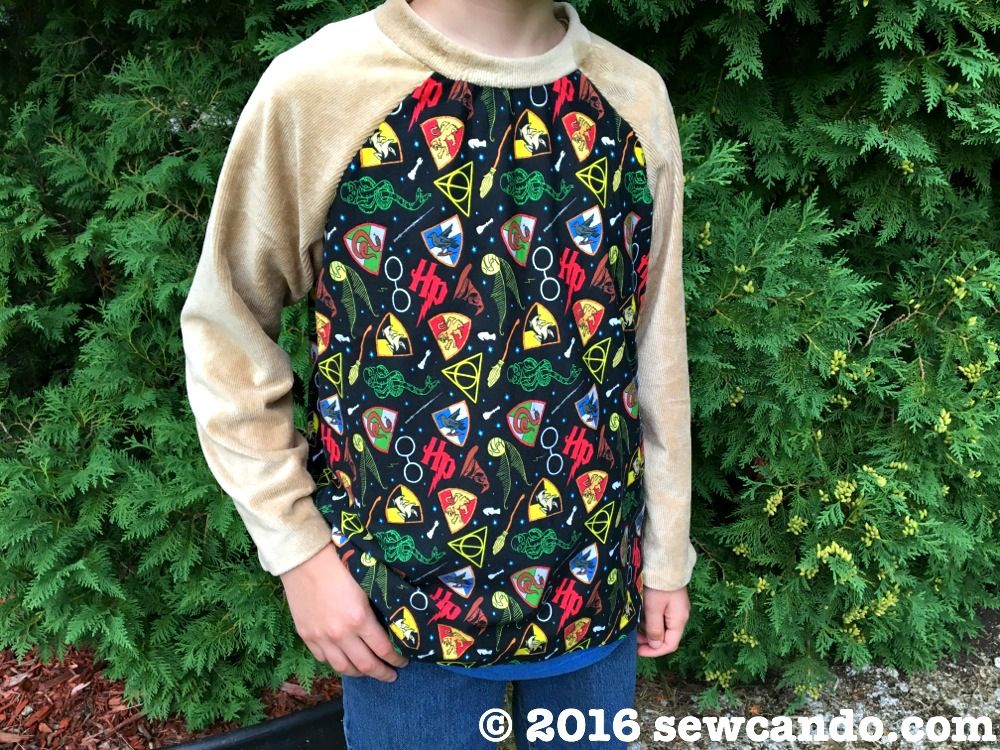
It goes up to a size 14 and includes pants and a tank top as well as the raglan shirt, so good bang for the buck (or for the change as it ended up!).  


Indie Patterns: There tend to be slightly more picks with indie pattern makers if you search for them.  The Offbeat Oxford Shirt Pattern by New Horizons has a hip style and is a way to use quilting cotton for big boys.  Ironically there are usually more older-boy approved prints available in quilting cotton these days, but clothing patterns to use them are a bit rarer.  This one goes from 12mos up to 14yrs, so it'll last for a good while:


Ottobe Design Pattern Magazines: These tend to provide more options for up to about 11yrs and then a handful for the bigger boys, but a lot of their older kid patterns can be super complicated.  I'm kind of a lazy sewer and don't want to have to spend weeks completing one thing or tearing my hair out because there are too many tricky techniques involved.  A 11-14 yr old boy probably isn't going to appreciate you pulled several all nighters to make him a single item.  One coat I liked at first glance actually had 15 pattern pieces, plus the lining!  Long story short, it didn't get made.  Their patterns also give the bare minimum instructions and zero step illustrations, so keep that in mind.  

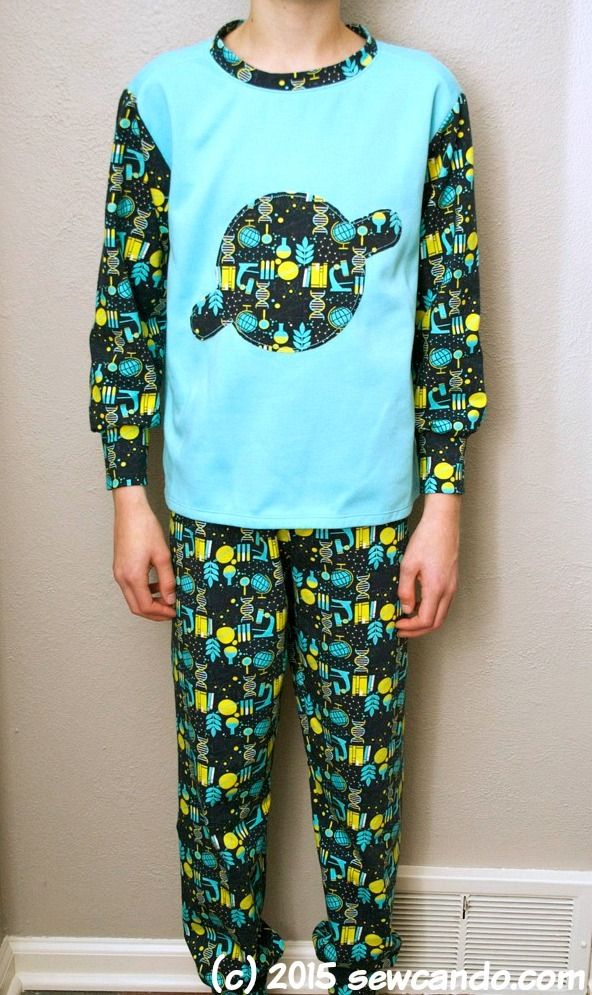
Good news though, I have had great success with their Rudolph Pajama Pattern (in issue 6/2009) and that goes up to 170cm or 15yrs.  The way it's pieced also makes it easy to mix those precious knit prints (which can get $$ when you need several yards for a growing boy!) with some less expensive solids. It's also nice change from the basic loose pajama pant, made from flannel or fleece, which is one of the few available-everywhere patterns for boys.

  
Out of Print Patterns: There are some real winners out there, but finding them is a little more work.  Simplicity 5362 is great because it goes right up to adult (covers the whole family!), includes both zip-up hoodie + pants, and works with both wovens and heavy knits/fleece.  I modified the hoodie when my middle guy was a littler smaller to make this giraffe coat, but with a different fabric (and no animal add-ons), this shape still works great for older kids.  I'm planning to make him a new one this season, so stay tuned for that.


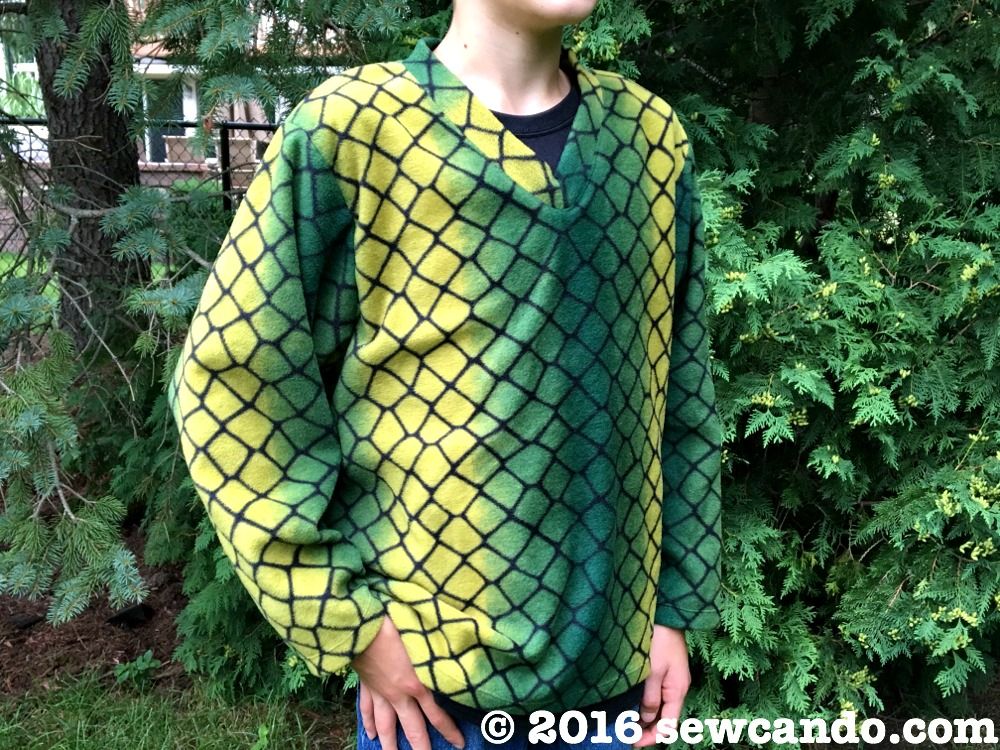
Kwik Sew 2745 is another awesome pattern.  This is ideal for fleece or other heavy-weight knits.  It goes up to size 14.  I've used it many times and the v-neck option always looks great.


Drafting Your Own: this is always an option.  I do it a lot for my daughter.  For some basic looks you can use something out of the closet to trace and then add allowances.  I probably should do that more, but since they grow so darn fast, my laziness makes me prefer to just use the next size in a pre-made pattern.  This especially applies for tops, which can look a bit off or homemade-y if you don't get the neckline or shoulder just right. 

Do you have some favorite patterns for the bigger boys?  Why do you think pattern makers seem to neglect the boys?  Share your thoughts & pattern finds below!


Wednesday, December 9, 2015

Trim The Tee: Ninja Bread Man Shirt Tutorial


I've finally got a holiday tutorial to share!  It's only early December, but the insane volume of seasonal stuff on the internet starting in October makes me feel totally behind the times. Not anymore, thanks to my Ninja Bread Man Shirt Tutorial.


I got the idea for this from a similar shirt I saw in a catalog. They wanted $42 for their ninja bread man appliqued tee. C'mon now, $42 for a Christmas-themed t-shirt for a kid? Get outta here!

So....I grabbed a plain shirt for $5 and used some scrap fabric to make my own for my ninja-loving 10yr old.  It was totally worth it.  He can't help but do some ninja moves while wearing it:


I even did some flocked lettering which makes it look more like something from a store, instead of the usual flimsy, plastic-y iron-on stuff.


Here's how I made the Ninja Bread Man!

Materials:
- Blank long sleeved t-shirt
- Tan, black and white scrap fabric (I used knit & fleece)- White ric-rac
- 2 red buttons- Paper backed fusible
- Iron, press cloth, pins, fabric shears, lighter, hand sewing needle
- Flocked iron-on transfer material
- Cutting machine (I used a Cricut Explore)


I started by freehand drawing my ninja-style gingerbread man on my paper-backed fusible - giving him one arm raised up and a karate kick leg, then cut him out:


I ironed the paper guy onto the wrong side of my tan knit fabric:


Then I cut the ninja bread man out and peeled away the paper.


I ironed him onto the front of the shirt according to the fusible directions.  I top-stitched him into place, with matching thread, using a triple stitch, which is ideal for sewing knits and also gives a nice, thick appearance:


I cut some ric-rac to trim the arms and legs, making sure to run the raw edges near a lighter flame to melt them slightly (so they won't fray) and then pinning them into place.  I stitched them down, close to the wave on each side, rather than just a straight line down the middle so they won't curl upward after a few washes. 


I traced an eye mask on another piece of paper-backed fusible and and did the same, iron onto wrong side, then cut out, except this time with some black fleece.  You can iron fleece, but it needs to be on a low setting.  I used thread scissors to cut out the eyeholes.


Then I cut a piece of white scrap slightly smaller than the mask and layered it under the mask, then ironing - again on low- on top of the the ninja bread man's face.


I also cut a little curved piece for his mouth and topstitched both the mouth and mask around the edges.


I hand sewed two red buttons on his front:


For the lettering, I used the font Last Ninja and cut a mirrored version of my lettering (since it's cut face down), using my Cricut Explore.  I used flocked heat transfer material. 


Despite being thicker than the regular stuff, it cuts easily, seems to hold better onto fabric, looks more like something from a store and has a nice, fuzzy feel.  All that makes me really love it.  I get the best results by ironing the shirt first to warm it, then ironing on the transfer (with plastic sheet still on it) under a press cloth and then when cool, ironing it again from the inside of the shirt.


Now, we've got a fun & festive look that was fairly quick to make and easy on the wallet!


For more winter-themed shirt ideas, check out the rest of my Trim The Tee series.  Easy & festive DIY designs for the winter season and cheap to make so you can save the big bucks for the presents;)


Wednesday, March 18, 2015

Easy Convertible Sleeping Bag Tutorial (With A Hidden Surprise)


Today I'm sharing a quick project that's simple enough for a beginner to do and is a big hit with the kids: My Easy Convertible Sleeping Bag.


It's just the right size for kids to be comfy, but can also be opened up for a bed-sized blanket thanks to it's snap closures.  No tricky giant zipper to install (or for the kids to get fabric caught in). Converting it from bag to blanket is literally a snap!


Anti-pill fleece makes it cuddly and warm, but not too heavy to roll up small to store:


And there's some hidden detailing on the solid side so it's reversible, but not boring:

Hey look - It's Pinkie Pie and Fluttershy!

Project Background: I bought this fabric for my My Little Pony fanatic 5 year old.  It had all of the "Mane 6" ponies AND Spike the dragon, so I knew it would be much loved.  Since the print was really large I bought enough to make a blanket, but then I kept postponing doing anything (aka Fabric Hoardingbecause I didn't want it to be just a boring rectangle.  Since I started my fabric hoarding reformation a few months ago, I finally decided it was time to put this to use instead of staring at it on the shelf and just piling more fabric on top of it.


~~Time to Make The Sleeping Bag!~~

Materials:
- 1 1/2 yds of each anti-pill fleece (1 print, 1 solid)
- Pins, rotary cutter, hand sewing needle, matching color thread, pinking shears
- 19 Plastic snap sets + setting tool (I use a snap press)

I started by folding my fabrics in half, widthwise and stacking one on top of the other.  This makes cutting them exactly the same a breeze.  If you wanted a bit of insulation/loft, you could also cut a layer of batting, but since ours is more for snuggling indoors than camping, I left it out.


Then I used a small plate to round off the corners, cutting with my rotary cutter.


I opened up my fabrics and, with right sides facing, pinned them together all the way around.  Then stitched with a 1/2 inch seam allowance, leaving a 3 inch gap at the bottom edge for turning.  I trimmed the curves with pinking shears close to the stitching:


After turning, I slipstitched the gap closed.


Now, the hidden detailing part.  I opened the blanket up so the layers were nice and flat and pinned them together around some of the characters.  


Then I topstitched around the outlines with bobbing thread to match the bottom fabric.  It can be a little tricky turning such a large piece and not bunching the fabric, so the pinning is key.


I did just the silhouette of each of the characters, so on the reverse we had these:


A little Rainbow Dash

It definitely keeps the theme going on the solid side, but in an understated way:


Adding Apple Jack and Spike

Then it was time to set the snaps.  I folded my sleeping bag in half again and measured 3 inch spacing on the open side and bottom and pinned each spot.  I used some cute heart shaped snaps from an assortment I'd bought a few months back and picked out the colors that were My Little Pony-esque.  I laid them out in pairs for the backs and fronts.  


Side note: I used my snap press to set them.  It costs a little more to buy a press (rather than pliers or those kits you hammer in), but if you sew for kids, plastic snaps can become a best friend for easy closures on clothes, cloth diapers, bags, etc. and the press is a lot easier to use.  I've had Big Red here for almost 5 years and have used it loads.  Plus the snaps hold up way better than any others and look super cute.  I've got more info on how to use a snap press in my Crafty Gear 411 post here.  


I alternated the colors for a pretty pattern and set them 1 inch in from the edge:


I also decided to make a matching pillowcase with some MLP quilting cotton I'd bought around the same time.  I did not want to start fabric hoarding by characters/prints, which was starting to happen with these, so this was an ideal use 'em up project.


Now my little lady has some fun My Little Pony bedding to cuddle up to every night:


And a fun sleeping bag to relax in the rest of the time:


Friday, May 10, 2013

Artterro Eco Art Kit Giveaway & Review


Today I've got a special treat - a new crafty giveaway and review to go with it.  This way you can see how fun this prize truly is!  It's all thanks to the lovely people at Artterro:

Artterro photo ArtterroLogoSmall_zps00ee16ed.jpg

Arttero makes fun & eco-friendly arts and craft kits of all sorts.  Bookmaking, dolls, jewelry, garden art, these are just some of the kits that they offer.  Artterro is all about creativity.  

Each kit is carefully curated to offer a delightful art experience for practically any age and skill level, and they include an ideas sheet full of inspiration to get you started. Their materials include many handmade, recycled and US-made components, and their packaging is minimal, recycled and reusable. With Artterro, kids and adults can truly unplug and enjoy art.   

So how are the kits to use?  

We got a chance to try out the Wool Felt Bug kit:


The package was small, but there was a surprising amount of supplies when we separated them out.  We could have made more than half a dozen buggies with all this:


Since my youngest was under the recommended age, but still wanted to participate, we used some craft glue of our own for some of the fabrication, but the boys got to do a bit of hand sewing on theirs with the needles & embroidery floss from the kit.  


I liked that because a lot of glue-only crafts tend to fall apart when the kids start playing with them, but ours haven't.  Check out the bugs my little bugs made:


I wasn't sure if the kids would really stick with making their bugs - they have a tendency to get frustrated when crafts are too free form (unlike their mother), but the inspiration guide that was included gave them some good starting points and then they really took off on their own.  


My oldest even decided to make layers of scales with sequins on his bug's tummy:


Overall I thought this was a fun, solid kit.  It was nice that there was enough of everything for all 3 of them and we still have enough supplies for each of them to make another bug.  A great gift idea to get the kids crafts too, so I'll be keeping these in mind next time we get a birthday invite.

I also like the variety of crafts they offer and that they aren't gender specific.  Or limited to just being for kids - I kind of want to do this Garden Art Kit all by myself:


Want to try them out too?  


Artterro is giving away a Wool Felt Bug Kit to one lucky 
Sew Can Do reader:


And Artterro has a special discount for Sew Can Do readers:
  Through May 21,
 enjoy 20% off at their online store
 with code: SEW20.

Thanks to Artterro there are lots of great ways to get some new crafting going and save at the same time!  

a Rafflecopter giveaway

I was not financially compensated for this post. I received free products to review & giveaway. The opinions are completely my own, based on my experience.

LinkWithin

Related Posts with Thumbnails