Showing posts with label Easy projects. Show all posts

Wednesday, March 29, 2023

DIY Tiered Tray Set Painting


I was looking for some fun Easter craft supplies for my shop and discovered, tiered tray sets.  I decided to do one up myself to create some finished project photos and now I am ADDICTED!

Even if you're not super crafty, or great with decorating or short on space, these sets make it easy to create something lovely for the season (or everyday).


You simply paint and assemble the various dimensional elements and then place them with some little plants & knick knacks for a pretty themed look you can put anywhere.  I'd seen a few dimensional sets like these and just assumed you had to be some incredible detail painter to make them look good, but the secret is that they come unassembled so you don't have to worry about staying in the lines.  

I researched a bit and discovered that there were a few videos on YouTube showing some ways to paint them, but not very many and almost no blog posts.  I like to do a quick read and then jump in to a craft rather than watch 1/2hr long videos that have a lot of filler chatter, so I thought I'd put together all the best tips I learned (and some of my own) for doing tiered tray decorations.

Tiered Tray Set Painting Tricks

This particular set is for Easter & has these layered elements:


It's recommended to plan out your color scheme and group the elements by color to be efficient.  For mine I chose an off-white, sage green, butter yellow and chocolate brown:


I did all my painting on freezer paper (shiny side up) to keep things clean and no-stick.  


The trick to painting without brushstrokes is to use foam makeup wedges and dab the paint on.  Super easy and drip-free too:


To make it simple to do the little pieces like letters, put a strip of painter's tape sticky side up and put the pieces on it.  Then you can hold the tape rather than the pieces.  Less mess and easier to coat:


I gave all the light colored pieces a double coat of paint.  The trick to keeping the cut-in lettering nice & contrasting (unpainted) like the Matthew 28:6 here is to dab gently with very little paint in those areas and use a wet toothpick to remove any paint that does get in the grooves:


To smooth the finish, go over them gently with a high (fine) grit sandpaper.  If you want to distress them, sand a little harder.


When dry, I grouped all my elements back together:


The detail pieces for mine were self adhesive so I just peeled the backing paper off and stuck them in place:


You can seal them with a poly spray if you want - especially if using for outdoors.  I strung the banner elements on some baker's twine:


As someone who's free time is in short supply, I really loved how quick these came together and how fun it was to style them up.  I also like that they don't take up a ton of storage space out of season, unlike wreaths and bigger decorations.  

I used mine on a tiered tray, but they are also ideal to use in wreaths or turn into magnets.  I could also see adding some pretty ribbon loops and hanging them to make an Easter tree too.


I bought this lovely tray off Amazon here.  The quality is really nice for the price and it also came with the wood bead garland.  My faux plants and flowers were all from Hobby Lobby.  I know I can easily use them in other ways when it comes time to change the decor.  You can find this set and others like it in my shop here.  Happy decorating! 


Thursday, August 11, 2022

Tutorial: Fabric Topped Clothesline Coaster or Trivet


Turn a bit of clothesline and a circle of fabric into a handy coaster or trivet!


By using the same type of clothesline that is popular for bowl & basket making, it offers an ideal base for warm drinks and containers:


With a pretty top side thanks to some lovely fabric:


I came up with this project when brainstorming use ideas for some new round mini fabric panels I started carrying in my fabric shop.  They were designed for use in the center of rope bowls that are a popular sewing project these days:


I'd never made a clothesline bowl before, but gave it a go after watching a few tutorials and it was pretty satisfying turning a skein of clothesline into a pretty and sturdy bowl:


I even tried out the whole fabric wrapped layer option and loved how it turned out:


Especially with a little coil finish that is beyond simple to do (literally just hand coil and hot glue in place!).  Seriously, these rope projects are addicting.  I'm looking forward to making a few more soon.


After gaining some technique confidence making a bowl, I decided to tackle my own idea for a rope project.  The little round fabric panels were perfectly sized for any mug or small bowl, so a coaster seemed an ideal item:


Here's how to make one!
Materials: 
- Skein of cotton clothesline
- 5 inch circle fabric art panel or circle of fabric
- heavy duty/denim 16/100 sewing needle
- 50wt thread
- HeatnBond (strong paper backed fusible) & iron
- small clips or hinged clothespins

Just like when making rope bowls, coil one end of clothesline in a spiral like a snail's shell, until it's about an inch in diameter and baste across with a very wide zig-zag stitch (setting length to about 2.5) in a "+" shape to hold in place.  Begin sewing at the center with the same zig-zag stitch, work around the spiral coil, catching the "zig" in one rope, while catching the "zag" in the rope next to it.  Continue working around and around until the diameter is 5 inches across:


Set the clothesline base aside and grab the HeatnBond & a 5 inch Circle Fabric Art Panel (or same sized circle of fabric).  Trace the fabric circle onto the paper side of the HeatnBond and cut out.


With fusible side facing the wrong side of the fabric, follow the fusing directions of the HeatnBond with an iron.  When cool, peel paper away from back of fabric:


Align the circle panel on top of the clothesline spiral so the loose end is at the top right as shown:


Fuse fabric to clothesline spiral:


Topstitch just inside raw edge of circle:


Carefully wind the loose clothesline along the edge of the panel, directly over the topstitching so this row is directly above the previous row of rope and clip all the way around, overlapping slightly at the top.


Topstitch all the way around at the center of the clothesline, stopping just to the right of the top center (as if between the numbers 12 and 1 on a clock).


Measure out 5 inches of loose clothesline and cut:


Coil the loose end inward, just as was done at the start and stitch together in the same way.  


Leave as is, or embellish with a button or charm.  Enjoy for yourself or give as a unique gift!


Thursday, June 30, 2022

Easy 4th of July Wreaths For When You're Short on Time


Not gonna lie, time for crafting has been eluding me for a while.  Between running my business, wrangling my kids and trying to keep the house together, crafting is at the end of my mile-long to-do list.  I still wanted to do a little something for the upcoming 4th of July holiday...except almost every free moment is spent on cleaning up for the arrival of weeklong houseguests, filling orders, etc. so I was stumped as to how to fit it in.

I was literally out buying paper plates and glass cleaner at Lowe's & saw these fun 15 inch metal stars and thought I could come up with a super quick way to make them into front door decor:


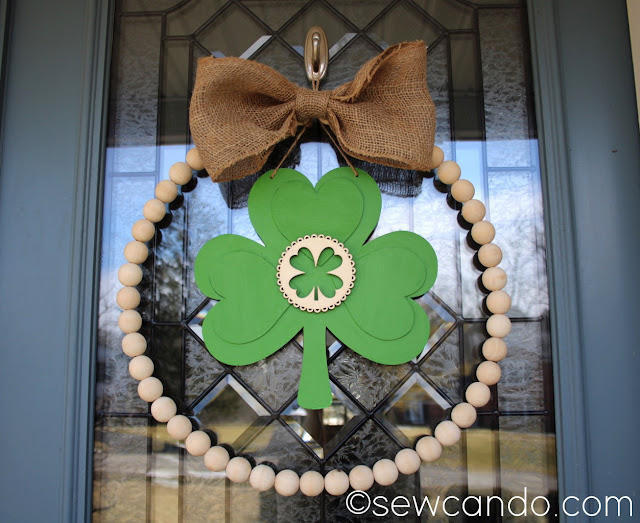
I had made some other quickie wreaths for St. Patrick's Day a few months back using some pre-string wood bead wreaths from Hobby Lobby, some wide burlap ribbon and a few wooden shapes:


So when I saw those metal stars I thought I could repurpose the wreaths for the 4th of July in just a few minutes - which is about all the time I can spare these days.  I was pretty happy with how they turned out, as well as the fact that it didn't mean sacrificing a bunch of time needed for other stuff:


I'd made the burlap bows and hot glued them onto the bead wreaths on the original versions.  I left those in place but cut the twine ties to remove my St. Patrick's Day centers:


I grabbed the same twine and laced it through the beads where the bows were glued using a stiff piece of wire to pull it through:


Then I looped the ends back under the wreath's wire, between the beads, and tied the open ends together to make my hanging loop.  This also made sure that the beads would be pressed together so the bows would be perky and face front rather than droopy, since the beads can rotate.  


I looped some twine through the hangers at the back of each star and made a lark's head knot.  Then I tied the open ends together around the top beads of the wreaths where my bows were.


Since the stars were metal I was concerned about them being noisy on the doors - especially since they'd be resting on the glass portion of ours.  With a lot of people coming in & out for the next week and gusty breezes lately, I didn't want major clattering all the time.  So I grabbed some felt furniture pads:


I cut them into triangular pieces and stuck one on the back of each star point.  


It worked like a charm.  They're visually bold, but nice and quiet:)


And the best part is I can still easily take them apart to reuse the bead part for another theme and then tie them back together for next year's Independence Day.  I LOVE when crafts can be multi-purpose (and there's less stuff to have to store somewhere)!!


Now our front porch is looking festive and I've still got time to finish everything else I need to do around here.


Happy 4th of July Everyone!


LinkWithin

Related Posts with Thumbnails