Showing posts with label Baby Gifts. Show all posts

Wednesday, February 19, 2020

Adorable Ultra Easy Baby Headbands


Today's project is so easy it, it practically makes itself.  It's just what a busy mom (or grandma, aunt or friend) needs when free time is short, but you want a DIY with big impact:  Adorable Ultra Easy Baby Headbands!  


These are really quick to make & turn out super cute!  They stay on well and are very soft.  They are fabulous to give as gifts or to use for new baby photo shoots:


Supply-wise, you can be as simple or detailed as you want with the decorative elements.  Using soft items is key though.  I used some cute satin roses and fabric covered buttons in my stash from previous trips to my local craft stores.  Smaller 1/2 - 3/4 in diameter is ideal size.  

Materials:
- Nylon baby headband or pair of girl's tights*
- Small fabric or crochet flowers, bows or fabric covered buttons
- Hot glue gun


* It's literally two steps to make these - one step if you use pre-made headbands.  I got mine online from a hair bow supply store that had lots of colors, but after I got them I realized you could easily make them super cheap.  
Here's how:

Take a pair of girl's nylon tights and cut the legs into 1 inch wide tubes.  One pair will make a TON of headbands & should stretch well enough to fit newborn - toddler.  After cutting, give them a little pull so the edges curl and you've got the perfect, soft & simple baby headband!


To attach the embellishments, just add a dab of hot glue to the back of the items and firmly press onto the headband.  If putting several items next to one another, make sure they're really close so there won't be gaps when it gets a little stretched while being worn.


 I did trios of embellishments for mine.  It took just minutes to make several.  Literally anyone could craft some up!  

Just a reminder, for safety purposes, these should only be worn while closely supervised - never when left alone or in bed.  


I LOVE how sweet they look on my littlest lady.  They're so quick & inexpensive that you could make some to match every outfit or occasion.  It's the ideal craft equation of minimal make time x maximum enjoyment of results. 


Wednesday, February 12, 2020

Plush Noah's Ark Toy Set from a Fabric Panel


Between homeschooling my 3 big kids, chasing after an almost 2yr old, a baby about to arrive + running my fabric shop, the past couple months were really short on crafting time.  I still wanted to do some handmade gifts at Christmas, so I used this Noah's Ark Soft Toy Set fabric panel, which I carry in my shop, to make a fun play set for my small guy.  

I loved how it came with a Noah figure & a nice assortment of animals & the directions are printed right on the panel so you just cut, sew and stuff.  Sew easy!


  It's also nice that the finished ark has pockets on both sides for a place to store all the figures and make play more fun.  


It seemed like the perfect handmade Christmas gift for my not quite two year old - especially as I didn't have the energy to do anything time consuming or complicated. 


 Despite sewing for 10+yrs, this was the first time I'd ever sewn a plush toy from a panel.  I wanted to see just how easy it would be to put together.

Cutting out all the pieces is straightforward.  I didn't prewash it since I didn't want things to shrink.  It can be hand or delicate machine washed when done.  The seam allowance is included in the pieces.  The next step is hemming the ark pocket pieces by folding, pressing and then stitching the top edges to the wrong side:


These get basted to the ark side pieces along the sides & bottom.  There are markings to make matching them up easy:


Then the top edges of the ark sides are pinned & stitched together, starting & stopping where the pocket edges are:


The bottom gusset piece gets added there to give the dimension for the ark:


There are markings at the bottom to show where to leave a gap for turning:


All the seam allowances should get trimmed down and clipped near the curves.  I find using pinking shears makes this easy to do in one step:


After turning right side out, it's time to stuff with polyfill.  It's key to stuff with small amounts at a time and really pushing into the curves and corners to give it a good shape.  


The figures are easy to do - stitching right along their printed designs gives a nice smooth finish when turned right side out & are stuffed just like the ark:


The gaps get pinned & slip stitched closed by hand:


It was pretty quick to make and it turned out just as expected.  It's easy enough for a beginner, which is a real plus.  I used some of my Multi Sky Cloud fabric & some blue velour to make a fun playscape back drop too:


Sew cute & easy to make too!

Wednesday, August 8, 2018

FREE Pattern Download: 3 in 1 Infinity Bib, Blankie & Burp Cloth


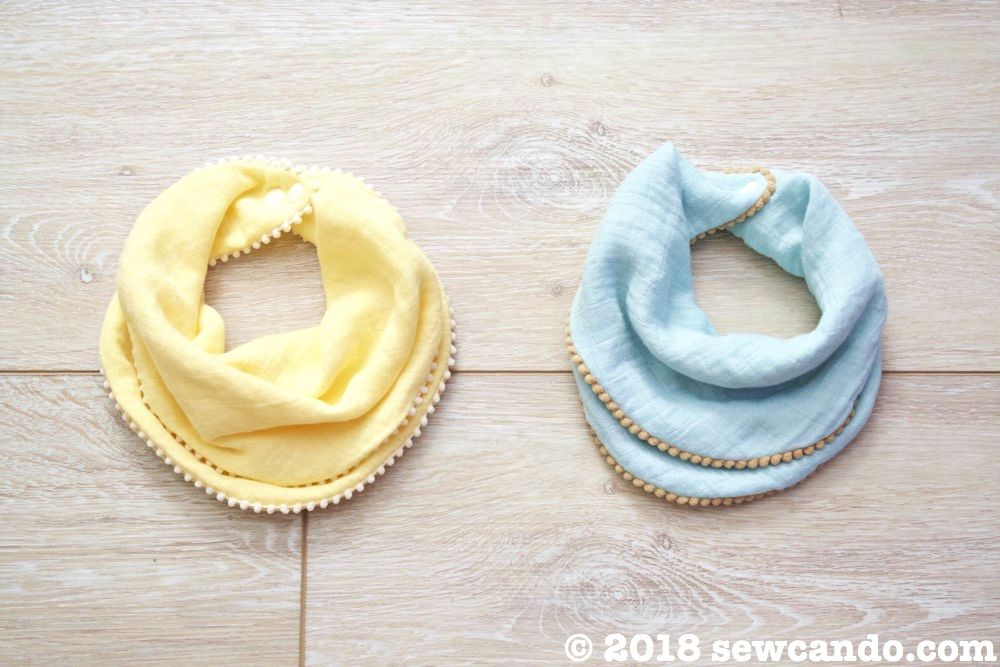
Today I've got a new downloadable pattern that's handy & stylish for the little one: My 3-in1 Infinity Bib!


For such small people, babies sure need a lot of stuff!  Our diaper bag weighs a ton right now.  Streamlining is hard though.  My little guy is a drooly one.  He's also still in the occasional spit-up phase, so good bib & burp cloth need to go everywhere with us.  As does a lovey blanket, which is vital to him going to sleep.  How about being able to bring one thing that acts as all 3?  Enter my new pattern.

Use it folded lengthwise as a bib to keep drool from soaking those cute outfits:


Fold it in half sideways for lightweight, yet absorbent burp cloth:


Leave it open for a baby-sized blankie to cuddle:


It's been a crazy hot summer, so something light & breezy is key.  I've made mine out of bamboo cotton swaddle muslin which is perfect.  It allows for airflow and is super soft.  It also looks stylish thanks to some pom pom trim.  

I'd seen a similar bib design for sale online for the hefty price of $18 each.  Yikes.  With how many bibs my 4 month old can go through in a day, I'd need a small loan to afford more than a day's worth.  Mine cost about $3.50 each to make & are a quick sew. My son's favorite swaddle blankets are a swanky brand made from bamboo muslin, so being able to make these from that same lovely fabric for a fraction of the price is ideal.  Serious savings!


Now let's make one!


Materials:
- My FREE Infinity Bib Pattern HERE
- 1/2 yd bamboo organic cotton blend swaddle muslin fabric (I bought mine from Simplififabric)
- 1 1/2 yds baby pom pom trim (I bought mine from Sugar Pink Boutique)
- 2 plastic snap sets
- Ball point needle

Download the pattern and print at 100% scale.  Measure the printout against the 1 inch sets box to confirm sizing is correct.  Cut out all 4 pieces and tape together at sides as indicated.


The swaddle muslin I bought gets softer in every wash.  Being a bamboo/organic cotton blend, it's the cuddliest muslin I've found too.  The baby pom pom trim is nice & plush and adds just the right amount of detail.


Start with folded fabric and, using the pattern piece, cut out the bib front & back:


On the right side of one piece, pin the trim 1/4 inch from the raw edge:


Stitch the trim in place, using a ball point needle.


Sew the trim all the way around, curving around the pointed ends, and overlapping the raw edges.  


Place this piece over the other piece, right sides together and pin.


On the side with the trim attached, stitch the bib front & back together, using the trim stitching as a guide to stitch over:


Leave a 1 1/2 inch gap for turning, then slipstitch closed by hand.


Set the plastic snaps along the markings, having the male snaps face up on one end and the female snaps face down on the other.  


When the ends are snapped together, this will give the slight twist needed for the layered infinity look.


Or just leave it open for a quick cuddle.  Whatever baby needs in the moment!


Wednesday, July 18, 2018

Fluffy Three Dimensional Letter Name Wall Art


Looking for an easy project for decorating the walls that's fast & cheap?  Then today's how-to is right up your street: Fluffy Letter Name Wall Art.


3-D names/words on the wall has been around for a while decor-wise, but I wanted something a little different than just basic yarn or puffed up fabric letters.  I didn't wan't it to involve a lot of materials or frustrating techniques though.  This method ticked all my boxes and takes just minutes to make too.  And it works great for any words you want to add to the wall (not just baby names!).


I used was some mdf letters from the craft store:


And some leftover eyelash yarn:


All I did was tie the yarn onto one end of a letter with a knot and then tightly wind the yarn around the entire letter.


I made sure to keep the yarn taut and each strand nice and close to the other so there'd be no gaps.  By using a dimensional yarn like eyelash it creates a puffier, fluffier letter and you can't see any of the winding.  Added bonus was since my yarn had variegated colors, it made some pretty stripe-like effects.


It makes it very forgiving if the strands overlap or you need to do a few extra wraps around the curves.  At the end I simply tucked the tail under a few layers and glued it in place.  That's it!


I didn't want the weight of the letter to pull on the yarn when hanging so my husband tapped in nails so the letters sit on them.  Since they're up high and over a tall dresser they won't get bumped or grabbed at, so it works perfectly.


It goes great with the 3-D Faux Candy Wall Art I did for the other wall of his room:


This little project has been a long time coming.  I actually had it done about 6 months ago, but only finally got it up on the wall (and able to photograph in place) about 2 weeks ago.


Life with a new baby + 3 other kids has definitely changed my speed and prioritizing!  I had the letters done before the baby came though, so he did technically have it in his room when he arrived;)


LinkWithin

Related Posts with Thumbnails