
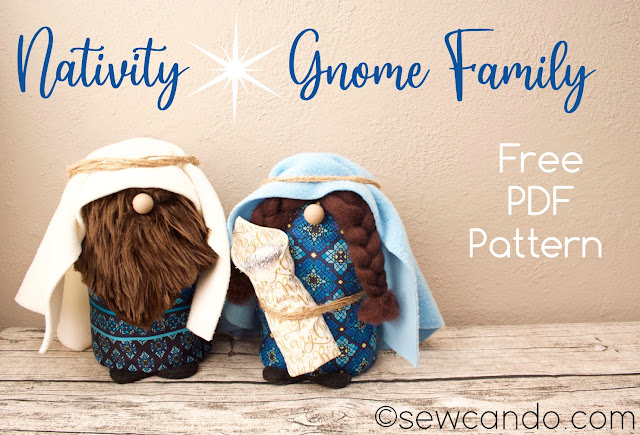
Gnomes are very popular this upcoming Christmas season and what better way to enjoy them than by creating a sweet gnome Holy Family? I've designed this FREE PDF Pattern and tutorial for making a Joseph, Mary & Jesus gnome softie set to display for the holidays. So cute & festive, they bring a smile to everyone.
Joseph is stoic with his full beard and humble headdress:

Mary has soft wooly braids and wears classic shades of blue:
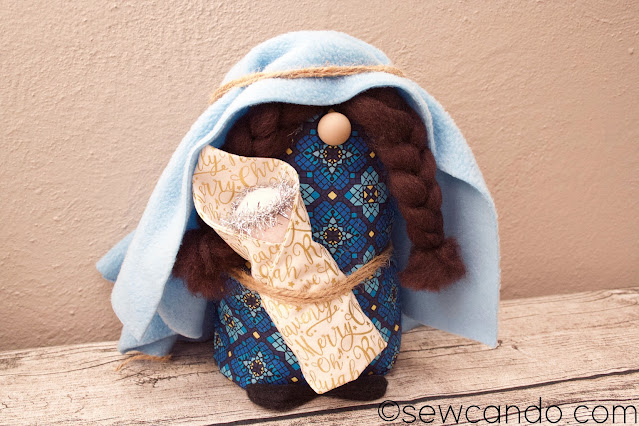
And sweet Baby Jesus, with his shining halo, is wrapped in a swaddling full of words that rejoice in his birth:

Use a range of fabrics & materials to make each one unique! They are even weighted to stand freely to easily pose wherever you desire. They appeal to all ages and are wonderful ways to share the meaning of Christmas with everyone who sees them.
I used a mix of faux fur, wool roving, fleece and quilting cotton for ours, including some metallic Oh Holy Night Words and blue stained glass style Rebirth Tile and Stripe fabrics from my shop to make them extra Christmas-y, but you could use any fabrics to make the bodies.


I found faux fur gives Joseph's beard great texture and detail, but you could also use wool roving, yarn or minky.

Now, Let's Make Some Holy Family Gnomes!
Materials:
- 1/2yd cotton fabric each for Mary & Joseph (we used Rebirth Tile and Rebirth Stripe)
- (2) 8 inch squares of cotton fabric (we used Oh Holy Night Words Linen) for the swaddling
- (2) 18in w x 16in h pieces of fleece or felt for headdresses
- (2) 4in w x 3in h pieces of fabric for feet
- 5 inch square piece of faux fur for Joseph's beard
- 12 inches wool roving for Mary's hair
- 5 inch square scrap of skin tone fleece or knit fabric for Baby Jesus
- Jute twine or satin cord
- Metallic cord or mini tinsel for halo
- 1 inch diameter wooden or plastic ball
- (2) 19mm round beads or 1 inch pom poms
- Bag of poly fill stuffing
- Bag of plastic poly pellets
- Cardboard
- Hand sewing needle
- Hot glue gun
- My FREE Christmas Gnome PDF Pattern
Note: If you are making these to give to children as toys, rather than for the intended display purposes, I strongly suggest that all components used be fabric and stitched into place, rather than glued. For safety I'd also recommend forgoing any potential choke hazards like poly pellets and beads.
Start by downloading and printing my FREE PDF Pattern. Print pages to actual size (no scaling) and cut out pieces.
With cotton fabrics folded, cut the following pieces for each gnome figure, according to pattern directions: (2) Body, (1) Bottom, (2) Inner pillow:

With right sides facing, stitch together the sides of the body front and back with a 3/8in seam allowance. Stitch around the pillow, but leave a two inch gap for turning. Trim down seam allowances and turn pillow right side out.

Measure 2 cups of poly pellets and pour into the pillow. Using a pitcher or funnel makes this quick & easy:

Stitch pillow closed and cut feet pieces and inside base from cardboard:

With a 1/4 inch seam allowance stitch around the curved edges of the feet, leaving the bottom open. Trim down seams and turn right side out.

Find the center of the bottom front of each figure and baste the raw edges of the feet there.

Pin and stitch the fabric bottom to the body, trimming down seams afterwards.

Turn right side out and run a basting stitch along the top raw edge:

Insert the cardboard base inside and cover with weighted pillow, then stuff with poly fil. Don't stuff Mary all the way to the top, so she will be slightly shorter than Joseph. Pull lower threads up to closeup up the top and knot.

For Joseph: cut beard from faux fur (plush minky or fleece could also be used) using pattern piece.

Find the front center of the gnome figure and measure about 2 inches from the top and hot glue beard into place:

From fleece or felt cut a 18in w x 16in h piece to make the headdress:

Place on top of head so that it slightly covers the top of the beard by about 1/2 inch. Fold front sides forward and hot glue folds down. Trim lower edge of headdress into a curve to length desired.

Add large headed pins around the head and wrap twine or ribbon around the head just under them, hot gluing into place every few inches. Hand stitch bead or pom pom nose just under the top edge of the headdress.

For Mary: Take 12 inch long piece of wool roving or bundle of yarn and stitch at middle, onto the body about 2 inches from opening. Braid both sides.

Cut a 18in w x 16in h rectangle of blue fleece or felt for the veil and drape head to overlap about an inch from top edge of braids. Fold, glue and add twine wrapping as done with Joseph. Hand stitch bead nose on just under center point of braids.

For Baby Jesus: Cut two 8 inch squares from fabric for swaddle, a scrap of fleece or knit for the body and small wooden ball for the head. Note: Since the Oh Holy Night Words swaddle fabric is directional, I cut it on the diagonal as a diamond shape rather than straight across as a square so the wording would not be upside down when finished.

Put ball at center of body fabric and tie underneath, pulling fabric taut, then trimming down bottom edges to be about 3 inches long.

With right sides facing, stitch together fabric squares, leaving a two inch gap for turning. Turn right side out and press flat. Lay Baby Jesus as shown, fold up bottom and the cross sides over to complete the swaddle.

Hot glue or hand stitch swaddle closed. Cut and glue on a small piece of tinsel ribbon for the halo.

Position baby facing out at the middle of Mary's body and tie together with twine:
Now the gnome Holy Family is complete. Add to your mantle, shelf or table for a sweet & soft Nativity display this Christmas season.


