
Here's How:
You'll Need
A bag of chocolate candy melts - white
1/2 cup corn syrup
Necco wafers
Brown jimmies (extra long)*
Small oval & triangle candies*
Sugar Pearls
Food coloring gel
Food writer pens
Cornstarch
Pyrex container
Cling wrap
Cookie sheet
Small paintbrush
Toothpicks
You can get nearly all these supplies in the cake/candy making section of most craft stores
* You can get the long jimmies, ovals and triangles all together in the Animal Sprinkle Set by Wilton
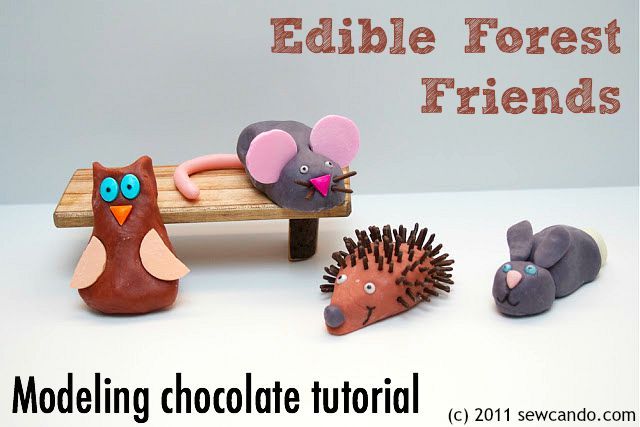
First thing you need to make a batch of modeling chocolate, my go-to recipe for easy cake decorating. I love it because if you goof up while making the shapes you can just roll them out again until you get it right, unlike frosting directly on a cake which is much less forgiving when you make a mistake. It also tastes a lot better than fondant and much simpler to make.
Just melt one bag of chocolate melts in a Pyrex container in the microwave according to package instructions. It may not look like it's completely melted, but if you stir well it will get smooth. Fold in 1/2 cup of corn syrup until it starts to come together like a dough ball, then spread out about 1/2in thick on cling wrap covered cookie sheet and top with more cling wrap.

Let it sit for at least 3 hours, then knead with hands until soft like play dough. Now you're ready to get decorating! Using the gel food coloring, color half the batch gray, a small golf ball amount pink, leave a smaller bit white and color the rest brown.
For the mouse:
Sprinkle some cornstarch onto a smooth work surface and roll a ping-pong sized ball and shape it into a lopsided oval. Press in two pink Necco wafers for the ears:

Roll out a skinny strip of pink about 3 inches long for the tail:

Press together tail and back of mouse. Add two sugar pearls for eyes, an upside-down triangle candy for the nose and some jimmies for whiskers:

Add pupils to the eyes with a black food pen and the little mouse is ready to be nibbled:

For the Owl:
Take a ping-pong ball sized piece of brown and press flat into a pear shape. Pinch the top edges to make the "ear" sections of the owl's head:

Press in two oval candies for eyes, a triangle for the beak and snap a Necco wafer in half and press in the sides for the wings:

Draw on some eyes and look Hooo's ready -

For the bunny:
Make a small ping-pong ball out of gray for the body, with a slightly smaller ball for the head, two small bits for ears, a gum ball sized ball from white for the tail and a small bit of pink for the nose:

Shape the body into an oval and attach the head and tail:

Shape the ears into small, flattened, lopsided ovals. Break a toothpick in half and press half of each piece into the back sides of the ears with the rest of the toothpick piece sticking out the bottom.

Then insert the remaining part of the toothpick into the head so the ears will stand up:

Shape the pink bit of chocolate into a nose and attach to head with a long jimmy. Press in sugar pearl eyes:

Add centers of eyes and a curved mouth with food pen. Since there are toothpicks used, be sure anyone eating knows they are there before taking a big bite!

For the Hedgehog:
Again use a ping-pong size amount of brown modeling chocolate, but carefully pull out and narrow one end of the ball to look like this:

Starting at the back end and working up from the bottom, insert the extra long jimmies for the spines, stopping when you get to the elongated end. This takes a bit of patience, but the look is really worth it:

Add sugar pearl eyes and a small amount of gray for the nose:

Add some centers to the eyes and a small smile on one side of the face with the food pen:

Brush off any excess cornstarch with the paintbrush and these little chocolate friends are ready to be admired or eaten. This amount will make enough for two cakes plus some extra for other decorations. I tinted some leftover modeling chocolate blue and rolled out some little lakes for the centers of the cakes. A little brown sugar "sand" to hide the edges and our sweet woodland critters had a place to call home:


Sharing this with my FAVE LINK PARTIES too so click HERE to check them out!
They are all so adorable! I think I like the bunny the most, oh no wait the mouse, no no hold on the porcupine actually give me a second um ALL OF THEM lol. Nice job! So I am new to blogging and I am having my second giveaway to get the word out about my blog on mosaic art. I was hoping every one could come help an old lady out. I am not very tech savi and I am always bothering my son to set these things up fpr me and they aren't any good if no one comes lol. All you have to do is subscribe to my feed to enter come on over it could be fun. http://emosaicideas.com/mosaic-starter-kit-giveaway-2
ReplyDeleteI wanted to eat one of those, but the kids gobbled them all up. It was a woodland massacre.
ReplyDeleteOh these animals are just brilliant! Love the hedgehog! What a great idea!
ReplyDeleteThanks for linking to a Round Tuit!
Hope you have a great week!
Jill @ Creating my way to Success
http://www.jembellish.blogspot.com/
Cute, THanks! Visit me at http://raisingdieter.blogspot.com/ for a giveaway!
ReplyDeleteI have it on good authority that the hedgehog was delicious! :)
ReplyDeleteThese would make good gifts in cellophane too.
ReplyDeletePLEASE come share at:
www.ladybugswithzoi.blogspot.com
Hi Cheryl!
ReplyDeleteJust wanted to let you know that this was the most voted link in the round tuit party this week - so you've won a full post feature! Could you let me know if you're happy for me to use some photos from your blog for this feature post?
Thanks!
Jill @ Creating my way to Success
http://www.jembellish.blogspot.com/
Your modeling chocolate critters are absolutely adorable! Such fun, and such wonderful details, especially the hedgehog!
ReplyDeleteIn this week of Thanksgiving I especially want you to know how grateful I am to have you be a part of the creative spirit and camaraderie at Rook No. 17. Thank you for linking up to “A Little Birdie Told Me…”!
Yours,
Jenn
Really just the cutest! Thanks so much for sharing on craft schooling Sunday! Maybe candy melts is one of those things I should pick up on my next trip to the US!
ReplyDeleteSuper cute!
ReplyDeleteI featured you today on my blog :)
http://www.jaqsstudio.com/2011/11/made-by-me-8-linky-party-and-features.html