
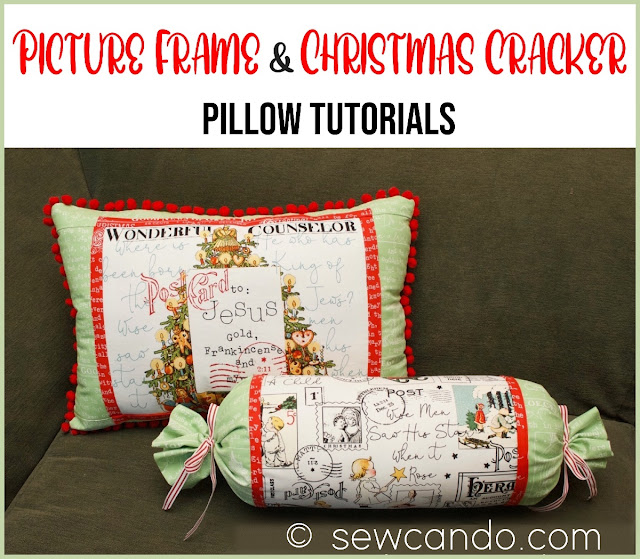
It's the perfect time to make some decorative pillows for Christmas! I came up with these two fun pillow design tutorials while I was making projects with fabrics from my shop and wanted to share them - they're both fairly quick to make and add a touch of festive cheer to any space.
The first project is the No Form Picture Frame Pillow. This pieced pillow uses minimal amounts of fabric to make a sweetly framed design:

There's a different block on the back side so they are reversible and by using fusible fleece, there's no need for a pricey pillow form to put inside. I used image blocks from a particular Christmas panel, but you could use a large scale print as the central section and any favorite fabrics for the coordinates.

Pom pom trim gives the pillow some fun detail and extra pops of color:

Finished size: approximately 15"h x 21" w
Materials:
- 1 rectangle blocks panel (I used All About Christmas Story Placemat Panel)* or 1/2yd of a large design fabric
- 1/2yd cotton fabric for border (I used All About Christmas Good News Green)
- 1/2yd cotton fabric for framing (I used All About Christmas Good News Red)
- 2 yds 1/2 inch pom pom trim (I used Cherry Red from Sugar Pink Boutique)
- 14 inch zipper
- 1/2 yd fusible fleece
- Polyfil
- Rotary cutter/shears, iron, zipper foot, hand sewing needle, pins
*Note: If using this particular panel, there are 3 blocks, so with the fabric amounts above you can make 3 dual-sided pillows and just multiply the yardage of pom pom trim by 3. Or make one & use the other blocks to make gift bags, placemats or other quilting projects!

Cut the following pieces:
Main fabric/panel - (2) blocks 11 1/4in high by 13 3/4in wide rectangle
Border fabric - (4) 11 1/4 in high by 4 1/2in wide strips for sides
(4) 2 1/2in high by 21 1/2 in wide strips for tops & bottoms
Trim fabric - (4) 11 1/4 high by 2in wide strips for sides
(4) 2 high by 14 1/2 wide strips for tops & bottoms

Press each the side trim strips in half, wrong sides facing (wait to do the upper & lower trims):

Take the side trim pieces and match up the raw edges of the trim with side edges of the center fabric blocks (right side up). Since the trim and side fabrics are directional, make sure the words are all facing the right direction! Place the side fabric strips on top, right side down and sew together with a 1/4 inch seam allowance.

Press trim strip flat going towards the side strips and top stitch along the edge so it will lay smooth.

Take upper & lower trim strips and fold, right sides facing and stitch down the short ends, then turn right side out and press flat.

Baste these strips along the top and bottom of the blocks as shown, making sure they line up with the edges of the side strips to make the "frame":

Place the upper & lower fabric strips on top, right side down and sew together. Press open with trim strips going outward and top stitch them in place.

Cut out two 14.75 inch high by 20.5 inch wide rectangles of fusible fleece and center on the wrong sides of fabric, leaving 1/2 inch of fabric showing around all sides and fuse in place. By using fusible fleece on the back, the fabric has flexible stability so it can easily be stuffed with polyfil & retain its shape and feel like a pillow form.

On the right side of each rectangle, baste pom pom trim around the raw edge, overlapping the raw ends of the trim 1/2 inch, making sure all pom poms are facing inward.

Most pom pom trim will dangle from a 1/4 inch trim edge, so you will want the basting to be to the left of that so that edge will be hidden inside. It's easiest to stitch this on using a zipper foot.

With right sides facing, pin together both sides of the pillow and stitch with a 3/8inch sea allowance, leaving a two inch gap at the bottom for turning. Trim corners close to stitching. Turn right side out.

Stuff pillow with polyfil, using a pencil, knitting needle or chopstick to help stuff into corners. Slip stitch opening closed by hand.

Now let's make a Christmas Cracker Pillow!

This sweet pillow is an easy sew project. It's got a charming whimsical style and looks great anywhere.

It also makes a wonderful holiday gift!

and features an easy zipper opening:

Materials:
- 1/2yd cuff cotton fabric (All About Christmas Good News Green)
- 1/8yd small trim cotton fabric (All About Christmas Good News Red)
- 14 inch neck roll pillow form
- 14 inch zipper
- 1 yd 3/8 inch wide decorative ribbon
- 1 yd embroidery floss or thin string
- Rotary cutter/shears, iron, zipper foot, rubber bands
Cut the following pieces:
Main fabric - (1) 19 7/8in high by 12 in wide rectangle
Trim fabric - (2) 2in high by 19 7/8 in wide strips
Cuff fabric - (2) 15 high by 19 7/8 wide rectangles

Press each the trim strips in half, wrong sides facing:
Match up the raw edges of the trim with one edge of the cuff fabric (right side up). Place the main fabric on top, right side down, and sew with a 3/8 inch seam allowance.

Roll up the main fabric, stopping about an inch from the raw edge.

Wrap the other end of the cuff fabric over it, pin then sew together with a 3/8 inch seam allowance:

Pull the main fabric out through the open side:

Press the trim and cuff flat.

Top stitch along the fold so it will lay smooth when rolled. Repeat on the other side.

Center and pin the zipper along one of the longer sides, face down. Stitch zipper in place using a zipper foot.

Pull opposite side of fabric around and repeat with other side of zipper to create the pillow tube:

Stitch together the remaining fabric along the cuffs on either end of the zipper:

Turn pillowcase right side out:

Open zipper and insert pillow form. Cinch cuff ends toward the center of each side and pull to get creases as desired. Secure with a rubber band. Tie in place with some embroidery floss and tie on top with decorative ribbon.

Now the pillow is ready to enjoy or gift!




