Showing posts with label Baby gear. Show all posts

Wednesday, October 21, 2020

Little Halloween Silicone Teether Toy

 
This year will be the first Halloween for my smallest pumpkin and my littlest nephew.  They're too little for trick or treating and both have teeth coming in, so I decided to make them something they could still "taste" for the occasion: a  
Silicone Halloween Teether Toy.

Who wouldn't want a colorful bat, spooky ghost,

 
or a jolly pumpkin to nibble on when those itchy gums are getting them down?
 
 
It goes right onto all our favorite things like the stroller belly bar, playmat bar, activity tray...
 
 
..and car seat handle.  It's been great for keeping the smalls busy on the go and adding a little Halloween festivity to the everyday.

 
I fell in love with making silicone teethers and pacifier clips when my 2yr old was a baby and I've gotten into it again this go round.  I shared some of the other cute ones I made & tips I've learned here


I find it a really enjoyable craft, pretty inexpensive and super practical.  They're fun for little hands to grab, comforting for those drooly, need-to-chew gums, incredibly easy to clean and very hard wearing.  The ones from my 2 yr old are still like brand new.  And because food grade silicone is so durable, once they outgrow the teether phase, the beads can be reused to make jewelry, key chains or DIY hairbands like the ones I've made below.  
Extra long life for crafted holiday items = win to me!


There are a lot of variations in materials and techniques for silicone teether toys out there.  Some is good, some a bit questionable.  I'm sharing the key bits I've learned that help get consistent and safer results.

Quick Disclaimer: I make mine for personal use and am not affiliated with any suppliers mentioned.  Obviously small objects and beads can present a choking hazard to young children, so this type of toy is intended for supervised use only.  I only use them attached to the car seat, stroller, high chair or activity center while someone is watching baby.   

Materials:
- Silicone pendant teether
- (5) 15mm round silicone beads
- (2) silicone focal beads
- 1 yd 1.5mm wide satin cord
- Breakaway safety clasp
Tools: Lighter, Scissors, ruler, silicone mat, 
large upholstery/crafting needle, silicone thimble
 
I buy my supplies from a number of sources, but since I'm using them to make things for little ones, I always make sure they have safety certification, silicone items are graded food safe and everything is CPSIA compliant.  I bought the cute pumpkin pendant, bat & ghost focal beads from My Pretty Posh Princess and my cord, breakaway clasp & round beads from Cara & Co.  
 
Also keep in mind that selling handmade teething items for babies requires further safety testing of the final item (which differs from country to country).  It is NOT as simple as just buying a bunch of beads, stringing them cutely and listing them as baby items on Etsy, despite countless people doing just that.  It's always a good idea to check when buying items like this from small time sellers.   
 
 
I folded my cord in half and slipped it through the hole in my pendant toy using a lark's head knot (as shown) and then did an overhand knot (which will end up inside the first bead):

 
I used (5) 15mm round and (2) focal beads for my toy strand.  Laying them out in advance to make sure the order looks good before stringing is always a smart move.  If choosing different sized beads it's also good to make sure the full length of the finished teether will be 22cm (8.6inches) or less, not including the clasp bit, to avoid being a strangulation hazard.

 
I heated up the ends of my satin cord with a lighter and then pressed them flat with my silicone mat & thimble so it would be easier to thread both ends on my upholstery needle. 


The bead hole can be very snug when it comes to threading two cords through, so using this kind of needle really helps.  I pulled the bead down firmly to make sure it covered my overhand knot.
 
 
Then I did an overhand with an extra pass through just above the bead & pulled the cords tight.  A square knot or surgeon's knot would also be good options:

 
I repeated this between all the beads, and with a knot inside each bead, to keep things strong & secure.
 
 
After the last knot above the top bead, I threaded the ends of my breakaway clasp on the two cords.  Then made overhand knots on each, 2 inches from the bead strand's last knot, so it would easily fit on the various belly bars and handles of our stroller, car seat, etc.  I cut the excess cord and heated up the little stub of the raw end with the lighter and pressed it into the knot to fuse it and slipped the clasp ends over them.
  

Then I thoroughly washed the teethers before being used and then we were ready for some Halloween teething fun.  Now everyone in our house gets a little seasonal treat this year! 


Sew Can Do waives all responsibility and liability from the use of teethers made following the information in this post.   Readers are responsible for making sure that teethers meet the appropriate safety requirements for their country/region and understand that by using suggestions from the above post, that they assumes any and all responsibility & liability for the use of the toys made.



Wednesday, February 19, 2020

Adorable Ultra Easy Baby Headbands


Today's project is so easy it, it practically makes itself.  It's just what a busy mom (or grandma, aunt or friend) needs when free time is short, but you want a DIY with big impact:  Adorable Ultra Easy Baby Headbands!  


These are really quick to make & turn out super cute!  They stay on well and are very soft.  They are fabulous to give as gifts or to use for new baby photo shoots:


Supply-wise, you can be as simple or detailed as you want with the decorative elements.  Using soft items is key though.  I used some cute satin roses and fabric covered buttons in my stash from previous trips to my local craft stores.  Smaller 1/2 - 3/4 in diameter is ideal size.  

Materials:
- Nylon baby headband or pair of girl's tights*
- Small fabric or crochet flowers, bows or fabric covered buttons
- Hot glue gun


* It's literally two steps to make these - one step if you use pre-made headbands.  I got mine online from a hair bow supply store that had lots of colors, but after I got them I realized you could easily make them super cheap.  
Here's how:

Take a pair of girl's nylon tights and cut the legs into 1 inch wide tubes.  One pair will make a TON of headbands & should stretch well enough to fit newborn - toddler.  After cutting, give them a little pull so the edges curl and you've got the perfect, soft & simple baby headband!


To attach the embellishments, just add a dab of hot glue to the back of the items and firmly press onto the headband.  If putting several items next to one another, make sure they're really close so there won't be gaps when it gets a little stretched while being worn.


 I did trios of embellishments for mine.  It took just minutes to make several.  Literally anyone could craft some up!  

Just a reminder, for safety purposes, these should only be worn while closely supervised - never when left alone or in bed.  


I LOVE how sweet they look on my littlest lady.  They're so quick & inexpensive that you could make some to match every outfit or occasion.  It's the ideal craft equation of minimal make time x maximum enjoyment of results. 


Thursday, November 1, 2018

New Craft Love: Making My Own Silicone Teethers


With a little one in the house again my crafty eye has been turning to things to make for him.  My latest project obsession (which has become an addiction) is making silicone teething toys. It's just so fun creating our own designs & bead combinations and it's been totally worth it, because my little guy loves playing with them all.  

Beyond being great for teething, silicone teethers & pacifier clips are easy to keep clean and really hold his interest.  So many baby items can't be washed (hello ridiculous spot clean only instructions) and get gross right away from drool, spit-up and other baby made messes. Being able to do a proper hand wash with soap on them is ideal.  


I'd seen a lot of cute silicone bead teether, pacifier clips and necklaces around, but some of the styles seemed a little boring and buying just a few would've added up to a tidy sum.  So this momma did what I usually do - figure out how to make my own.  


I've made a number with different textures, colors and sizes to be appealing for my little guy's discerning eye.  I even made this seasonal one for fall, which may be my personal favorite.


I can also attach them to many of our modes of baby travel so there's less chance of them getting lost...


or falling on a dirty floor while we're out and about.


There's a lot of varying info out there on making teething items like these, some good, some a bit reckless considering they're meant for babies.  As a result, I'd rather not wade into liability territory by publishing any full tutorials for them.  Instead, I'm sharing some key factors I've found from many different places in the hopes that it'll help others be a bit more careful when DIY-ing this kind of thing, or even when buying them pre-made from small businesses. 


The most important part with making baby items is safety.  I did a lot of researching before I got started and have gleaned this info for making things as safe as I can.  

Silicone Quality 

I've seen a number of craft bloggers sharing that they made their own silicone bead teether & pacifier clips using materials they bought in bulk on Amazon or eBay.  Those product links don't show they've been third-party tested by the seller and don't have any certificates showing compliance with FDA or CPSIA requirements (confirming they are actually food grade and BPA & phthalate free).  I love a bargain as much as the next gal, but do you really want to cheap out on materials your baby is going to put in his/her mouth?  Maybe they're fine, but maybe they're not - is it worth the risk to save a couple of bucks?  Buy supplies (or finished teethers) from a shop that has all this documentation clearly shown.

Technique

I was also pretty shocked to see a number of tutorials, even on legit silicone bead supply sites that encourage buyers to even open their own teething item businesses, just stringing a bunch of beads on a cord and then tying it onto a clip or in a knot make it into a teething ring.  And with lengths that varied widely.  That all seemed really careless to me for something you're giving to a baby.

Knotting: for one, I make knots in between every single bead.  It takes more time and maybe doesn't look as slick esthetically, but I feel better knowing if one of these ever got cut or snapped, that all the other beads would stay in place, not become a choke-palooza or roll to the four corners of the Earth in a store or outside.


I recently discovered a technique (which required me using closed captioning + Google translate every 5 seconds to translate a Dutch video to fully understand), that was done with two strands of cording so that the knots could actually be pulled inside the beads as they were added so the knots were hidden.  It was trickier to do, but it gave the no-knot look and feels crazy strong.  There's no way this thing is coming apart.


Length: I also have been careful to keep the length 22cm or less, not including the clasp/clip.  European safety standards (which seem a lot clearer and more stringent) say a pacifier clip shouldn't ever be longer than 22cm to avoid being a strangulation hazard.  


Cording:  I always use strong nylon cord.  I've seen a number of places selling or showing how to make items using satin or grosgrain ribbon, but again, one of the safety standards in Europe is that whatever the cording material is, it should be able to withstand nearly 10kg of weight without snapping or breaking.  I haven't tested any basic ribbon to see if it actually can withstand something like a sack of potatoes or bowling balls weighing from it, but it certainly feels flimsier than the cording, so I'm not taking a chance. 


No Permanent Loop: I also use breakaway clasps on anything that has loop or ring shape. They make it easy to attach these to our stroller & bouncy seat belly bars and car seat, but give extra safety so little body parts can't get tangled up in them.


Lastly, which should go without saying, but I'm going to say it anyway, I only let my little one play with these items when fully supervised.  There's no way I'd leave anything in with him at nap time or when I can't see him playing with it.  

Now we have some great items and since I made them myself I know they have the safe features we need. I'm also trying other fun uses for silicone beads beyond baby which I can't wait to share too.  Stay tuned!  


Wednesday, August 8, 2018

FREE Pattern Download: 3 in 1 Infinity Bib, Blankie & Burp Cloth


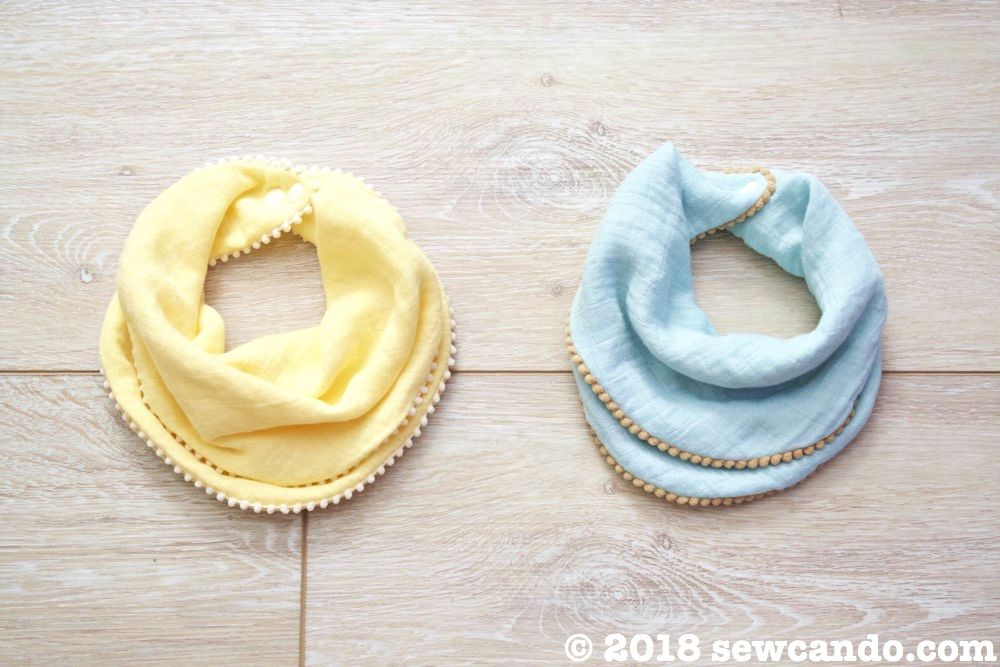
Today I've got a new downloadable pattern that's handy & stylish for the little one: My 3-in1 Infinity Bib!


For such small people, babies sure need a lot of stuff!  Our diaper bag weighs a ton right now.  Streamlining is hard though.  My little guy is a drooly one.  He's also still in the occasional spit-up phase, so good bib & burp cloth need to go everywhere with us.  As does a lovey blanket, which is vital to him going to sleep.  How about being able to bring one thing that acts as all 3?  Enter my new pattern.

Use it folded lengthwise as a bib to keep drool from soaking those cute outfits:


Fold it in half sideways for lightweight, yet absorbent burp cloth:


Leave it open for a baby-sized blankie to cuddle:


It's been a crazy hot summer, so something light & breezy is key.  I've made mine out of bamboo cotton swaddle muslin which is perfect.  It allows for airflow and is super soft.  It also looks stylish thanks to some pom pom trim.  

I'd seen a similar bib design for sale online for the hefty price of $18 each.  Yikes.  With how many bibs my 4 month old can go through in a day, I'd need a small loan to afford more than a day's worth.  Mine cost about $3.50 each to make & are a quick sew. My son's favorite swaddle blankets are a swanky brand made from bamboo muslin, so being able to make these from that same lovely fabric for a fraction of the price is ideal.  Serious savings!


Now let's make one!


Materials:
- My FREE Infinity Bib Pattern HERE
- 1/2 yd bamboo organic cotton blend swaddle muslin fabric (I bought mine from Simplififabric)
- 1 1/2 yds baby pom pom trim (I bought mine from Sugar Pink Boutique)
- 2 plastic snap sets
- Ball point needle

Download the pattern and print at 100% scale.  Measure the printout against the 1 inch sets box to confirm sizing is correct.  Cut out all 4 pieces and tape together at sides as indicated.


The swaddle muslin I bought gets softer in every wash.  Being a bamboo/organic cotton blend, it's the cuddliest muslin I've found too.  The baby pom pom trim is nice & plush and adds just the right amount of detail.


Start with folded fabric and, using the pattern piece, cut out the bib front & back:


On the right side of one piece, pin the trim 1/4 inch from the raw edge:


Stitch the trim in place, using a ball point needle.


Sew the trim all the way around, curving around the pointed ends, and overlapping the raw edges.  


Place this piece over the other piece, right sides together and pin.


On the side with the trim attached, stitch the bib front & back together, using the trim stitching as a guide to stitch over:


Leave a 1 1/2 inch gap for turning, then slipstitch closed by hand.


Set the plastic snaps along the markings, having the male snaps face up on one end and the female snaps face down on the other.  


When the ends are snapped together, this will give the slight twist needed for the layered infinity look.


Or just leave it open for a quick cuddle.  Whatever baby needs in the moment!


LinkWithin

Related Posts with Thumbnails