Sunday, May 29, 2011

Memorial Craftastic Monday & Giveaway!

I hope everyone here in the U.S. is having a great holiday weekend.  We're finally getting a hint of sun & warm weather around here after a ridiculous amount of rain.  I've practically needed a snorkel to do any gardening lately!


In between trying to tame the weed jungle that is my yard, wrapping up the homeschool year & attempting to fake spring cleaning my house, I'm getting CraftShare 2011 organized, working on some top secret stuff & putting together some new projects, so some summertime craftiness is on its way, I promise!
You can grab the new CraftShare button over on the sidebar to help spread the word.  And I have a special incentive for you if you do....extra chances to win in TODAY'S GIVEAWAY:


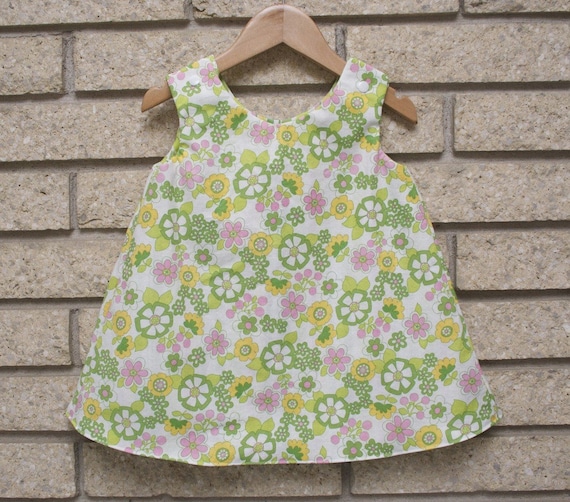
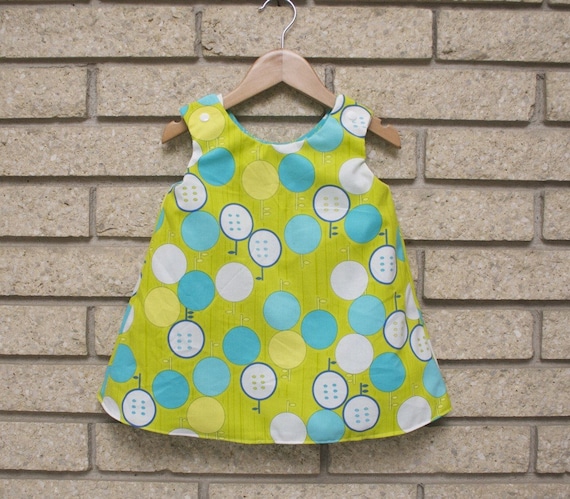
A Set of My CABBAGE ROSE BONNET & REVERSIBLE SERENA DRESS PDF Patterns.  The Cabbage Rose bonnet is an easy pattern for even a sewing beginner and perfect for shading little faces from the sun.  Adjustable design gives bonnet a comfortable fit.  Pattern covers sizes 0-6 years.


The Reversible Serena Dress Pattern is quick & easy to make and gives two great looks in one.  It fits 0-12 months as a dress and works perfectly as a tunic top for up to 2yrs.


It's easy to enter:
  • Leave a comment below!
For additional entries (leave a separate comment for each one):

  • Add the CraftShare 2011 button to your blog (worth 3 entries!!)
  • Become a follower of Sew Can Do
  • Become a fan of Sew Can Do on Facebook
  • Become a fan of The Green Hedgehog on Facebook

The giveaway will be open through 11:59pm EST June 3rd.  The winner will be chosen randomly and announced on June 4th. GOOD LUCK!


Now let's take a look at some of the party goodies from last week:

From the Kids Can Craft Link-up, my "Pick of the Week" favorite was Creative Contentment's pretend treats that the kids can make themselves using things around the house.


Photobucket
The Kids Can Craft Party is for projects kids can make.  It's always open and the projects do not have to be new (so if you've got a good one from last year, throw it up there!).  You can link up ANYTIMEJust click HERE to get to that party:)

And from the Craftastic Party.  Here are a few of sweet ideas that caught my eye:


Can't Stop Making Things shared this great idea for a flavor stir stick for iced tea:


This cool way to decorate tees with puff paint was passed on by Taylor Made - doesn't it look neat?


Now go ahead & link up your own creation and it might be chosen as a featured project for next week!  Here's how:


  • As long as it's crafty and made by you it's Craftastic (no links to giveaways, shops, other link parties or other people's work - THEY WILL BE REMOVED).  Just add the link to your specific post (not the main page of your blog).
  • Grab my party button & put it on your post or blog.  The code's on the sidebar ->
  • Check out some of the other great links and share some crafty comment love.

I now leave the party open until 10:00pmEST every Friday, so there's plenty of time to add your newest creations.  Have a great, short week!


Wednesday, May 25, 2011

Calling All Crafters: Guest Posts Wanted!


Are you crafty?  Got some great ideas to share?  Then I want you to come be a guest here at Sew Can Do!  Last year's CraftShare was so much fun, I'm thinking about doing it again.

In case you're asking "what the heck is CraftShare?", last summer I came up with projects made in specific topic categories like laminated cotton, felt, tasty treats, etc. and shared tips & tricks I learned while working with them.  

There were also some special guest posters sharing their expertise to keep the ideas rolling.  It was a great way for everyone (including me) to try some things outside our usual crafting "safety zones" and learn more about products & project ideas.  Readers also commented with their own questions & suggestions, so everyone got to share in the crafting fun.


All the categories & projects have permanent links in my menu bar above, so even after CraftShare ended, the ideas have been easy to find and revisit.


I'd love to do CraftShare 2011, but I will need some help from you!  If you've got a great tutorial to share & some know-how, I'd love to have you as a featured guest poster.  


I'm looking for guest posters in the following categories:
  • Tasty Treats (Anything edible that is yummy)
  • Die-cutting/Cutting Machines (Silhouette, Cricut, Cuttlebug, Sizzix, etc.)
  • Hot Glue (Projects using a hot glue gun)
  • Mod Podge (Projects using any type of Mod Podge)
If you've got a tutorial idea or expertise that fits in one or more of these categories, contact me at info@thegreenhedgehog.com.  I'll be adding featured guest buttons to special section of my sidebar and in a permanent spot on the CraftShare page.

I'm also looking for advertisers and giveaway sponsors
Got a product or shop that relates to any of those categories? This is a great way to let crafty readers know about your products or shop and gain some perfectly tailored exposure.  Contact me & we can figure out the best way to showcase what you've got.

It would be great to make CraftShare 2011 come to life this summer & with a little help from some of you, we can!

Monday, May 23, 2011

Craftastic Monday & Jelly Roll Madness!


Today's Craftastic party is brought to you by Crafty Girls Workshop, one of my fabulous sponsors!  Did you know they are having a special Jelly Roll Madness Month?


All their gorgeous jelly roll fabric collections are just $25!  And there are some seriously pretty items to choose from, like the one above or this one:


Stop by and check out the jelly rolls HERE.  There are also loads of cute PDF patterns that are emailed within 24hrs so you can get crafting in no time. So be sure to head over & see all the crafty gear they've got!
crafty girls button

Now let's take a look at some of the party goodies from last week:

From the Kids Can Craft Link-up, I have 2 "Pick of the Week" favorites.

Jellyfish Jelly shared this cool undersea jar project that looks really fun


Come Together Kids had a fun tutorial for this cute & tasty hamburger cookies - my kids would be all over this idea


Photobucket

The Kids Can Craft Party is for projects kids can make.  It's always open and the projects do not have to be new (so if you've got a good one from last year, throw it up there!).  You can link up ANYTIMEJust click HERE to get to that party:)

And from the Craftastic Party.  Here are a few of sweet ideas that caught my eye:


Counting Bunnies Too made some super cute monster puppets with dollar store gloves,


Check out this amazing garden cupola Forever Decorating made from old windows - seriously gorgeous!!!


Giggles Galore made some adorable whale coin purses - I seriously love these:


Now go ahead & link up your own creation and it might be chosen as a featured project for next week!  Here's how:

  • As long as it's crafty and made by you it's Craftastic (no giveaways, Etsy shops,  other link parties or other people's work please).  Just add the link to your specific post (not the main page of your blog).
  • Grab my party button & put it on your post or blog.  The code's on the sidebar ->
  • Check out some of the other great links and share some crafty comment love.

I leave the party open until 11:59pmEST every Thursday, so there's plenty of time to add your newest creations.  Have a great week!


Wednesday, May 18, 2011

A Little Princess Hairdo Hat


My kids love playing pretend, so I've been thinking about fairy tale crafts & costumes for a while now.  It's been a lot of fun coming up with ideas they want to use in their play adventures & today's creation is no exception.  Now that I've got a little princess around the house I thought it would be fun to create her a little themed hairdo hat a bit different than the other styles I've designed - more fanciful & slightly dressy I suppose.  And from that goal The Little Princess Hairdo Hat was born!


I made a princess cone-shaped hat out of bright pink fleece and added some pretty scalloped trim and airy tulle detailing in a softer shade of pink.  I also created a built-in braid with the face framing "hair" like all the cartoon princesses have.  And since all her other hats have been brunette, we went with blonde for a change.


I love watching her run around in it.  It's like having a little storybook character hanging around the house.  And she totally digs it too.


At the rate her hair is growing in (incredibly slowly), I foresee more even hairdo hat ideas in our future.  I also added this style to my shop, The Green Hedgehog, in case anyone else wanted to give their loved one the royal treatment too:)

Sharing this creation with my FAVE LINK PARTIES too so click HERE to check them out!

Monday, May 16, 2011

Craftastic Monday & More!

Welcome to a new week everyone!  Hopefully Blogger won't be rolling out any changes this week, so those of us who use it can focus on the crafting instead of dealing with missing posts, comments or other issues.

Let's get straight to the party goodies from last week!

From the Kids Can Craft Link-up my "Pick of the Week" was:

Painted toast from the Seven Alive.  How clever is this idea?  Playing with your food is totally fun!


Photobucket

The Kids Can Craft Party is for projects kids can make.  It's always open and the projects do not have to be new (so if you've got a good one from last year, throw it up there!).  You can link up ANYTIMEJust click HERE to get to that party:)

And from the Craftastic Party.  Here are a few of my favorites:


Missy's Cakes and Aprons made this awesome penguins at the beach cake:


Super cute polymer buttons created by Muffins and More:


Rice krispy treats disguised as apples?  LOVE it!! Check out the tutorial at Nothing But Country:


Now go ahead & link up your own creation and it might be chosen as a featured project for next week!  Here's how:

  • As long as it's crafty and made by you it's Craftastic (no giveaways, Etsy shops,  other link parties or other people's work please).  Just add the link to your specific post (not the main page of your blog).
  • Grab my party button & put it on your post or blog.  The code's on the sidebar ->
  • Check out some of the other great links and share some crafty comment love.

I leave the party open until 11:59pmEST every Thursday, so there's plenty of time to add your newest creations.  Have a great week!


Tuesday, May 10, 2011

Choose Your Flair Custom Chair Tutorial


Kid-sized furniture is cute.  Especially little chairs.  But they're a tricky thing to get right.  The fancy, upholstered chairs in the upscale catalogs are pricey and come in only a handful of basic colors.  The more affordable foam chairs at the big box stores are pretty limited in the style dept.  Garish, cheap fabric, usually paired with some licensed character.  Blahhhhh.  And either choice makes it hard to match with specific decor or a theme.  

UNTIL NOW!  I'm going to show how you can make your own fabulous chair & removable cover for about $25. It's the Choose Your Flair Chair!  Make it soft & cuddly, use fun prints, personalize it.  Anything to give it your own flair.   It's easy to match your favorite little person's style, make a memorable birthday gift or just knock their socks off with a cool place to take a seat.  Ready to get started?  Let's go!


First, you'll need my handy pattern sheet for making a Choose Your Flair Chair.  You can download it here:


If you've already got a foam chair & just want to make a new cover, you're halfway there, so skip down to how to making the chair cover.

Supplies You'll Need:

For the Foam Chair Base
- 3"x24"x50" piece of foam (you can get this for about $15-18 with a coupon at Joann's)
- Exacto knife
- Glue (Gorilla glue is probably best)

For the Chair Cover
- 1 yd stretch knit fabric (60" wide). Interlock, French Terry, Minky, Fleece, etc.  ~or~ Two 1/2 - 3/4yds of stretch knit (how much depends on which parts of the cover are which fabric)
- 32" long piece of 1/4"wide elastic
- Ball point needle
- Yard stick, marking pen, shears/rotary cutter

Optional, but recommended: roll of paper to scale up my pattern info into full size pattern pieces (this keeps things as simple & easy as possible and then you can use it over & over).

Making the Foam Chair Base:
Using the yard stick & pen, measure and mark the cut lines for making the back, arms & seat as shown.  Carefully & slowly cut through the thickness with the knife.


Stack the two seat pieces and put an arm piece on either side and place the back behind them all.


Glue the pieces together.  Foam can be tricky to adhere, but it's ok if it doesn't stick, because the cover will keep it all together anyway.


Making The Chair Cover:
Lay out the pattern pieces on the fabric(s) as needed, making sure all pieces have the stretch of the fabric going horizontally.


Cut pieces out of fabric and either mark the pieces or leave the patterns attached, so it's easy to fit everything together.

Now, with right sides facing, stitch together one long side of the top piece to back piece with a 1/2" seam allowance.  Stitch the other long side of the top piece to the chair front so it looks like this:


Then stitch the chair front (end with the cut outs) to the seat:


Now to attach the arms.  With right sides facing, stitch the arm pieces to the chair face so they will look like this:


Flip the arms out of the way and attach the inner side pieces to the other section of the chair front just under the arms on each side:


With right sides facing, stitch together the upper part of the inner side to the arms so they look like this:


Do the same along the short sides of those pieces to create the front corner of the arms.  Now attach the front panel to this section:


The cover is nearly done!  To add the chair sides on, with right sides facing, stitch the short end of the "L" shaped panel to the top section of the cover.  Stitch the back of the "L" to the back section of the chair and the stitch the remaining angles to the chair front, arm and front.


Now this is where to add the elastic so it will stay on nicely on the bottom & be easy to remove.  Stitch on the 1/4" elastic about 3/4" from the raw edge.  Pull the elastic taut as you sew it on, so it will cinch up like this:


Sew it on all the way around:


Then fold the raw edge over the elastic to make a hem and stitch it in place on the right side of the fabric 1/2" in from the edge.  Again pull the fabric taut as you stitch and make sure to not to catch the elastic when sewing the seam:


Slip the cover over the foam, fitting the fabric around all the corners & smoothing into place:


And now, your Choose Your Flair Chair is complete!


Looking fun from every angle:


And cutie-pie kid approved:


And the added bonus is that as styles change or the chair is handed down to another little person, it's easy to make a new cover and give it a whole new look or just toss it in the wash (when it gets the inevitable spill or stain).  How's that for creating some serious kid-friendly flair?


Sharing this creation with my FAVE LINK PARTIES too so click HERE to check them out!
Tip Junkie handmade projects

LinkWithin

Related Posts with Thumbnails