Showing posts with label Michaels. Show all posts

Friday, November 15, 2013

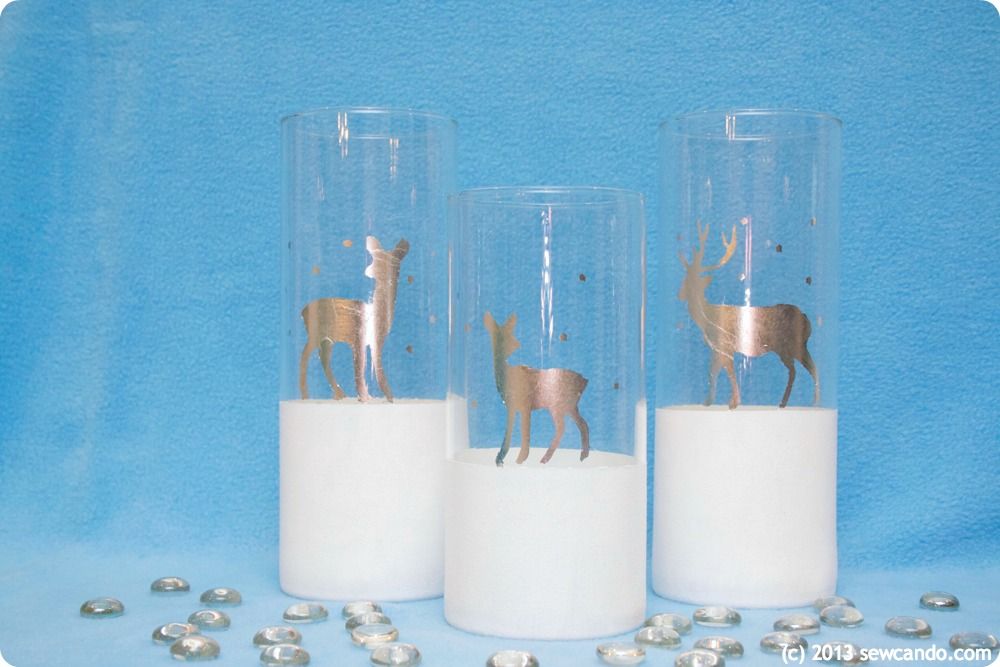
Holiday Magic You Can Make: Gilded Reindeer Glass Vases


Today's project is one I've been dying to share!  I'm getting a head start on my holiday crafts with these Gilded Reindeer Vases.  I received a box of multi-surface craft goodies from Martha Stewart Crafts for making something special for the holidays and they got me inspired to try something totally new to me: gilding.  And believe me, once you get the hang of it, it's pretty simple and addicting!
  

With a few key supplies I transformed some plain glass vases into a trio of snowy reindeer that look more like something from a fancy catalog than DIY from the dollar store.  And they've got that special holiday sparkle thanks to the silver gilding on the reindeer: 


As well as the glittery finish of freshly fallen snow below:


Now let's get started on the reindeer crafting magic!


Materials Needed:
- Glass vases (mine are from the dollar store)
- Martha Stewart Crafts Gilding sheets in Silver
Martha Stewart Crafts Gilding Adhesive & Gilding Brushes
Martha Stewart Crafts Paint in Wedding Cake White & Basic Brushes
- Martha Stewart Crafts Decoupage Medium in Glitter & Decoupage Brush
Martha Stewart Crafts Christmas Icon Stencils
- Painter's tape
- Rubbing alcohol & paper towel
- Optional: Martha Stewart Crafts Gilding Gloves, razor blade

* You can find Martha Stewart Crafts line in-store at Michaels or in Plaid’s online store.

Critical first step: start by cleaning the surface of the vases with rubbing alcohol & a paper towel.  This will remove any residues or oils that will prevent the paint & gilding from adhering.  Tape around each vase at the point you want the snowy ground to start.


I like to work on a piece of waxed paper since it's an easy, disposable work surface.  I just put a blob of paint right on it and work from there and then toss it when done.  I brushed on a layer of paint in vertical strokes. When it dried I did the next two coats horizontally so the brush strokes wouldn't be as noticeable and there was good coverage. 


Once all the painting was dry, I did the same layering job with my glitter decoupage medium and then peeled off my tape.


Then I taped on my stencils just above my snowy ground.  It's a little tricky to use these stencils on a rounded surface, but I really loved these reindeer, so I was determined to make it work. The gilding brush set includes a brush for painting on the adhesive so I used that to carefully brush on the clear adhesive.  A little goes a long way so don't be too generous or it could seep under the edges of your stencil (I learned that the hard way).  To make it easier to avoid that around some of the edges, I pressed down the stencil in that area with one hand while I dabbed my adhesive with the other.  Then remove the stencils and allow the adhesive to set for about 20 minutes.  It should feel nearly try and a little tacky to the touch when ready.


I slipped on my cotton gilding gloves and took a sheet of gilding from the pack, careful to keep the tissue backing paper on, and laid it over my adhesive.


Then I smoothed the gilding down with my hands and pressed with a circular motion to make sure it adhered to the adhesive and let it sit for an hour.  It was SO hard to be patient and wait to see the results!!!


Then came the fun part: the reveal.  I removed the tissue and carefully brushed at the gilding with the fluffy, round gilding brush.  Any bits that weren't glued to my design began to break and flake off.  This is the part where the gloves really come in handy.  The gilding is very fine and will definitely stick to bare hands, so cleaning up was much easier thanks to the gloves.


I used a razor blade to carefully scrape away any spots where adhesive snuck out of the stencil and make some of the edges look cleaner.  They add some holiday style as they are, filled with seasonal greens or filled with candles and can be grouped together as a centerpiece or spread out on a mantel.  Lots of decorating options!


To find more holiday inspiration, or info on ways to use this materials:

- Follow Plaid on Facebook
- Sign up for Plaid's Newsletter
- Follow Plaid's Martha Stewart Crafts board on Pinterest

And check out more project tutorials made with some of these items:


I'm also sharing this with my FAVE LINK PARTIES.
Click HERE to check them out!

I was financially compensated for this post.  I received select craft supplies from Plaid Crafts for their Martha Stewart Crafts Holiday campaign.  The opinions and ideas are completely my own based on my experience.  For my complete disclosure policy, click here. 

Tuesday, November 12, 2013

What Happened When I Threw A Pinterest House Party


I never thought I'd be saying I partied all weekend, but last weekend I totally did!  Craft-style, that is.  And it was fabulous.  As I mentioned previously, Michaels Stores asked if I'd help host an in-store "party" to celebrate their new Pinterest-inspired events last weekend.  I did a bit of hands-on crafting with my fellow shoppers and got to scope out their new Pinterest-themed displays.  I even got called a crafting blog celebrity over the PA, so that was pretty special!  They also asked me to host my own Pinterest Party, with friends, at home. Today I'm sharing a peek at my house party and the fun project we did that was perfect for the coming holiday season: Custom Cork Coasters Sets.


We used my dining room as our crafting area.  Michaels sent me some customized party supplies & stickers to theme it Pinterest-style and a store gift card, which I used to buy the crafting supplies for our project.  Here's a little pre-party pic of our set-up:


For our party project, I'd found this idea on Pinterest for making stenciled cork coasters (the source of the tutorial is the very stylish French Country Cottage):


I thought this would make a great DIY holiday gift, especially since it wouldn't require any complicated crafting skills.  I got an assortment of paints and accent items at Michaels to decorate them...

 
as well as the 12x12 cork tiles to cut down as the tutorial recommended.  These were ideal since they gave us plenty of coasters so everyone could make a few sets to take home.  I also added an assortment of decoupage papers & finishes, so we would have more coaster decorating options.


We cut up the tiles into 4x4 squares.  And by we, I mean my sweet husband who also played ring master/babysitter to 6 kids so we could snack & craft uninterrupted.  Is that true love or what?! But we did punch out all our own stencils and pick color schemes, so we weren't totally slacking;)


Everyone got serious when it came down to painting.  These were women on a mission.


We used a bunch of different paint colors: some bright Christmas shades, a few cool metallics and some non-seasonal shades too, just to switch things up.


Some crafters painted the whole coaster first with a background color and then added stencils or paper shapes.  I did a few stenciled and a few decoupage papered. 


Then we sealed them with decoupage - the matte & glitter finishes were the go-to choices.


The time went by so fast!  We all had a great time crafting, chatting & sharing ideas.  Everyone made something they could use themselves or give as a gift, so it was as practical as it was fun. Every crafter had a different take too and even those that though they were the least crafty did a fantastic job:


When they dried we tied them up with ribbons & baker's twine and added some jingle bells as gift-y accents. This was one of the sets my friend Lindsay of Youngstown Bread did:


Crafting really is more fun when you do it with others, so I'm really glad to have had the opportunity to treat my favorite ladies to a crafty soiree.  Best of all, we ended up with some lovely creations:


A big thank you to Michaels Stores for helping me put together such a fun & memorable party and having me take part in their #MPinterestParty too!


I was not financially compensated for this post.  I received party supplies and a gift card from Michaels Stores.  The opinions are completely my own, based on my experience.  

Saturday, November 2, 2013

Join Me At Michaels For An In-Store Pinterest Party!


I'm excited to announce I'm hosting a craft party and YOU'RE INVITED!  

Along with several other bloggers across the country, I'll be hosting a Pinterest Party at my local Michaels store on Sunday, November 10th from 1-4pm.  Visitors are encouraged to drop in, take a tour of Michaels new inspired-by-Pinterest displays and then come hang out in the craft classroom for some fun crafting we can do together.  You can buy some supplies or bring some of your own, whatever you want to craft it up!  It'll be a fun way for us to do some crafting together and to not just pin ideas, but really make them our own. Here's just one of the inspired projects we can work on together:


If you're in the Detroit area you can come and join me, in-person.  And if you live elsewhere, you can still join in too!  Just head over to Michaels Pinterest Party page and click on your preferred to city to get the exact Michaels location for the in-store party nearest you, hosted by another crafty blogger.  Here's my local party spot:


Come with a project in mind, get ideas from the new Pinterest-inspired displays or head over to Michaels Pinterest board to find more project inspiration.  


I'm really looking forward to meeting my fellow local craft lovers and hope to see some of you there!!


Saturday, August 3, 2013

Back to School Challenge: What We Learned Board Tutorial


Can you believe back to school season is nearly here?  I know, it's coming up fast!  Michael's stores contacted me and asked if I'd like to participate in their First Day of School Blogger Challenge and create a craft project to celebrate the First Day of School.  


This was a special challenge for me, since we're homeschoolers and the usual lunchbox, teacher gifts, backpack type stuff doesn't really apply to us.  I came up with something that is ideal for all families, no matter what way you do school.  The What We Learned Memory Board.


This reusable board gives a fun & easy way for kids to show off what they're doing.  Not only is this a great way to summarize a day's activities or for making a visual "report" for a particular theme, it makes it easy for Mom to save the memories.  


Just keep the pinned items or - better yet - photograph the board and just save the photo. How's that for saving space!


 Materials Needed:
- Chalkboard paint
- Corkboard sheet - 8.5x11
- Unfinished wooden frame - 8x10
- Scrapbook notes - I used Recollections Creative Chaos Pads.  These are perfectly themed for this
- Foam paintbrush, scissors, chalk, pushpins

Start by removing the back panel and cover sheet from the wooden frame.  Paint the the front and side edges with the chalkboard paint.  I did 3 coats for good coverage, leaving an hour between coats and then a full 24hrs to cure.


Trace the back panel onto the cork sheet and trim to size.

  
Condition the surface of the frame by lightly rubbing with chalk and then wiping off.


Place cork into frame, followed by the back and close.


Then fill out and add the scrapbook notes.  It's a great way to help the kids put what their doing into words.  No more "What did you do today?" questions being answered with "I don't know".


Add some extra details or descriptive words or images for that day or a particular theme in chalk on the frame.  


Since it's now a chalkboard & bulletin board combined, this can have different notes, drawings or projects everyday:


Are you ready for school to start?  For more fun ideas, check out Michael's Back to School Challenge Pinterest Board and Lookbook


I'm also sharing this project with my FAVE LINK PARTIES.
Click HERE to check them out!

I was not financially compensated for this post and received a Michael's gift card to use for purchasing supplies for this project.  The opinions are completely my own, based on my experience.  For my complete disclosure policy, click here. 

LinkWithin

Related Posts with Thumbnails