

 |
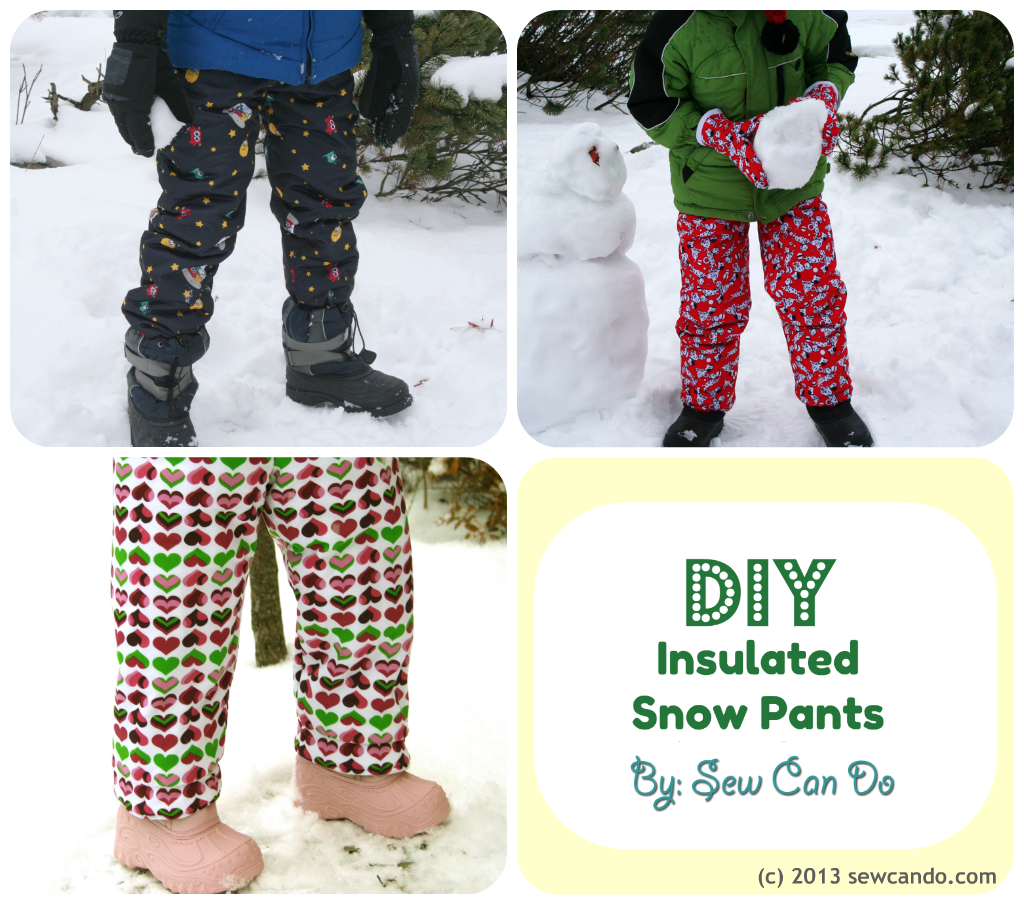
| Yes, those are 101 Dalmatians frolicking on both the snow pants & mittens! |
Today's Part 1 is an updated version of my popular DIY Insulated Snow Pants. These babies are great because they are just as warm as the ultra pricey brands and you can customize your own color combos.
And did I mention they can be made in less than an hour??
- 1yd Anti-pill or Micro Fleece, which makes a cuddly, hardwearing lining.
- 1 yd Thermal Batting aka Insulating Lining, (traditionally used for making hot pads). It's needle pricked with silvery mylar to add the critical insulate so the warmth stays in & cold stays out.
- 1 yd PUL (polyurethane laminate), a laminated polyester traditional used for making cloth diapers - ideal because it's waterproof and lightweight.
- 1 yd One inch wide non-roll elastic, which resists rolling & twisting to keep cuffs and waistband in place
- Pattern for pajama or loose fitting elastic waist pants*
- Sewing Notions (measuring tape, rotary cutter/shears, safety pin, pins, sewing machine)
*1 yd is enough to make up to about 10yr old sizing. If you want to make a lot smaller or larger, follow your pattern's yardage guide & adjust accordingly.
All these materials can be found at most chain fabric stores - using coupons can make them very affordable. Personally, I find the best selection of fleece and PUL prints & colors is online, look for diaper sewing shops to find some cute and unique designs.

The pants pattern I used had a single piece for each leg. If yours has 2 (a front & back), just overlap the side seams by the amount of the seam allowance to make a single leg piece - it saves time! Since these will be going over regular clothing, choose one size up from the pant size usually worn on the sides of the pattern for the best fit (leaving waist & length the usual size). Cut folded fabric so there are two pieces of each of the thermal batting, fleece and PUL:

Now layer a piece of thermal batting over the wrong side of the PUL:

Fold with the right sides of the PUL facing and stitch down the side. Trim the seam allowance and repeat on other leg:

Turn one leg right side out and insert into the other leg so the crotch areas are lined up. Pin together and then stitch. Trimming seam allowance again.

Repeat with other leg and again using just the fleece to make lining. I also sewed a tag onto the inner backside of the lining at this point so it's easy to know which way is back.


Pull the lining out and it should look like this:

Now stuff lining into the outer pants and stitch waistbands together 1.25 inches from the top seam to form the waistband casing:


Sew ends of elastic together and sew gap in fabric closed. I did this by hand with a slipstitch:


For a firmer, more gathered cuff, fold the raw edges of the cuffs inward .5 inches and pin:


Pull them on and they're ready for the snow. And they total rival the high end brands that cost $50+ in terms of warmth & keeping wetness out.


Stay tuned for Part 2 of the tutorial later this week. I'll share how to make some matching insulated mittens for keeping hands warm using the scraps leftover after making these pants. UPDATE: Click HERE for the FREE mitten pattern & how-to.


I'm also sharing this with my FAVE LINK PARTIES.
Click HERE to check them out!
Wow! These are great! Thanks so much for the tutorial!
ReplyDeleteThis is a really great tutorial that will come in handy. I pinned it. Thanks!
ReplyDeleteI love these! They look so warm! Thanks for a great tutorial!
ReplyDeleteGreat tutorial as usual. They look so good!!!
ReplyDeleteAt the moment I get to know where I can get this special fabric I start sewing these super practical pants. Thanks!
ReplyDeleteHere are a few of my fave sources:
Deletehttp://www.diapersewingsupplies.com/pul-fabric-prints/
http://kidsinthegarden.com/shop/index.php?main_page=index&cPath=4_109
http://www.naturesfabrics.com/pul.html?limit=all
Yea! Thank you for this tutorial. We live in Vegas, but we do go up to the mountains to play in the snow and I hate buying super expensive snow gear to use three times a year!
ReplyDeleteExactly Camille! These are so much more affordable and just as good as the fancy ski brands.
DeleteCheryl, These pants are such a great idea! If we take the kids skiing next year I am definitely going to make these pants! Awesome tutorial!!
ReplyDeleteJenny
Seamingly Smitten
Thanks Jenny - knowing how much clothing you make this is an immense compliment!
DeleteI am so excited to make these! I never would have thought of the thermal backing (although it makes complete sense). Great job, and excellent tutorial. I can't wait to read about the mittens!
ReplyDeleteThanks so much Theresa - after I dreamed these up, I couldn't believe it hadn't occurred to me sooner! The mittens how-to and FREE downloadable pattern are now up. You can find them here: http://www.sewcando.com/2013/01/make-your-own-snow-gear-part-2.html
DeleteSuch cute pants Cheryl - and great fabric too!
ReplyDeleteThanks for linking to a Round Tuit!
Hope you have a fabulous week!
Jill @ Creating my way to Success
http://www.jembellish.blogspot.com/
amazing!!! Can't believe you made your own... so impressive!! Would love for you to share this at my party...http://www.nap-timecreations.com/2013/01/valentines-pie-and-tasteful-tuesday.html
ReplyDeleteThose turned out super cute. I love that you can personalize them and make them so much more fun to wear.
ReplyDeleteThese a so cute. Thanks so much for sharing at Wednesday's Adorned From Above Blog Hop 36.
ReplyDeleteDebi and Charly @ Adorned From Above
Marci @ Stone Cottage Adventures
Nichi @ The Mandatory Mooch
You have the BEST ideas and tutorials for making so many things! If I had your know-how I would never ever have to purchase a single article of clothing for me or my family again! GREAT job, and thanks so much for sharing it with us for Pearls and Lace Thursday! Off to read that mitten tutorial!!
ReplyDeleteBlessings,
Doni
Doni you are so very kind and thank you for such a wonderful compliment! You made my day:)
DeleteThese are so great! Thanks for the tutorial.
ReplyDeleteI'd love if you shared this project at my Show & Tell party this week. http://www.gingerlymade.com/2013/01/show-tell-10.html
Thanks for sharing at Gingerly Made's Show & Tell party. You were featured this week.
Deletehttp://www.gingerlymade.com/2013/01/show-tell-features_29.html
That is just crazy! I love that you made your own snow pants! I would have never thought that it was possible! I am feeling inspired! Thank you so much for sharing at the Inspiration Gallery Link Party! I am pinning this idea to our feature board!
ReplyDeleteJaime from crafty scrappy happy
Thanks Jaime. Hearing my idea has inspired you mean a lot. I appreciate the feature pin!!
DeleteThese are too cute! So great to be able to have snow pants with fun prints. Thanks for the tutorial.
ReplyDeleteThese are great!! My kids are getting out of the kids clothes sizes and snow pants for juniors/misses are outrageous!! These would be so much more fun...pattern on material and unique to them. Thanks so much for sharing!!!
ReplyDeletewarm and cozy! Thank you for sharing at the Thursday Favorite Things hop xo
ReplyDeleteA comprehensive and easy to follow tutorial, Cheryl.
ReplyDeleteHi Cheryl, I've featured your Snow Pants today... Threading Your Way ~ Features
DeleteThanks for sharing the tutorial! We only occasionally get snow so there's no sense investing in snow pants that will more than likely be outgrown before they are needed. I'll have to stash some of these fabrics so I'm ready to go.;)
ReplyDeleteGreat idea!
ReplyDeleteThis is awesome! I would never have thought of this!!!! thank you so much! [inning!!!
ReplyDeleteOh my gosh... these are so cute and I'm glad you included such a great tutorial (I need all the help I can get, lol!) Thanks for sharing at my weekend link party! Hope to see you again next week :)
ReplyDeleteShauna {The Best Blog Recipes}
http://thebestblogrecipes.blogspot.com/
You've also been featured as one of last weeks favorites! Check it out @The Weekend re-Treat!
DeleteAhh, why can't I sew?! How stinkin' cute are these?! Thank you for sharing at our Pinteresting Party!
ReplyDeleteThanks so much for coming by and visiting our blog and sharing your awesome project. Come by again and link up some more awesome projects in our Saturday Showcase again next week!
ReplyDeleteHave a good week!
Susie@bowdabra
http://bowdabrablog.com/2013/02/02/saturday-showcase-craft-project-linky-18/
How water proof are these pants? They look cute and warm, but if they're not water-proof, that's a deal breaker in South Dakota
ReplyDeleteThese are TOTALLY waterproof on the outside. The outer fabric is PUL, which is what is used in today's cloth diapers. It's polyester that's coated with a layer of polyurethane. As someone who's used it for making diapers, waterproof bags and snow pants for use in Michigan winter I can attest to the stay-dry power of these!
DeleteGreat! Thank you!
DeleteI was wondering how durable these were? I am thinking of making a cute pair for my 8 yo for next year. And maybe a pair for my 12.5 year old boy (black of course with pockets). The reason I ask is my kids fall and tend to tear a hole in there pants... do to not enough snow or just being taller and heavier then other kids... my dd is in a size 16 for next year. And my son is well into a Large man size. Sounds odd but he didn't use snow pants that much this year so I didn't buy him a new pair his size is way expensive for a few times out with his sister or snow blowing (with a leaf blower) . :o)
ReplyDeleteAngela, these wear like iron. I made ours a size bigger and they've last YEARS. You can't really tear PUL fabric, so unless they are falling on scissors or something crazy sharp you can't rip holes in it. If you use the materials I specify, your snow pants will be way more durable and warm than anything you can buy.
DeletePS... They are in larger size do to there tall stature.
ReplyDeleteHave you made an adult size? I can't wear ready to wear snow pants--too girl-shaped rather than woman shaped.
ReplyDeleteI haven't but you totally could. Just use a loose fitting pants pattern you like, like a pajama pant.
Delete