Showing posts with label Homemade Christmas. Show all posts

Wednesday, August 9, 2023

Finally Sewing Again: Making A Table Topper Quilt


After a really long time not feeling creative, or having time to do anything crafty, I'm slowly finding some free moments and a bit of inclination to tackle things.  Truthfully speaking, most days I'm exhausted from dealing with my big kids, corralling my toddlers and keeping my shop running, but the crafting spark hasn't totally gone out!  

What pushed me to start sewing again was needing a sample project for my shop (so this post kind of ends up being a bit of an "advertorial", but more because this really is what I'm making right now - not because I want to get all sales-y on ya!).  

I've just started carrying digital quilt patterns, which is great for getting customers sewing asap, but one design didn't have a finished project photo or digital mock-up to go with it.  Kind of hard to sell an item without an image of it, right?  So I decided to use fabrics from a new Christmas collection I got in (called Comfort & Joy) to make this sample table topper quilt:


To be honest, I'd been a bit nervous to start it.  I've been a self-taught sewer of bags, clothes, home decor and literally every other fabric project for years, but I'm not really a quilter.  I've only made a handful of basic quilts and since I'd not sewn anything in months I was a little apprehensive of my rusty skills making a go of it.  Add the fact that two of the fabrics I was using were directional, I needed to take a little extra time to make sure I had them cut with the pine trees and text facing the right ways:


I do have to say it came together pretty quickly.  The design is the Guiding Star Table Topper Digital Quilt Pattern.  The instructions are very straightforward so a beginner quilter like me can easily make it.  It features an 8 inch focal square, so I fussy cut from my text print fabric to make a nice holiday phrase block:


The one modification I made was to make the back self-binding rather than doing a separate backing piece and binding edge.  


It saved me a bunch of time and made it easier to get a nice even binding edge on the front.  I used this handy how-to for getting nice mitered corners with a self binding, since it had been so long since I'd done them last: 


This little quilt can be used as a table topper, wall hanging finished or as a center for making a larger quilt.  


I feel confident enough to do another one (or more) and possibly piecing them to make a larger quilt, so I'm pleased I could get back in the sewing saddle and test drive a new pattern at the same time.  Plus, I've got a nice, new, Christmas-y item already sewn up early.  Boy, does it feel good to be ahead on a project for a change!


Wednesday, December 7, 2022

Making Snow Globe Mason Jars


This easy DIY makes a sweet gift handmade item that is sure to delight!  Fill the jars with cocoa or cookie mix, candies, nuts or potpourri.  They make a lovely gift or sweet little decoration that can be enjoyed year after year.  The Nativity looks so heavenly nestled in the snow:


  I fell in love with this project idea last year when I discovered a tutorial for making them to gift hot cocoa mix in over at Dream A Little Bigger.  Unfortunately I ran out of time to make any so it had to wait until now.  Several of the suggested products used there are no longer available, so I found some ideal substitutes to make them work and am sharing my findings so you can too:)


To make them I used a mix of some winter mini decorations, as well as some Nativity-themed flat backs & buttons from my shop and some pretty trims from my friend Jennifer's shop: Sugar Pink Boutique.


Materials:
- Mason jars (I used standard 8oz)
- Hot glue gun
- Ruler, rotary cutter, wire cutters

* It's a lot easier to start with solid white lids, but if you only have access to the metal ring kind, glue the seal to the ring and then paint white before starting.


Begin by hot gluing the central flat backs or buttons onto the jar lid at the center.  I used A Child Is Born & Three Wise Men Flat Backs from my shop for these.  Make sure items chosen will all fit under the dome (no taller than 1 1/8in).  I had to trim down my tree a bit at the base.


Carefully use the wire cutters to clip off the hanging circle of one of the ornament halves.  It's ok if it's not perfect - the ribbon will cover this up.


Put just under a tablespoon's worth of the artificial snow in the globe half:


Carefully put the jar lid over the globe and firmly hold together.  Run a thin line of hot glue around the edges to adhere them together.  I smoothed it as I went with a silicone finger protector (but a silicone hot pad or spatula edge would work too).  Check the edge to make sure there are no gaps (add a little more glue if needed).


Use ribbon & trim to dress things up and cover the seam edge just made.  An easy way is to use a wide trim with a decorative edge, like this 1.5in wide velvet center crochet ribbon.  Just hot glue it around the lid edge and overlap the ends at the back.


The crochet edge makes a pretty little fence around the scene.  I added a topper 3/8in wide trim of metallic silver velvet to add a little extra bling that doesn't shed:


For a different finish, I used 1/2in wide grosgrain ribbon, baby pom pom and some metallic satin tree trim on my Three Wise Men version:


Glue on the 1/2in wide ribbon first, making sure the top edge overs the seam of the snow globe, then glue the pom pom trim over the lower edge (which will camouflage any of the lid that was showing).


Then add the satin trim just above the top of the pom pom:


After making a few, it starts to go pretty fast and it's a lot of fun to make a variety of versions by using different figures and trims.


Add your favorite fillings: holiday mixes, candies, potpourri, etc. and they're ready to gift.  Enjoy seeing your recipients faces lit up when they receive them!  


Friday, December 3, 2021

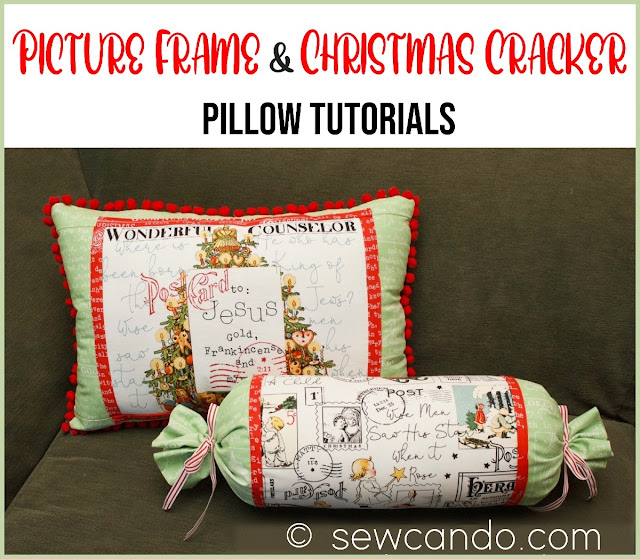
Picture Frame & Christmas Cracker Pillow Tutorials


It's the perfect time to make some decorative pillows for Christmas!  I came up with these two fun pillow design tutorials while I was making projects with fabrics from my shop and wanted to share them - they're both fairly quick to make and add a touch of festive cheer to any space.


The first project is the No Form Picture Frame Pillow.  This pieced pillow uses minimal amounts of fabric to make a sweetly framed design:


There's a different block on the back side so they are reversible and by using fusible fleece, there's no need for a pricey pillow form to put inside.  I used image blocks from a particular Christmas panel, but you could use a large scale print as the central section and any favorite fabrics for the coordinates. 


Pom pom trim gives the pillow some fun detail and extra pops of color:


Finished size: approximately 15"h x 21" w

Materials:
- 1 rectangle blocks panel (I used All About Christmas Story Placemat Panel)* or 1/2yd of a large design fabric
- 1/2yd cotton fabric for border (I used All About Christmas Good News Green)
- 1/2yd cotton fabric for framing (I used All About Christmas Good News Red)
- 2 yds 1/2 inch pom pom trim (I used Cherry Red from Sugar Pink Boutique)
- 14 inch zipper
- 1/2 yd fusible fleece
- Polyfil
- Rotary cutter/shears, iron, zipper foot, hand sewing needle, pins

*Note: If using this particular panel, there are 3 blocks, so with the fabric amounts above you can make 3 dual-sided pillows and just multiply the yardage of pom pom trim by 3.  Or make one & use the other blocks to make gift bags, placemats or other quilting projects!


Cut the following pieces: 

Main fabric/panel - (2) blocks 11 1/4in high by 13 3/4in wide rectangle
Border fabric - (4) 11 1/4 in high by 4 1/2in wide strips for sides
(4) 2 1/2in high by 21 1/2 in wide strips for tops & bottoms
Trim fabric - (4) 11 1/4 high by 2in wide strips for sides
(4) 2 high by 14 1/2 wide strips for tops & bottoms


Press each the side trim strips in half, wrong sides facing (wait to do the upper & lower trims):


Take the side trim pieces and match up the raw edges of the trim with side edges of the center fabric blocks (right side up).  Since the trim and side fabrics are directional, make sure the words are all facing the right direction!  Place the side fabric strips on top, right side down and sew together with a 1/4 inch seam allowance.


Press trim strip flat going towards the side strips and top stitch along the edge so it will lay smooth.


 Take upper & lower trim strips and fold, right sides facing and stitch down the short ends, then turn right side out and press flat.


 Baste these strips along the top and bottom of the blocks as shown, making sure they line up with the edges of the side strips to make the "frame":


 Place the upper & lower fabric strips on top, right side down and sew together.  Press open with trim strips going outward and top stitch them in place.


 Cut out two 14.75 inch high by 20.5 inch wide rectangles of fusible fleece and center on the wrong sides of fabric, leaving 1/2 inch of fabric showing around all sides and fuse in place.  By using fusible fleece on the back, the fabric has flexible stability so it can easily be stuffed with polyfil & retain its shape and feel like a pillow form.


 On the right side of each rectangle, baste pom pom trim around the raw edge, overlapping the raw ends of the trim 1/2 inch, making sure all pom poms are facing inward.


Most pom pom trim will dangle from a 1/4 inch trim edge, so you will want the basting to be to the left of that so that edge will be hidden inside.  It's easiest to stitch this on using a zipper foot.


With right sides facing, pin together both sides of the pillow and stitch with a 3/8inch sea allowance, leaving a two inch gap at the bottom for turning.  Trim corners close to stitching.  Turn right side out. 


Stuff pillow with polyfil, using a pencil, knitting needle or chopstick to help stuff into corners.  Slip stitch opening closed by hand.


Now let's make a Christmas Cracker Pillow!


This sweet pillow is an easy sew project.  It's got a charming whimsical style and looks great anywhere.  


It also makes a wonderful holiday gift!


and features an easy zipper opening:


Materials:
- 1/2yd main cotton fabric (I used All About Christmas Postcard White)
- 1/2yd cuff cotton fabric (All About Christmas Good News Green)
- 1/8yd small trim cotton fabric (All About Christmas Good News Red)
- 14 inch neck roll pillow form
- 14 inch zipper
- 1 yd 3/8 inch wide decorative ribbon
- 1 yd embroidery floss or thin string
- Rotary cutter/shears, iron, zipper foot, rubber bands

Cut the following pieces: 

Main fabric - (1) 19 7/8in high by 12 in wide rectangle
Trim fabric - (2) 2in high by 19 7/8 in wide strips
Cuff fabric - (2) 15 high by 19 7/8 wide rectangles


Press each the trim strips in half, wrong sides facing:


Match up the raw edges of the trim with one edge of the cuff fabric (right side up).  Place the main fabric on top, right side down, and sew with a 3/8 inch seam allowance.


Roll up the main fabric, stopping about an inch from the raw edge.


Wrap the other end of the cuff fabric over it, pin then sew together with a 3/8 inch seam allowance:


Pull the main fabric out through the open side:


Press the trim and cuff flat.


Top stitch along the fold so it will lay smooth when rolled. Repeat on the other side.


Center and pin the zipper along one of the longer sides, face down.  Stitch zipper in place using a zipper foot.


Pull opposite side of fabric around and repeat with other side of zipper to create the pillow tube:


Stitch together the remaining fabric along the cuffs on either end of the zipper:


Turn pillowcase right side out:


Open zipper and insert pillow form.  Cinch cuff ends toward the center of each side and pull to get creases as desired.  Secure with a rubber band.  Tie in place with some embroidery floss and tie on top with decorative ribbon. 


Now the pillow is ready to enjoy or gift!



LinkWithin

Related Posts with Thumbnails