
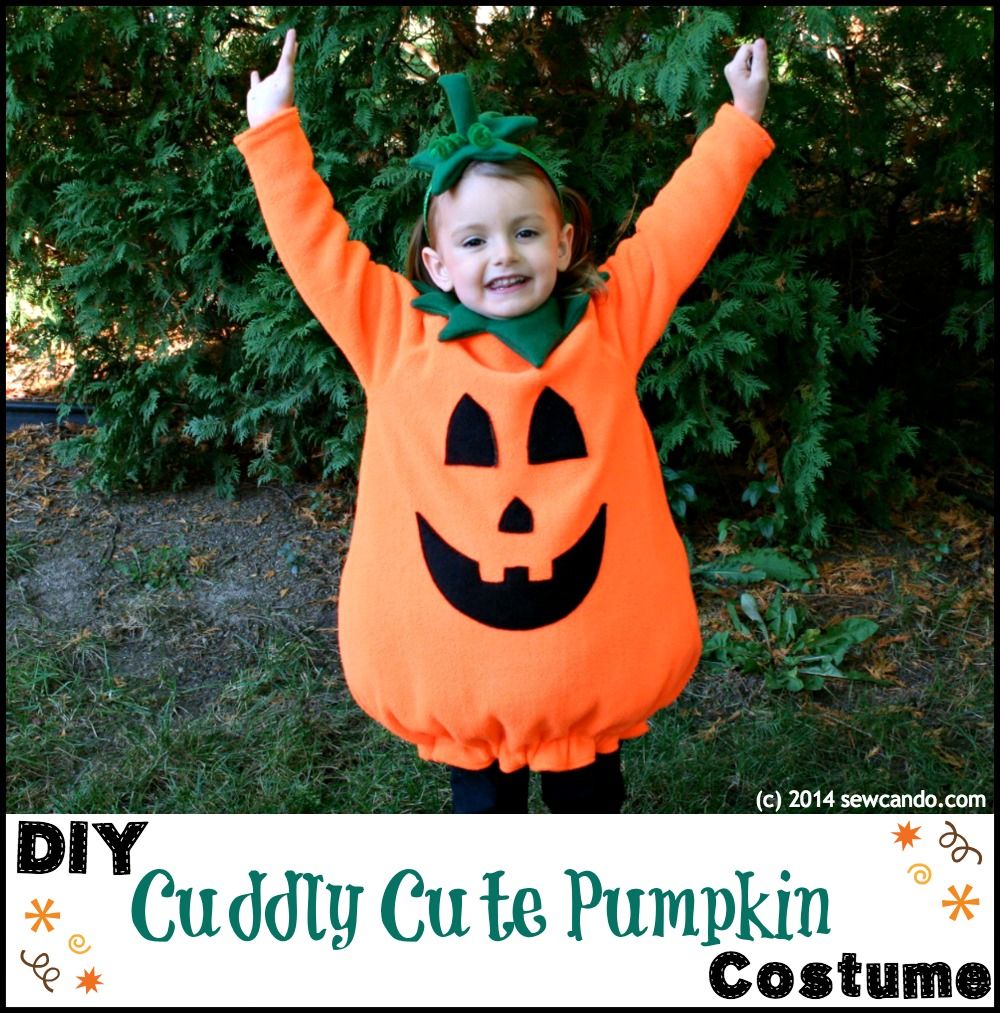

This year my daughter was very matter-of-fact that she wanted to be a pumpkin for Halloween - months in advance - and never wavered from it. I'd been certain she'd have picked a My Little Pony (her obsession) or the girls from Frozen (thanks to it's constant bombardment on everything everywhere we go), but no, she stuck to "I want to be a pumpkin". Last year she picked being a ghost, so she definitely prefers traditional. And I'll take that any day over the borderline vixen-style costume looks that keep getting pushed at little girls these days.

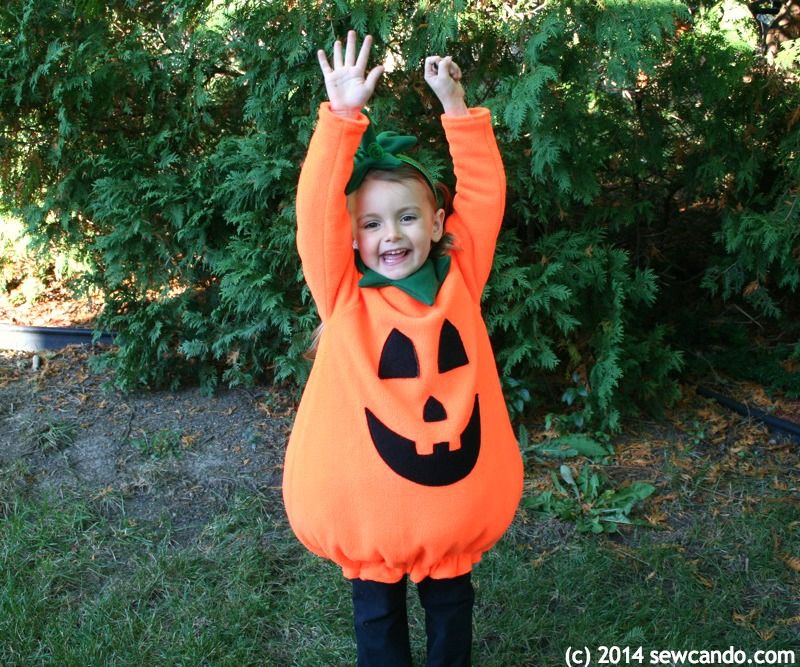
I didn't want to have to buy a pattern (out of a combination of pride & thriftiness), so I came up with this DIY design instead. It's got all the festive features - jolly jack o' lantern face, and plump pumpkin shape as well as all the practical necessities - easy to slip on & off, wide opening for walking and being fully lined in cozy fleece for a warm trick or treat experience. Plus a cute green stem on top:

I'm pretty happy with how it turned out and thought it would be helpful to share how I did it.

To get the overall shape and sizing right I used a raglan-sleeved A-line dress my daughter had in her closet.

I traced around the front, back and sleeves and added a seam allowance to all edges (adding about 4 inches extra length at the bottom. To get the rounded shape I used my French curve design ruler and expanded the sides a bit further out and then curved them inward.

Now I had my main pattern pieces ready to go. I cut out two fronts, two backs and 2 pairs of sleeves. I cut two of everything so there would be a full set of pieces for the outer AND for the lining.

For the jack o'lantern face I used some black fleece scraps and cut some slightly rounded triangles for the eyes and nose. For the mouth I grabbed a dinner plate to make a perfect crescent shape and cut out some teeth.

I used a little spray adhesive on the backs of the pieces to hold them in place while I appliqued them onto a front piece. I just edge stitched around.

Next, with right sides facing, I stitched the sleeves to the fronts and backs of my outer and my lining.

Then stitched down the sides from sleeve end to hem to complete things.

At the center of the back, I clipped a straight line down about 2 inches on both outer & lining. I repeated all those steps with the lining pieces.

Then I turned the lining right side out and inserted it into the outer and pinned around the neck hole, adding a small loop of elastic at one of the corners.

I stitched them together with a 1/4 inch seam allowance. Then I clipped around the edges and turned so the right side of outer pumpkin was on the outside.

I hand stitched a button to the corner opposite the elastic loop for my neck closure.

I inserted the lining sleeves into the outers, folded the raw edges inward about 1/2 inch and topstitched them together.

I folded the raw edges of the hem inward the same way and topstitched, but left a gap about 3 inches wide. This was for adding some fiberfill to plump out the pumpkin shape. After I got a good amount evenly around I made sure none was too close to the hem and topstitched all the way around about 2 inches from the bottom to create my casing.

Next I cut a piece of 1 inch elastic about 4 inches wider that my daughter's waist and snaked it through the casing, sewing the ends together and then stitching closed the gap.

The neck hole was a little wider than I wanted (I didn't want the collar of her clothes underneath the costume to show) so I also made a green stem collar. This was a bit of a design-as-I-go affair.

I started by cutting a pair of curved green pieces several inches wider and longer than a basic collar from a pattern in my daughter's size (that I had on hand). I tried it on her and trimmed it a bit as needed. I folded it in half and hand cut the pointed edges.

With right sides facing I stitched all the way around with a 1/4 inch seam allowance, leaving one end open and then trimmed down the raw edges with pinking shears. A knitting needle helped poke out the points and I slipstitched the opening closed by hand. I used sewn-in hook & eyes for the closure.

For a festive little stem headdress I grabbed a green glitter headband from the $1 section at Jo-Ann Stores as my base and made a sort-of star-shaped stem bit. Again just eye-balled the points and I stitched the right sides together with a small gap to turn.

The stem top was just a tall rectangle, folded in half & stitched down the side, then pulled so the top seam would be perpendicular to the side seam and a bit curved.

I tucked the open end under and inserted a curled a small pipe cleaner (done by winding around a knitting needle tucking the fold under the stem).

I slipstitched it to the base, then hand sewed that to the headband and it was done.

Truthfully, I was a little nervous when she finally tried it on. I had the horrible last-minute thought that she'd not like it being so plump & round. Several of the big 4 pumpkin patterns were basically sparkly orange dresses or fluffy tulle tutus to better compete with the glitzy girly costumes. I started to think maybe that's what she was picturing and would hate that it wasn't frilly or pumpkin princess-y. A lot of 5 yr old girls can be like that. Not this one though. The moment she put it on she had a big smile with a laugh said "I'm a fat pumpkin!". I love this kid:)

Hah, I love her attitude! And that's a great pumpkin costume.
ReplyDeleteThanks Charity! I'm proud of her - she definitely marches to her own drum.
DeleteShe's darling and so is her pumpkin costume. Great work, Cheryl!
ReplyDeleteThanks - knowing she loves it makes it worth the work.
DeleteCute little pumpkin! I love the headband! I'd love for you to share these at this week's Submarine Sunday Linky Party!
ReplyDeleteI think that's my favorite part too - thanks for the invite. Linking up now!
DeleteLove it, Cheryl!!! Thanks for sharing the tutorial.
ReplyDeleteThanks Pam - glad to share it:)
DeleteHello gorgeous! Super cute! Pinned. We hope to see you at our party tonight at 7 pm. It is so fun to party with you! http://loulougirls.blogspot.com/
ReplyDeleteHappy Monday! Lou Lou Girls
Cheryl!! This is fabulous. You are just so ingeniouswith that sewing machine. Thank you so much for linking it up with us at our Wednesday Time for a Party at the FineCraftGuild. Looking forward to seeing you again, tomorrow!!!
ReplyDeleteThanks so much - I'm just glad this one turned out the way I imagined it!
DeleteHi Cheryl,
ReplyDeleteThis costume came out so cute. Great tutorial.
Thanks so much for sharing with Adorned From Above's Link Party. We hope to see you at tonight's party.
Debi
Thanks Debi - hope you had a great Halloween too.
DeleteShe looks so adorable! I love that pumpkin stem headband, it is the perfect touch. So cute!
ReplyDeleteThe headband was definitely the part that was the most fun;)
Deletegoing to use this for a baby chicken costume
ReplyDeleteThen you'll want to see this post from last year when I used this pattern to make a chicken costume! http://www.sewcando.com/2015/10/tutorial-time-fluffy-chicken-costume.html
DeleteMy 2-year-old is asserting that she is going to be a pumpkin this year, and chose this picture as her costume inspiration. Going to give it a try! Couple questions if you don't mind answering - do you remember how much fabric you used for the pumpkin? I'm a terrible judge of quantity lol. And do you think the lining could be made from any fabric? It's not going to be super cold here, so I don't want her to roast.
ReplyDeleteI'm very flattered she chose ours! It will depend on the size of the child. For my daughter who was a 5T, I used 2.5yds of 60" wide anti-pill fleece for the orange. 1/4yd piece of the green for collar & headband. The front & back costume took 1 yd (then doubled to include the lining) and the sleeves were an extra 1/2yd. If your child is much smaller or bigger than that, I'd recommend drafting the paper pieces first and then measuring the length & width of the main piece and sleeve to calculate what you'll need. The green will be 1/4yd no matter what size. Making the lining from the fleece is easiest since it may be harder to find another thinner fabric that will stretch the same amount - possibly a thinner knit might work if it's not too stretchy.
DeleteI'm having the same issue! My daughter loves this picture but Halloween can sometimes be our warmest day of the year. Maybe we could do both layers with a thinner knit -- do you think that would work? (On the plus side Elizabeth, we don't have to worry about clothes showing through the neck hole!)
DeleteIf both layers are the same fabric, like a mid-weight knit, it should work. It's when mixing different stretch & weight fabrics that things can get tricky. I wish Halloween was warm here - we always have to figure out how to make the costume warm enough or big enough to layer lots of clothes underneath!
DeleteWe decided to use fleece but just leave the sleeves off -- if she gets cold we can put on a long-sleeve shirt and she has a green fleece jacket that matches the fleece perfect. I'll probably make it a little longer too so she can wear shorts without them showing. Our main fall festival is at 1 in the afternoon, so hopefully this will be cool enough!
DeleteGreat idea! Also, if you're looking for a way to attached the armholes of the outer & lining with a nice finish, check out how I did it on my Layered Tulle Sleeveless Dress: http://www.sewcando.com/2016/03/how-to-sew-my-layered-tulle-rosette.html
DeleteI'm going to try using this technique for a mushroom! My son is also 5, but MUCH bigger than a 5T. (Try a kids 8!). He insists on being the "free guy" mushroom from Mario brothers... So green and white it is, but if you have any ideas for a cute hat, I'll take them!! Thanks for posting this!!
ReplyDeleteLove that idea Susan!
DeleteThank you so much for sharing this! I'm so excited to make this costume for my daughter.
ReplyDeleteI'd love to see it when you do Angie!
DeleteI love this and I'm going to generally follow it as I go to make my daughter a costume from thrifted fabrics!
ReplyDeleteThank you! It's been one of my favorites to make - classic, but cuddly. Love the idea of using thrifted fabrics too.
DeleteMy 9-year-old wants to be a pumpkin (she was a ghost last year and black cat before that, so definitely a classic-spirit as well). You are well beyond my level of crafty aptitude, but I will use this as a guide. Wish me luck!
ReplyDeleteAnd yes, I'm so happy about the plumpy costumes vs some of the alternatives.
I hope this helps you and I'm glad to hear others are of the same mind when it comes to costumes. My daughter has been a ghost before too!
DeleteThanks for this inspiration. I'm finishing up our pumpkin following your "pattern." It helps that you showed it on your cutting mat so I could eyeball the length and width! My four-year old is very excited to be a pumpkin, and I'm excited that he's chosen a warm costume (we just moved back to Chicago this year from Austin, where I usually have to worry about a costume being too hot!).
ReplyDeleteFantastic Christina and yes, this is ideal for the chilly Halloween weather. I'm glad it worked well with your new location!
DeleteThanks for this tutorial. My 3 year old has been insisting for months that she wanted to be a pumpkin (never wavered), and this was nice and comfy. I made some minor changes, but this was the perfect template to start from, with all the steps clearly explained. Thanks so much for sharing!
ReplyDeleteThat is so wonderful to hear Melanie! I hope she enjoyed it as much as we did:)
DeleteHi there! Great outfit :) Tell me please if you filled the main body with something to get this round shape? Or it's just the fleece? Many thanks!
ReplyDeleteThanks Kamila! Yes, at the step where I did the hem I mention that I left a gap to stuff it with some fiberfill (polyfill). It gives it a nice rounded shape and then I hand stitched the opening closed. Would love to see if you make it.
DeleteThis is exactly what I'm looking for. I will make this for my new grandson this year! I am determined to make an outfit for him rather than waste good $$. Great work!!
ReplyDeleteI LOVE hearing that Staci! It ends up being so much nicer too. Would love to see it when you do:)
DeleteThank you for the tutorial! I made a sleeveless version for my 3 year old. I'm an amateur sewer with only basic skills and totally botched the neckline and armholes so the seams are showing, haha. It's all good though. I also didn't consider checking the length to make sure she can walk easily. I ended up cutting off the elastic section and making a new one higher up to shorten it. It's still super cute though! I made the face with glow in the dark vinyl. Now onto the costumes for my other kids...
ReplyDeleteWhen it comes to costumes, I always think it's ok to fudge a bit. Everyone only sees the cute and not the seamstress details. Love the idea of glow in the dark vinyl for the face! I'm thrilled to hear you made this & would love to see a photo if you want to email it to cheryl@sewcando.com.
DeleteGood golly I made this for my six-year-old son and he LOVES it, thank you!! Like you worrying that it wasn’t “fairy princess” enough for your daughter, I was worried that he wouldn’t think it was “tough” enough, but he just lights up when he puts it on. Now I’m just hoping he doesn’t wear it out before Halloween! : )
ReplyDeleteThis just warms my heart to hear. They really teach us not to underestimate what they like, don't they? Thanks so much for sharing & using my tutorial.
DeleteI am planning to use this to make a Squishmallow costume for my daughter. Do you happen to have step by step instructions for how to make the pattern? I have a very similar dress to use as a pattern, but I have very basic sewing skills and I do not quite understand how you created your pattern pieces. Thank you!
ReplyDeleteHi Holly. Since this is about tracing an item that fits your child, there isn't much more I can describe than what I've noted here. You just trace around the outer edge of each piece and then draw a cut line a bit further out around the trace line for seam allowance (about 1/2 inch) and make it 4 inches longer at the bottom. Once you've done that, you can use a curved ruler like I show to extend the front & back sides to be a more rounded shape. I hope this helps.
DeleteThank you so much for your help! I just finished her costume, and I am so happy! My sewing is far from perfect, but the costume is very forgiving.
DeleteWonderful to hear Holly! And it's all about making something fun to enjoy rather than it being perfect, so I'm glad you kept going. I'd love to see it if you want to send a photo to cheryl@sewcando.com.
DeleteThank you so much for this amazing pattern. I have just finished a costume for my 8-year old daugther and we both absolutely love it!!
ReplyDeleteI've made a blog post about it, so if you want to see a picture you are more then welcome to have a look here: https://strikzilla.com/2022/10/30/graeskar-halloween-kostume/
Thanks again and enjoy your Halloween :)
/Strikzilla
Thanks so much for sharing this! I'm thrilled my pattern is making more Happy Halloweens:)
Delete