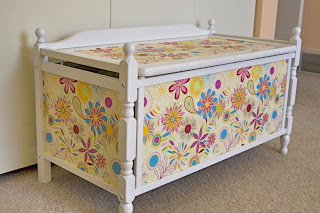
This week's craft topic is a personal favorite of mine because it makes customized decorating cheap, SUPER easy and look great with little effort. What's this magical decorating secret, you ask? Liquid Starch + Fabric! This simple combination puts paper, glue, wallpaper & paint in the shade. No fancy tools, pricey products and it's completely recyclable too. It is a real mystery to me how this technique does not get more attention, because it is so versatile and perfect for even those that consider themselves "non-crafters".
What is Liquid Starch+Fabric & what can you do with it?
The name is pretty self-explanatory. Just grab a bottle of liquid starch from the laundry aisle of your local grocery, some lovely fabric & a paint brush. Now you're ready to custom cover just about any porous surface: walls, wood, ceramics, etc. Use full yards for complete wall cover (think wallpaper WITHOUT the glue-y mess or removal issues), cut out shapes for the look of decals (without the high price tag and wall damage) or make a stylish covering for a smooth surface needing a little design makeover. And no matter what you choose, when you want to take it off (the next day or the next year), you just pull off the fabric and wipe down the surface with a wet sponge. No damage, no drama. You can even wash the starch out of the fabric & use it for something else - how's that for eco-friendly & economical?
Tips I've Learned:
- Cotton fabrics give the best results, since they are lightweight and meant to take starch
- Apply with a paintbrush directly to the fabric and then apply wet fabric to hard surface.
- Smooth it out with your hands over the surface to remove any wrinkles or air bubbles and adjust position if desired
- The fabric may stretch a little when wet, so be prepared to trim a little off the edges, if needed
- Do another layer of starch over it with the brush again & let it dry. If you don't like it, just pull it off and start again
I also had this white toy chest from my own childhood nursery, but was not keen on painting it, so I used the same fabric to give it a modern & coordinated look. I used just 1 yard of fabric (bought on sale for $5) & about 1/2 cup of starch (less than $2 for a whole bottle) for both projects, so the bang for the buck cannot be denied.
Have you ever tried this and, if you have, what have you done with it? Share your ideas and if you've got pics, put them up in the CraftShare Flickr Pool & show 'em off!


This is a great idea, thank you for sharing it. I had never heaqrd of such a thing before. The possibilities with this are endless. One question though, when you said the fabric is wet do you mean wet from the starch stuff, or do you wet it with water? Thank you!
ReplyDeleteGood question Lyndsey! Wet from the liquid starch - that's all you need to use. How awesome is that?!
ReplyDeleteI love that it is neutral and that I could use it again with another boy or a little girl.
ReplyDeletebaby gifts
wow this is a great idea!!!! I have to say it seams easy... and the chest!!! it's just incredibly pretty!!! I love the fabric you used =)
ReplyDeleteOkay, THANK YOU SO MUCH! I am so excited to try this!!!! We are in the process of moving our house around a bit, and then hopefully moving houses altogether soon, so this is fabulous!!! I can not believe I had never heard or thought of this before!!!
ReplyDeleteI have heard I can also do the same concept with a light shade and fabric and starch, but I was not sure how to do it.
ReplyDeleteThanks,
Missy
OH! The wheels are turning! I can't wait to try this!!! Thanks for sharing!!
ReplyDeletesmiles!
www.blackberryvine.blogspot.com
I've tried various decoupage ideas on old furniture and plywood craft items but would never have worked out how to fix fabric. Ideas, ideas, ideas bubbling away now so thanks for the inspiration. N x
ReplyDeleteI would love to do this in my kids' bedroom but I'm worried they'd be able to peel it off to easily, how easy is it to remove off the walls?
ReplyDeleteNow I need some starch!
ReplyDeleteI've heard of this before, but never tried it. I'm thinking of using it for my very ugly kitchen cabinet doors. It certainly would change things up!
ReplyDeleteAwsome ! Same question as Marilyn and also how would it deal with a showeroom situation? would that weeken the stick ? regular steam etc ? Thanks for a great post !
ReplyDeleteI really don't know - I've never used it in a bathroom, but I think it would be fine as long as it wasn't right next to the shower where steam would be directly on it.
Delete