Showing posts with label rug. Show all posts

Wednesday, March 13, 2019

FREE Pattern: Applique Cuddle Garden Rug


Spring is nearly here!  I'm getting ready for the upcoming sunshine, flowers and greenery, by starting some "blooms" inside with my DIY Appliqué Cuddle Garden Rug!

This sweet plush rug has lots of cheery flowers growing up from some ribbed minky fabric "soil". 


Like my Little Narwhal rug, this rug is made from a cuddly minky (aka cuddle) fabric on the outside.  The interior is upholstery foam to make it cushioned & supportive. 


All the appliqués are cozy, cuddly minky fabric too so the rug is heavenly underfoot.  It also makes a pretty wall hanging!


It has an envelope opening on the back so it's easy to remove and wash when needed, unlike most rugs.  


There's a little stuffing inside the flower centers and bluebird to give it a bit of extra dimension too:


I've made it easy for you to make too by creating some free download files for all the appliqués!

Materials:
- 1 1/2yds blue minky fabric for the main rug
- 1/2yd cut of green minky fabric 
- 1/4yd cut of brown minky fabric
- Minky fabric scraps in yellow, blue, pink
- 1yd 24 inch wide, 1 inch thick craft foam
- My Cuddle Garden Applique PDF Pattern Pg. 1 & Pg. 2 
- High loft batting, handful of polyfil
- Fabric adhesive spray
- Walking foot, heavy duty needle, disappearing marker 

Download, print & cut out my Applique PDF Pattern pieces, at 100% (no scaling), PG. 1 HERE & PG. 2 HERE.


Here's how to put it together:

I cut my one inch thick foam to the final rug size: 36in wide by 24in high.   

I then cut the front & back pieces, with the nap going in the same direction.  

- Main front piece: 38in wide by 26.5in high 
- Back pieces: (1) 14in wide by 26.5in high + (1) 31in wide by 26.5in high.  

I folded the narrow & wide back pieces two inches toward the wrong side, used spray adhesive to hold them in place, then stitched them down.


I traced the various appliqué pieces on their corresponding color fabrics, using a disappearing marker on the wrong sides of the fabric, and cut them all out.  I also freehand cut out: 

- (2) flower stems 1.5in wide by 18in high
- (1) flower steam 1.5in wide by 16in high
- (2) pairs of tall curving leaves about 1.5in wide by 12 in high that end in a point

I centered my three flower stem appliqués along the main rug fabric and used fabric adhesive spray to attach my appliqué fabric on the wrong side so I could be sure to have the right placement & no shifting while sewing.  

Next, I topstitched the appliqués in place, starting with the flower stems, then adding the leaves to overlap them and finally the flower petals, centers and bird.  I left a one inch gap in the circular centers and bird to stuff them with some polyfil using a chopstick and stitched the gap closed.  A dot of puff paint creates a little eye for the bird.


The last appliqué piece added was the brown soil strip at the bottom so that it covered the bottom ends of the flower stems.

To finish the rug I laid the smaller end of the back face down over the front, pinned the matching 3 sides and stitched them together.  Then I placed the wider back piece on, lining up its top, bottom and side with the front's, pinned & stitched.  This created the envelope overlap of a few inches for the back opening:


I turned it right side out and stuffed in my foam piece:


This rug is the perfect addition to my daughter's room and has got us all set for spring to appear outside too!


Thursday, May 24, 2018

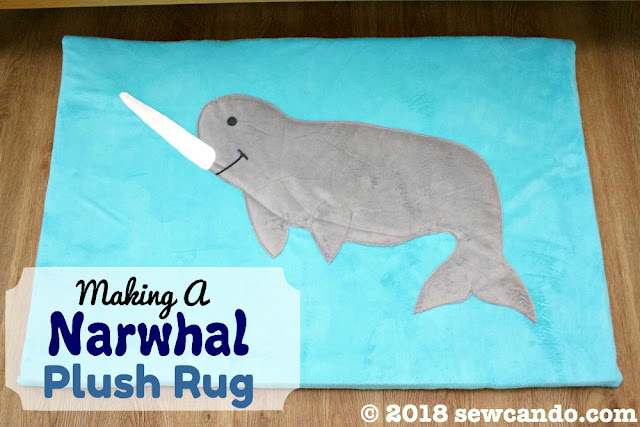
Making A Little Narwhal Plush Nursery Rug


Narwhals, narwhals swimming in the ocean...who doesn't love the unicorn of the sea, aka the narwhal?  I think they are so fun and are a favorite animal with the kids right now.  Even though our new baby's nursery isn't themed, I thought a fun rug with this sweet sea creature would be a good addition.  Enter my Little Narwhal Plush Rug


It's sized to go in front of the crib so this tired mom can be comfy while leaning over to tend to our new little guy.  It also doubles as a play mat/place to diaper change on the floor. Narwhal hugs!!  


The interior is foam to make it cushioned & supportive. The envelope exterior design means I can easily remove and machine wash the plush outer - unlike most rugs that can only be spot-cleaned.  In a baby or kid's room, machine washing is a necessity!  It's also inexpensive compared to most fanciful store bought rugs and because it's DIY-ed, it's even custom colored to match our space.


I used minky as my main rug fabric.  It wears well and is so cuddly and plush.  Perfect for a baby's room!  


For the narwhal's horn I used this silver foil flecked white fleece to add a bit of magic sparkle:


I even made the horn 3-dimensional so it would have the spiral look of the real thing:


Here's how I made ours
Materials:
- Minky fabric 1 1/2yds main, 1/4yd grey for narwhal
- Fleece fabric scraps
- 1yd 24 inch wide, 1 inch thick craft foam
- Paper for pattern making
- High loft batting, handful of polyfil
- Fabric adhesive spray
- Walking foot, heavy duty needle, disappearing fabric marker

I freehand drew a narwhal on paper & cut it out.  My drawing skills are usually awful but I think I got this one right.  I always use a paper roll from Ikea kid's department for big patterns like this.  My paper curled a bit from being rolled after cutting it out, so I used my notions to flatten it:


I cut my one inch thick foam to the final rug size of 36in wide by 24in high (my fabric measurements allowed for the thickness of the foam).  I started the rug by cutting my front & back pieces.  Making sure the nap was going in the same direction on all pieces was key.  

One main front piece was 38in wide by 26 1/2in high. For the back I cut two pieces,  a 14in wide by 26 1/2 high and a 31in wide by 26 1/2in high.  I folded the narrow & wide back pieces two inches toward the wrong side, used spray adhesive to hold them in place, then stitched them down.


I decided how I wanted the narwhal to be placed on the rug and traced the paper pattern with a disappearing marker:


After cutting out my narwhal from grey minky, 


I traced on the face:


Then stitched on the eye & smile I'd cut from some dark grey fleece scraps:


I cut a second narwhal from my high loft batting, but trimmed an inch off around it so it would be encased when I sewed the appliqué on.  


I used fabric adhesive spray to attach my batting to the appliqué fabric on the wrong side so I could be sure to have the right placement & no shifting while sewing.  Then I sprayed the joined narwhals on the other side of the batting, stuck them in the outline on the rug front and topstitched.


Next I stitched the horn in place, leaving a one inch gap and then stuffed that with some polyfil using a chopstick and stitched the gap closed.  Less is more with stuffing or it will make the fabric underneath pucker a bit.


Time for the swirl!  I drew some angled lines for the horn's swirl effect:


And stitched over them using my walking foot since it was bulky:


To finish the rug I laid the smaller end of the back face down over the front, pinned the matching 3 sides and stitched:


Then I placed the wider back piece on, lining up its top, bottom and side with the front's, pinned & stitched.  This created the envelope overlap of a few inches for the back opening:


I turned it right side out and stuffed in my foam piece:


The rug has worked great.  It's soft underfoot, adds some fun decoration to the room and washes great.  I'm not 100% in love with the angle of the horn though.  I thought it would fit better on the fabric tipped a bit higher than I originally drew it, but now I wish I'd left it alone...but since it sewed up easily, I could always pull it off the foam and make another if the perfectionist in me can't live with it.  I'm also debating adding a few more details to it, but for now, we're enjoying this special guy with our special guy.


LinkWithin

Related Posts with Thumbnails