
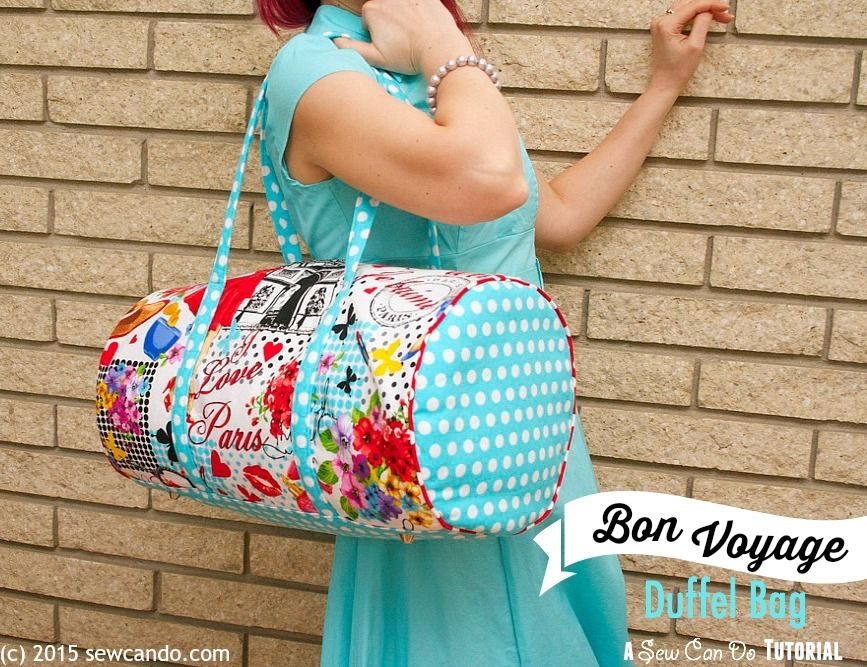
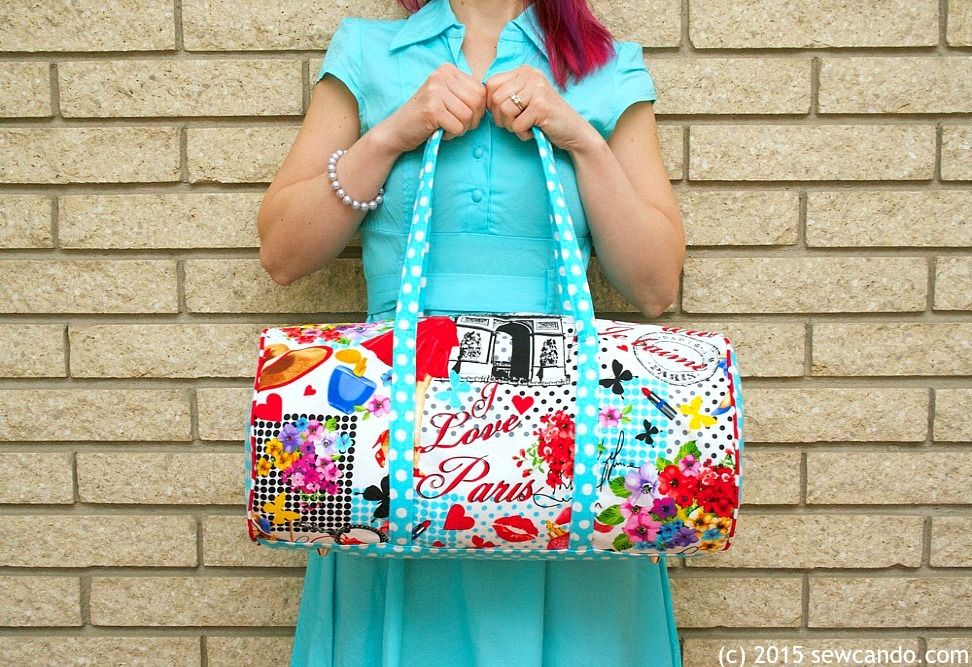
How about we get ready for summer with a brand new bag tutorial? I'm switching up the classic gym bag shape to be chic & fun for us stylish ladies in my Bon Voyage Travel Duffel Bag:
The handy 18 inch wide by 9 inch high size makes a great weekender bag for anyone wanting style coupled with lots of carrying room. I just took it on a weekend getaway and was able to get 5 full outfits in it! A girl's got to have extra fashion options, right?
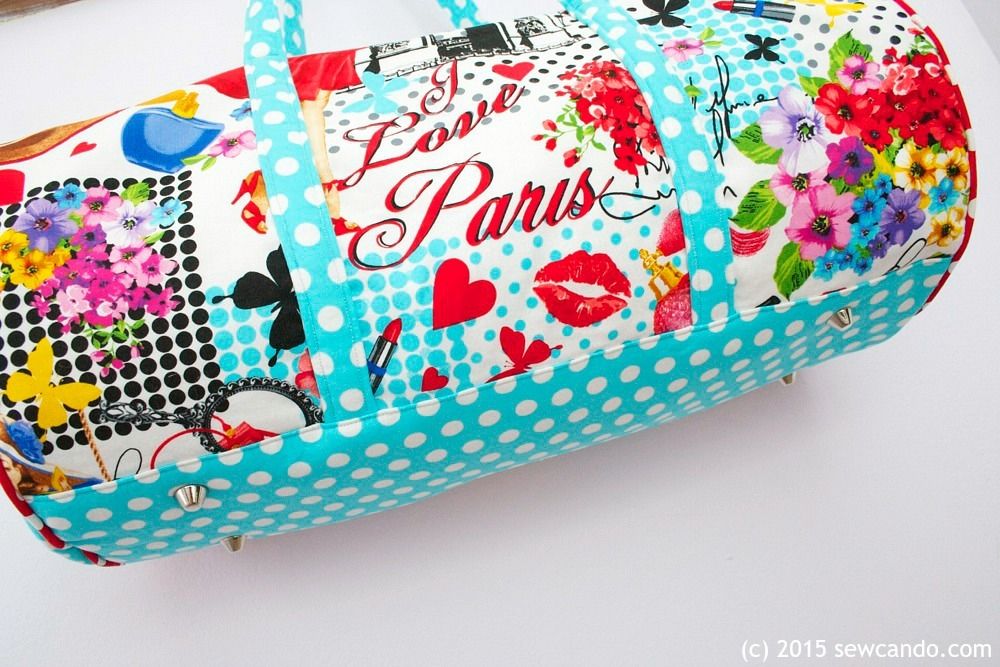
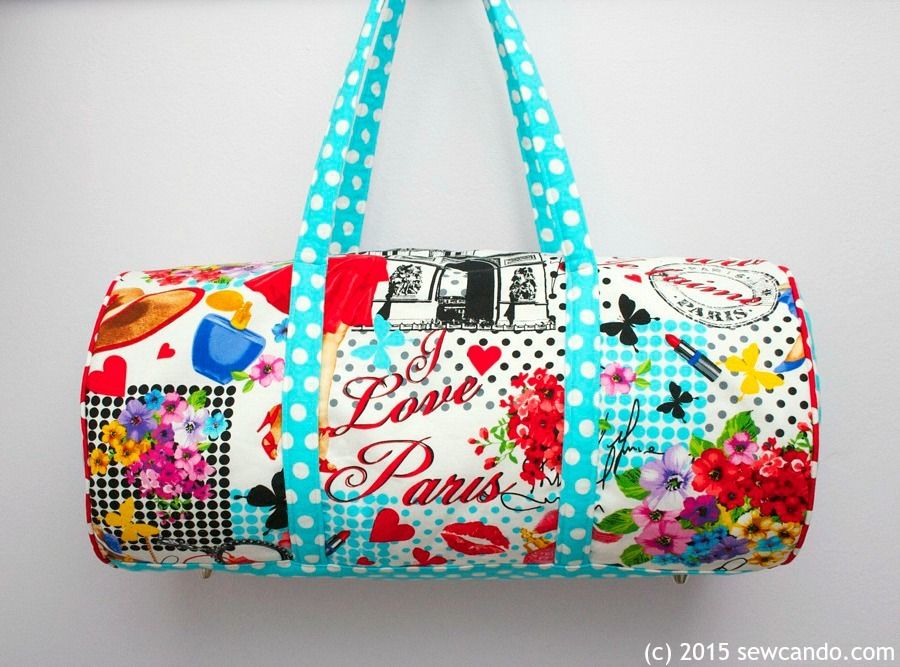
Purse feet give the bag bottom protection and some high end detail:
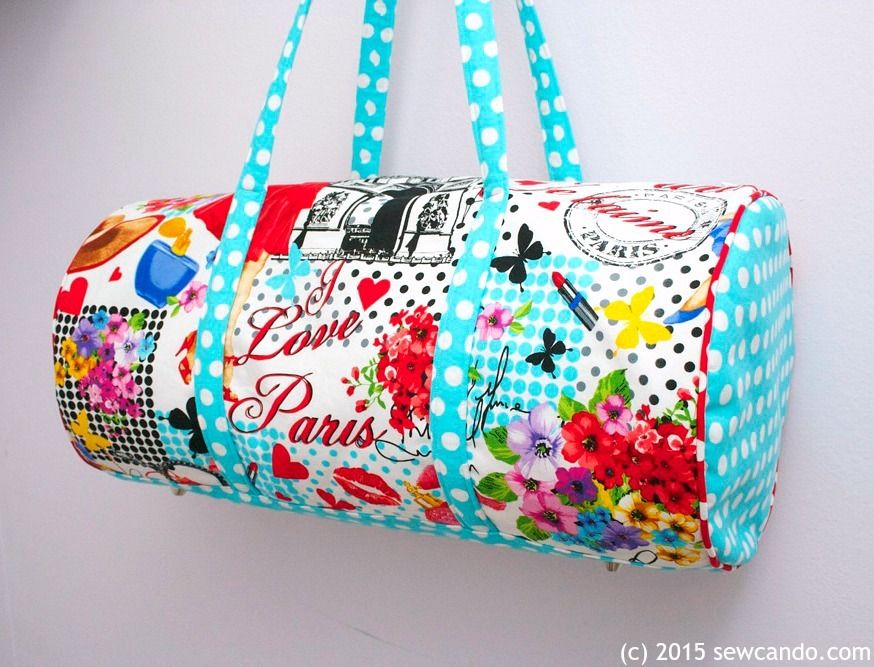
Full length zipper top closure means it's easy to get everything in and out of the bag:
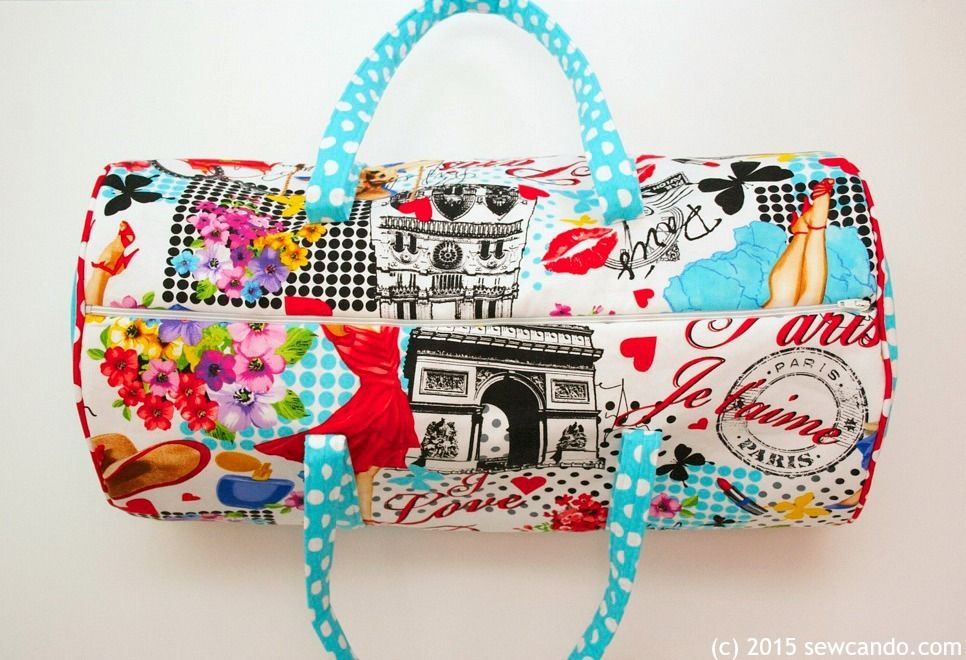
And custom piped sides with coordinated fabrics give an added bonus pop of color:

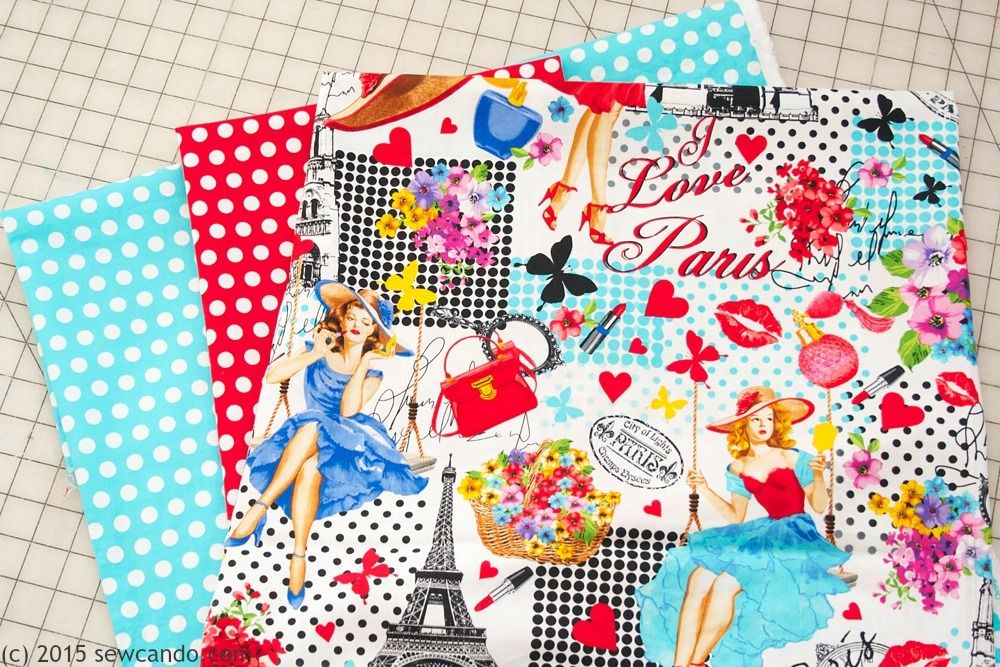
I created this as a guest project tutorial for Timeless Treasures blog to showcase their new Ooh La La fabric collection last week. Now I'm sharing it here at Sew Can Do. The colorful Tribeca Dots and Paris Pin-up Prints give a cool retro look:
Now, let's get to making the Bon Voyage Bag!
Materials:
- 1/2 yard Paris Pin-ups
- 1 yard Tribeca Dot in Aqua
- 1/2 yard Tribeca Dot in Red
- 2 yards 1/2 inch wide piping
- 1 yard Fusible fleece
- 4 metal purse feet
- 18 inch zipper
- Notions (zipper foot, pins, rotary cutter, iron, hand sewing needle, matching thread)
Seam allowance is 1/2 inch unless otherwise specified.
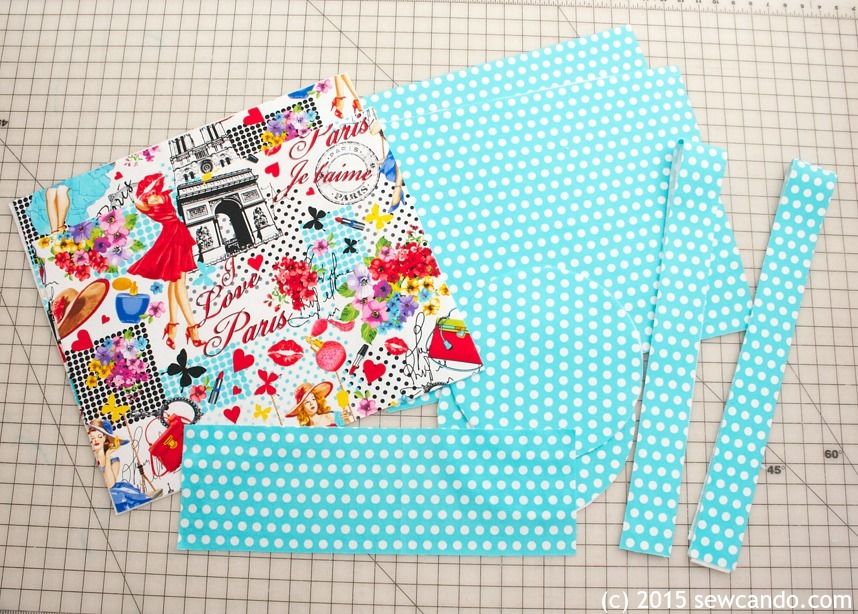
Cut the following pieces:
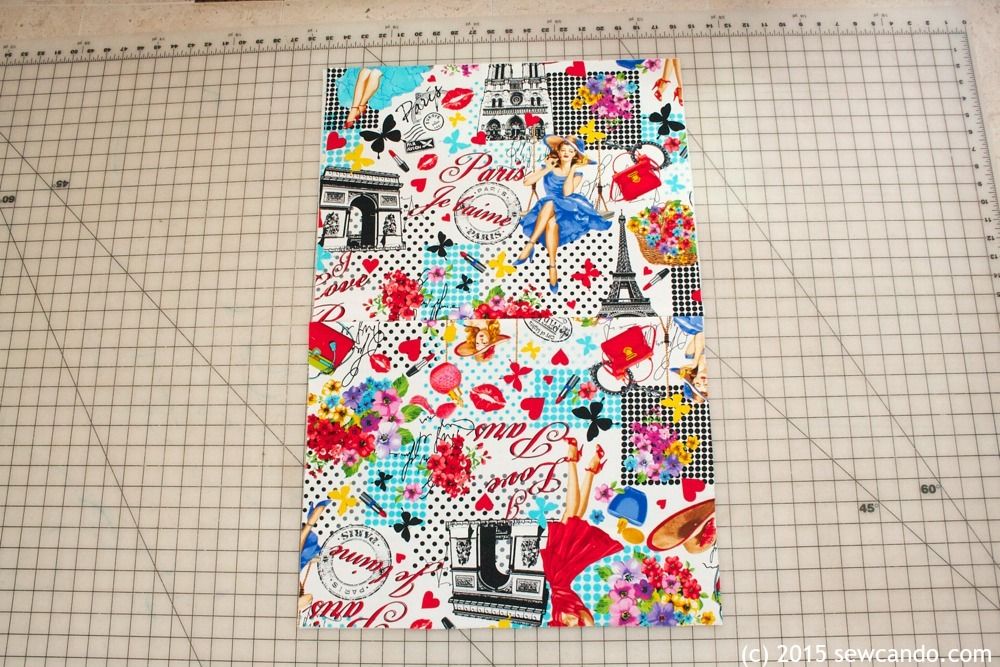
From Paris Pin-up
(2) Main pieces 19 inches wide by 15 inches high
From Tribeca Aqua
(2) Main pieces 19 inches wide by 15 inches high
(4) Circles 9 1/2 inches in diameter
(2) Strap pieces 42 inches wide by 2 high
(1) Bottom panel 19 inches wide by 6 inches high
From Fusible fleece
(4) Main pieces 19 inches wide by 14 1/2 inches high
(4) Circles 9 1/4 inches in diameter
(2) Strap pieces 42 inches wide by 2 high
(1) Bottom panel 19 inches wide by 5 inches high

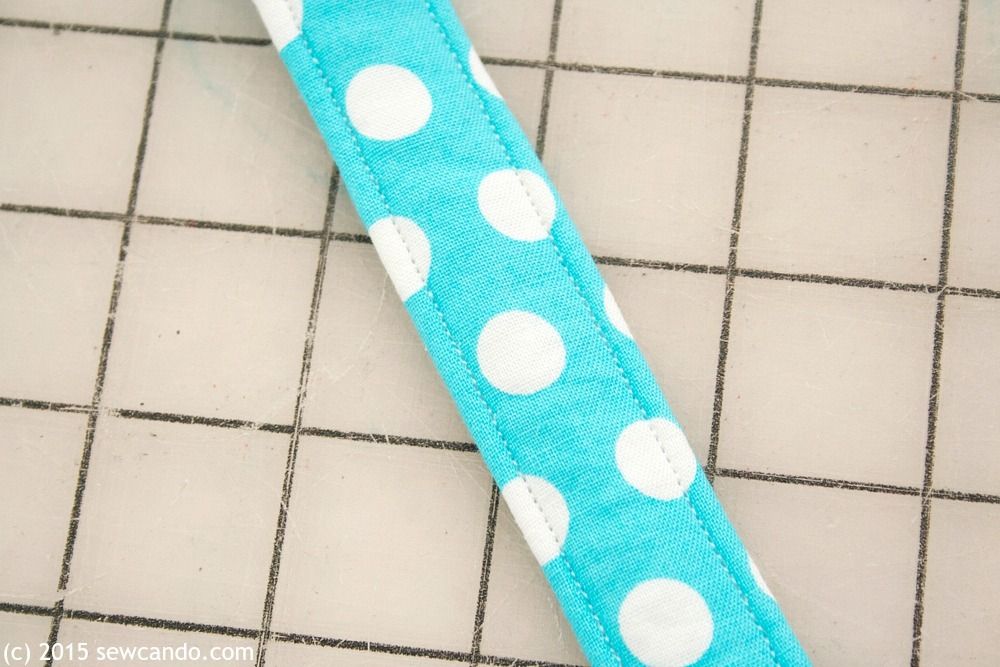
Start with the shoulder straps. Fold each lone strap in half lengthwise and stitch 1/4 inch from edge down one side. Clip corner and turn right side out with a knitting needle or pencil.
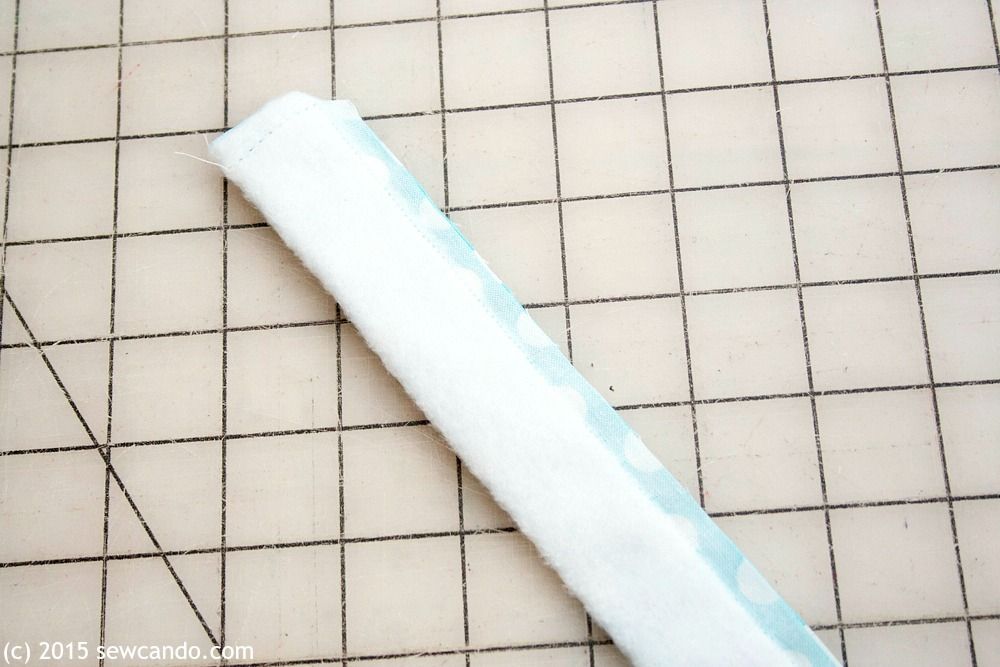
Press strap so that seam is in center.

Edge stitch along each strap.
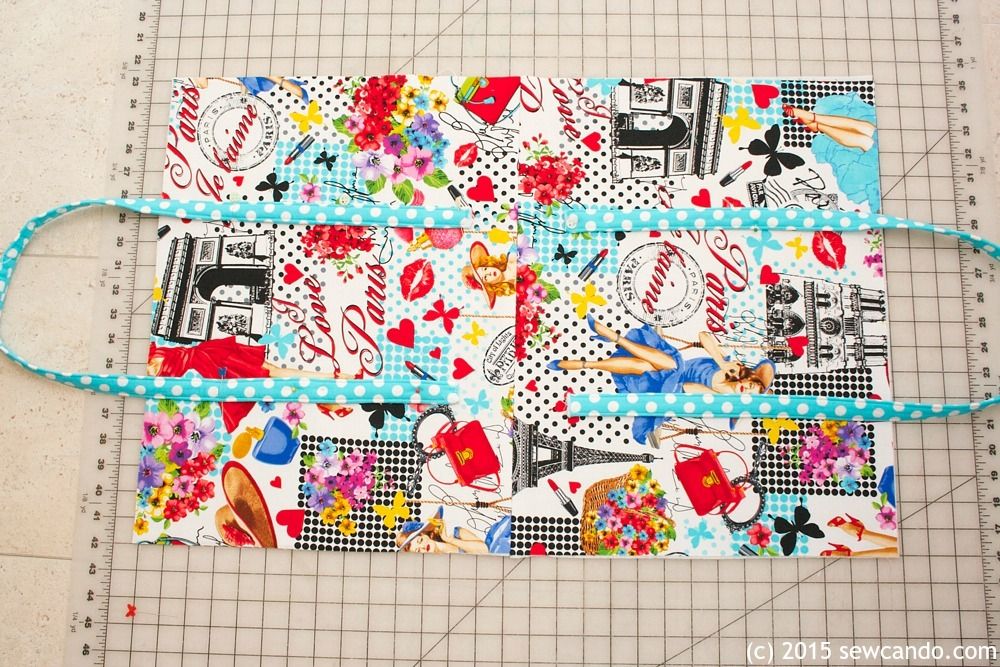
With right sides facing, stitch together the bottom edges of the two main outer pieces with a 1/2 inch seam allowance. Repeat with the lining pieces, but leave a 3 inch gap for turning. Press seams open.
Take outer and pin each strap so the ends are each 2 inches above the bottom seam and 6 inches inward from the sides. Stitch straps to main bag, stitching directly over the edge stitching, stopping 3 inches from top raw edge.:
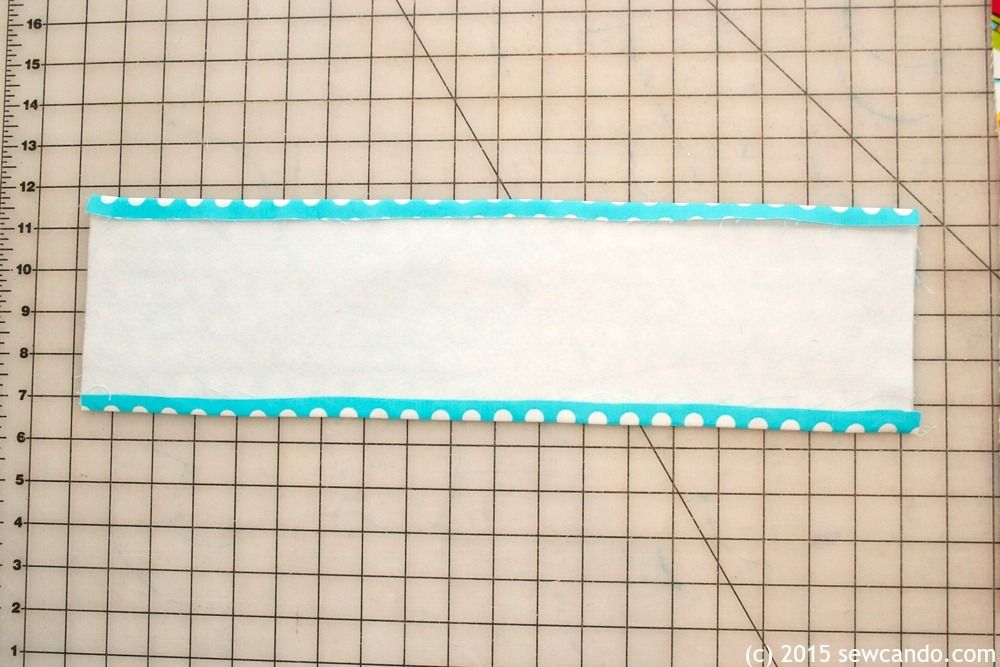
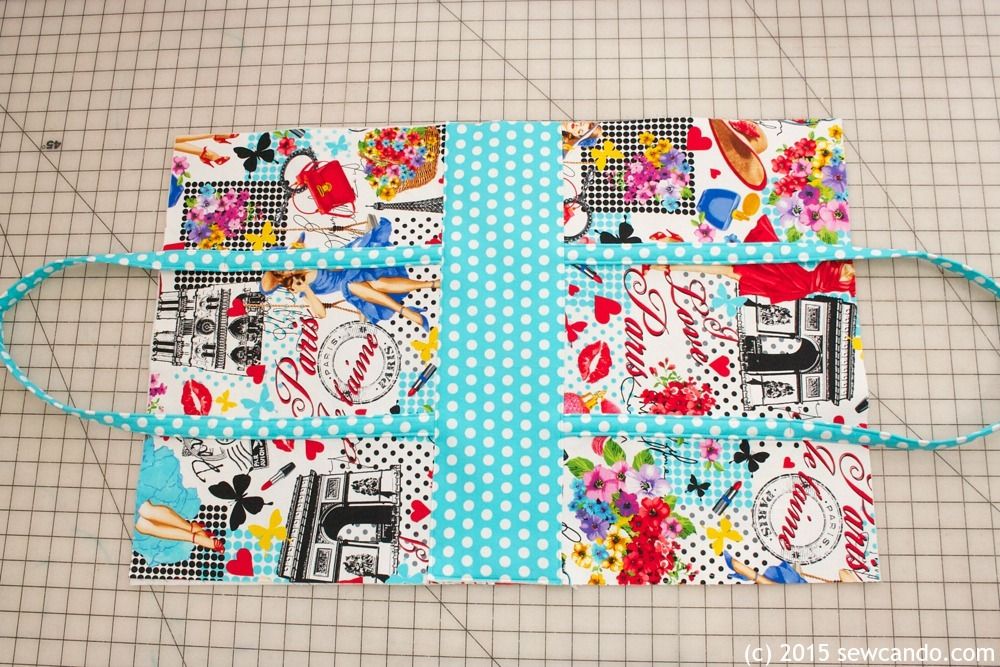
Take bottom panel and press the long sides under 1/2 inch:
Center the bottom panel over the main bag's bottom seam, pin, then edge stitch in place.
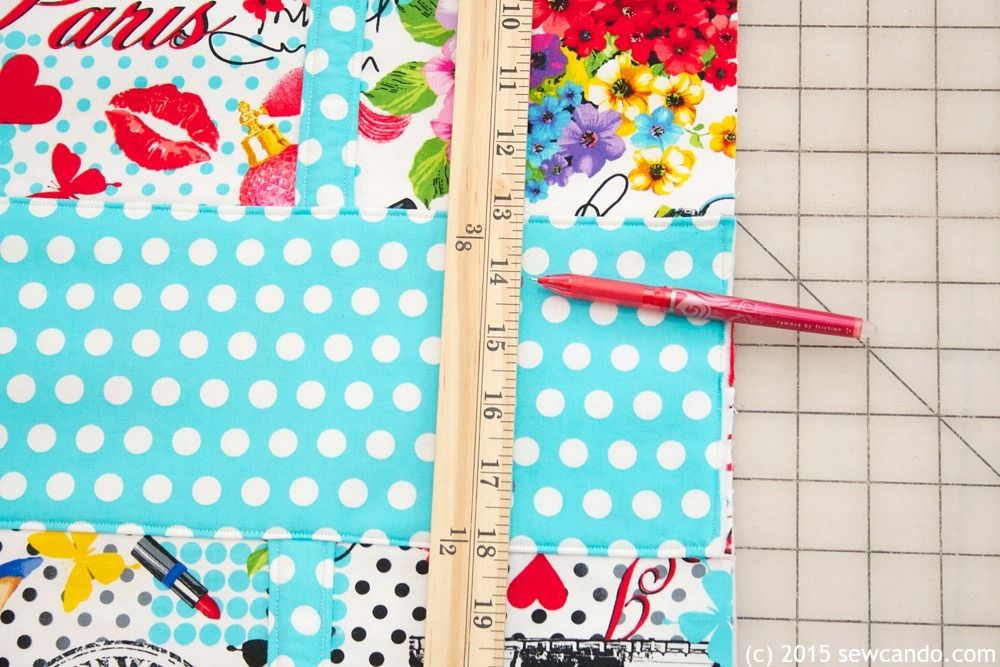
Now it's time to attach the feet. Measure 3 inches inward from each side and 1 1/4 inches from the top and bottom of the bottom panel and mark the placement.
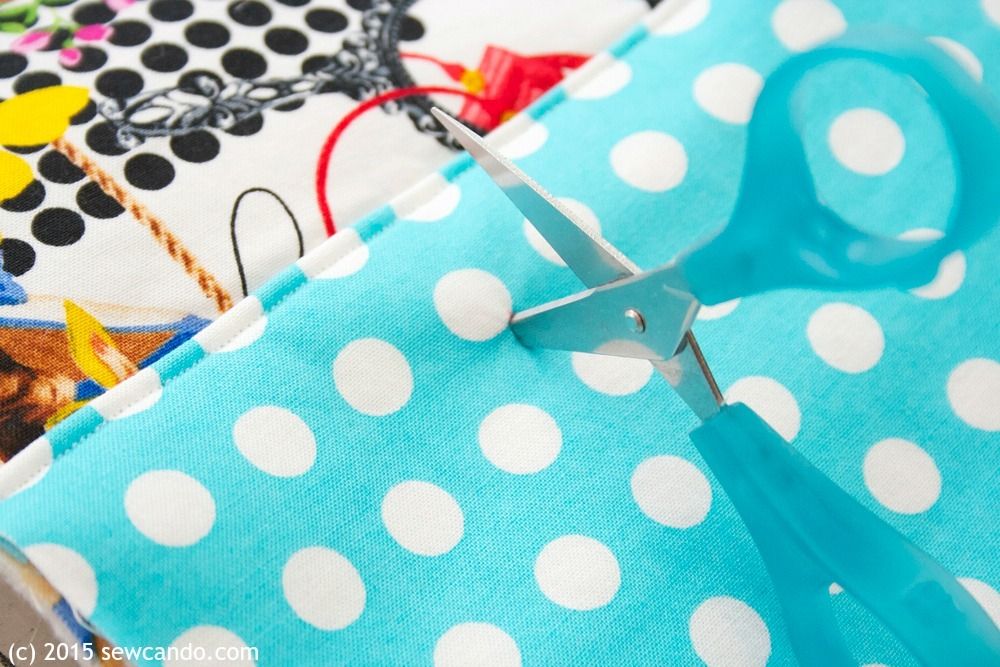
Use thread scissors to carefully make a small slit through each marking:
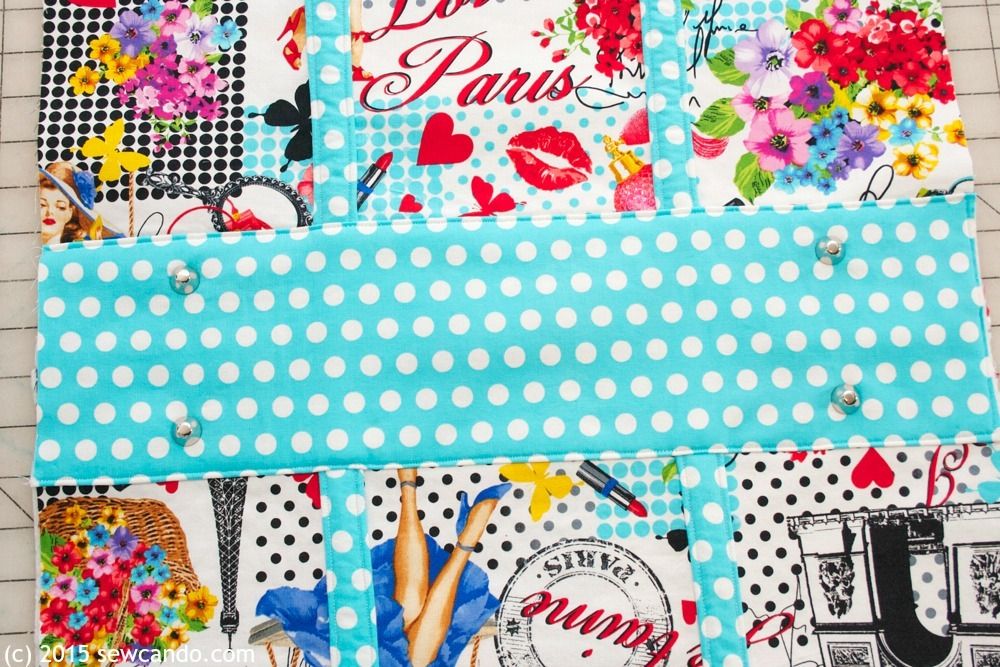
Insert purse foot with prongs pressed together and slip washer over them. Push prongs open and flat.

Repeat with remaining 3 purse feet.
To make the custom piping, cut (2) 1 inch wide strips on the bias from the Tribeca Red fabric. Note: Cutting can be done at a 60 degree angle, instead of the usual 45 degree, to get the full length needed out of a 1/2 yard cut.
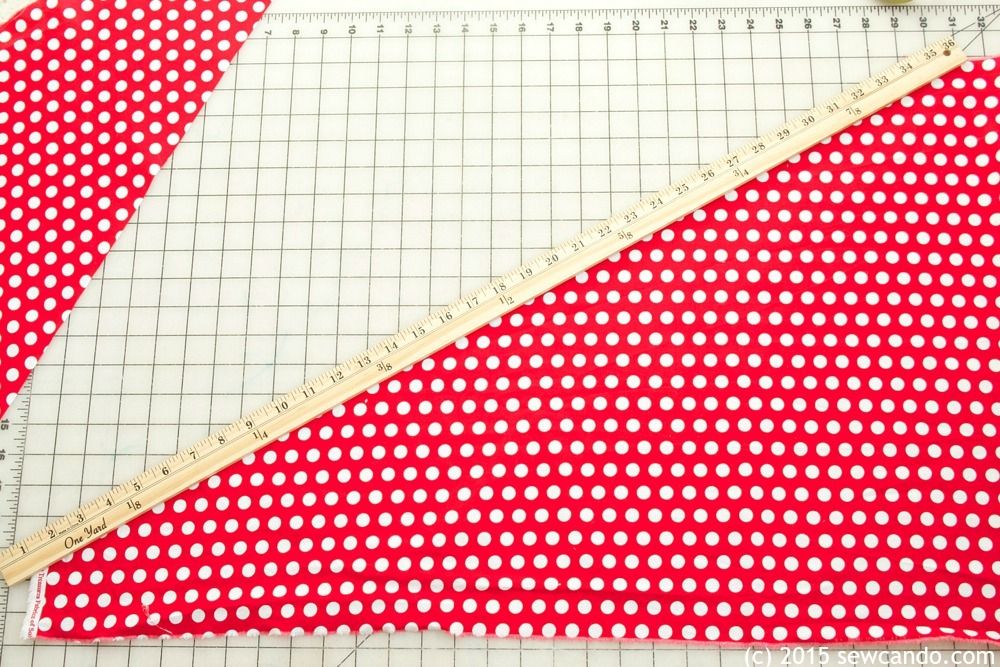
Trim the strips and two pieces of basic piping to be at least 28 inches long.

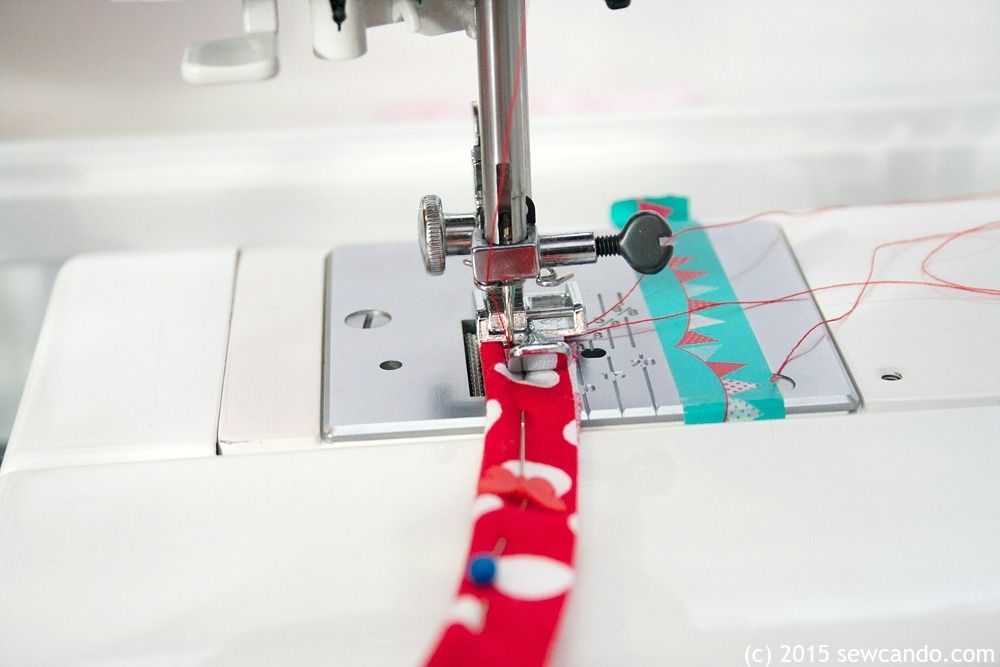
Wrap strip around piping and pin into place. Stitch close to cording of the piping using a zipper foot.
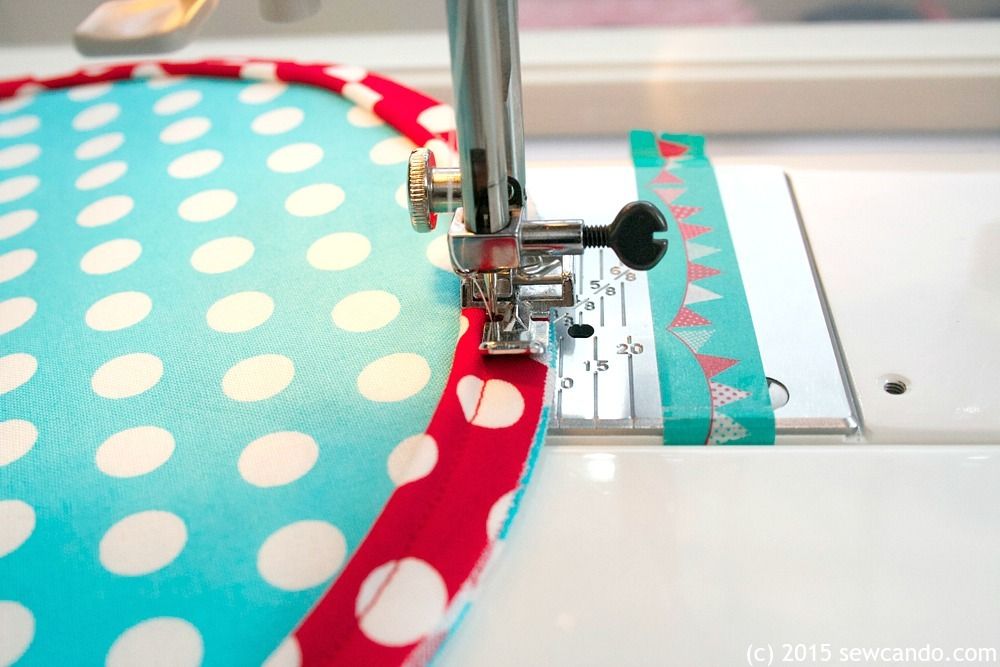
With raw edges together, stitch piping to outer bag circles, again using a zipper foot, starting 1/2 inch from the starting end (this will be key for finishing):
Upon reaching the end, overlap the raw ends, slightly downward and stitch into place as shown:
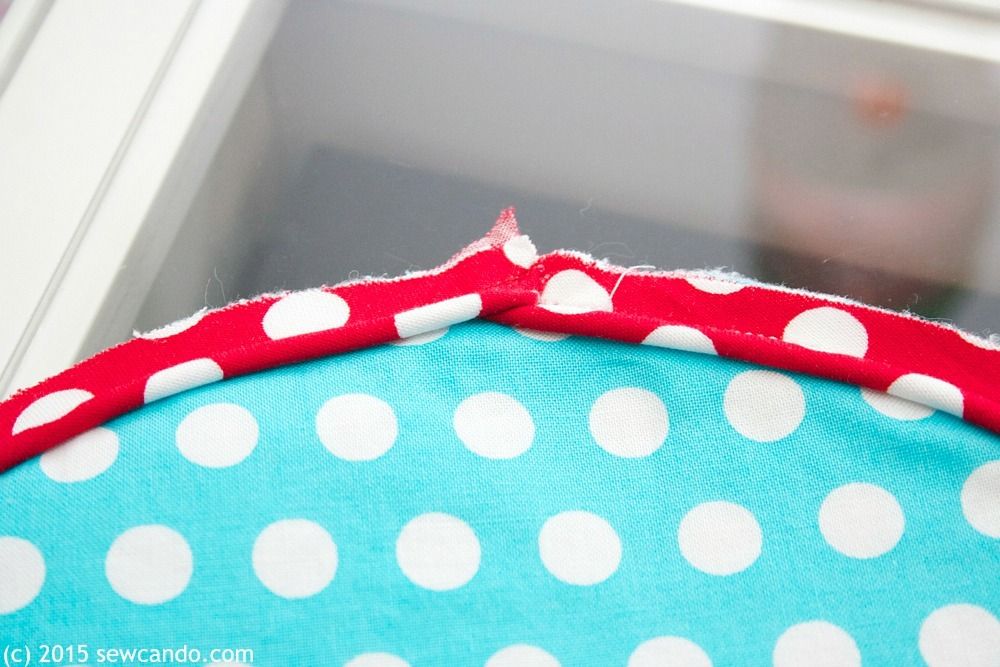
Now the outer circle sides are nice & piped:

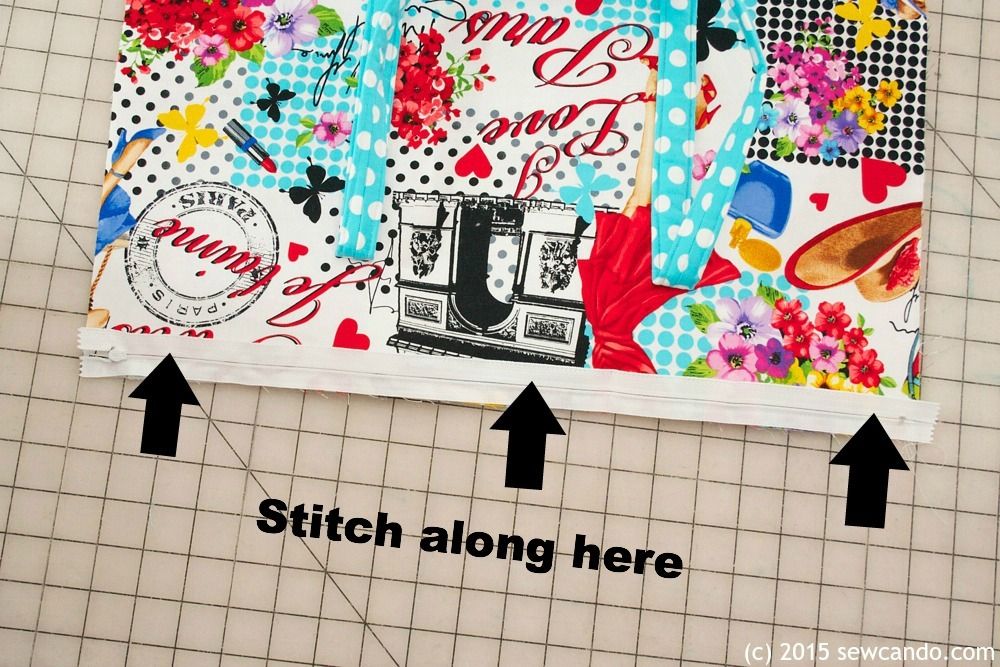
Time to attach the zipper. With zipper facing downward, pin zipper tape along the top raw edge of one side of the main bag. Stitch along close to zipper teeth, leaving 1/2 inch length unstitched at start & end.
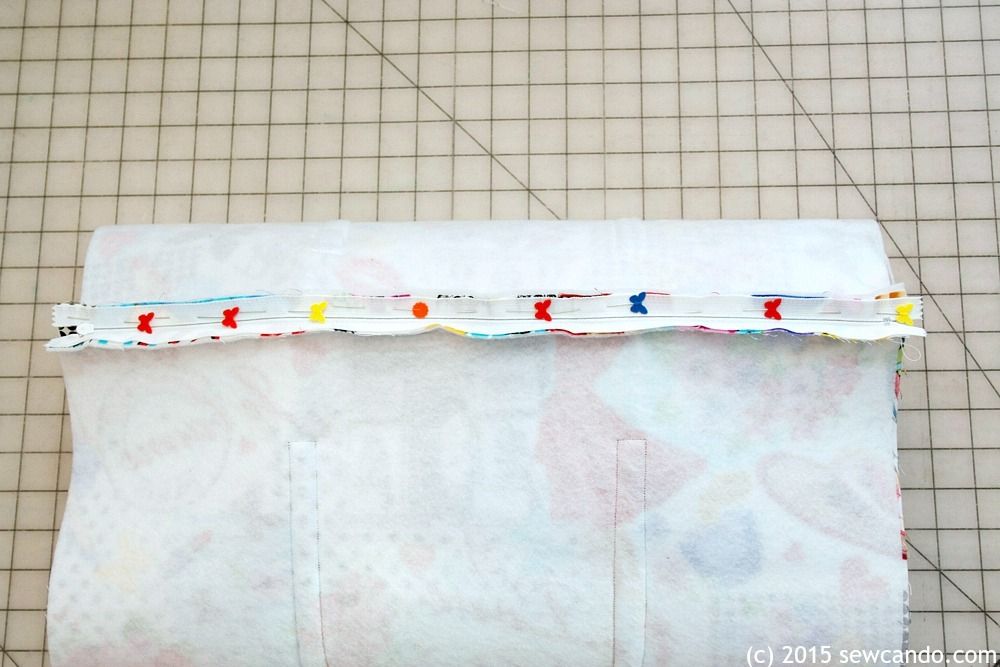
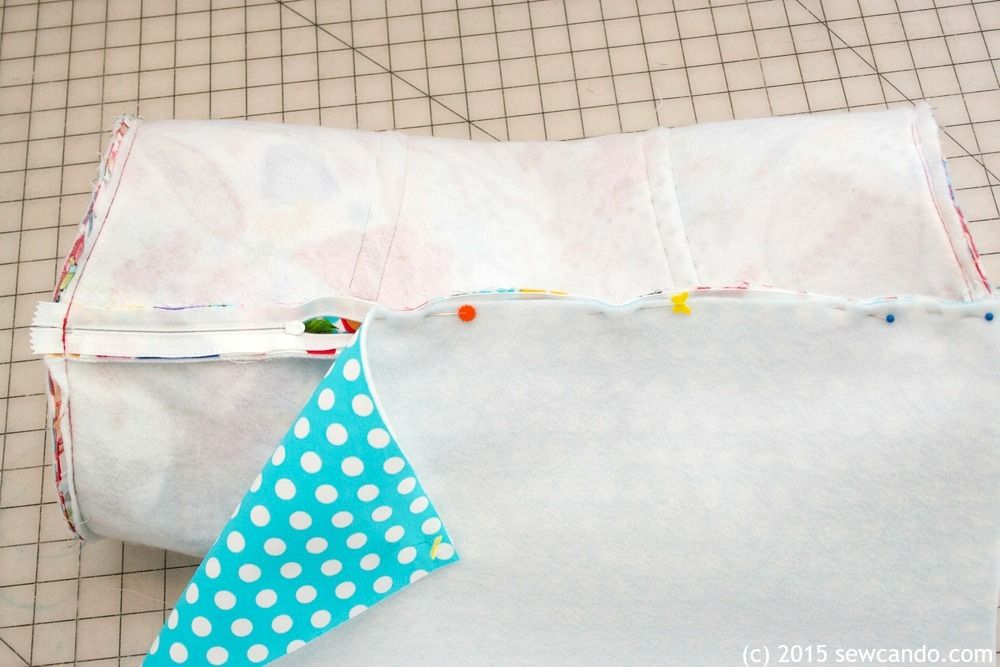
With right sides facing, pin each side circle to the newly made cylinder. Stitch on top of the stitching of the piping.

Clip around curves, careful not to clip into stitching:

Time to assemble & attach the lining. With the right side of the fabric facing down, pin one side of lining to the seam allowance of the already sewn main bag and zipper as shown and stitch over existing stitching with zipper foot.
Pull remaining raw side of lining to other side of zipper seam and repeat. Now the lining will appear to be a tube connected at the zipper to the main bag:
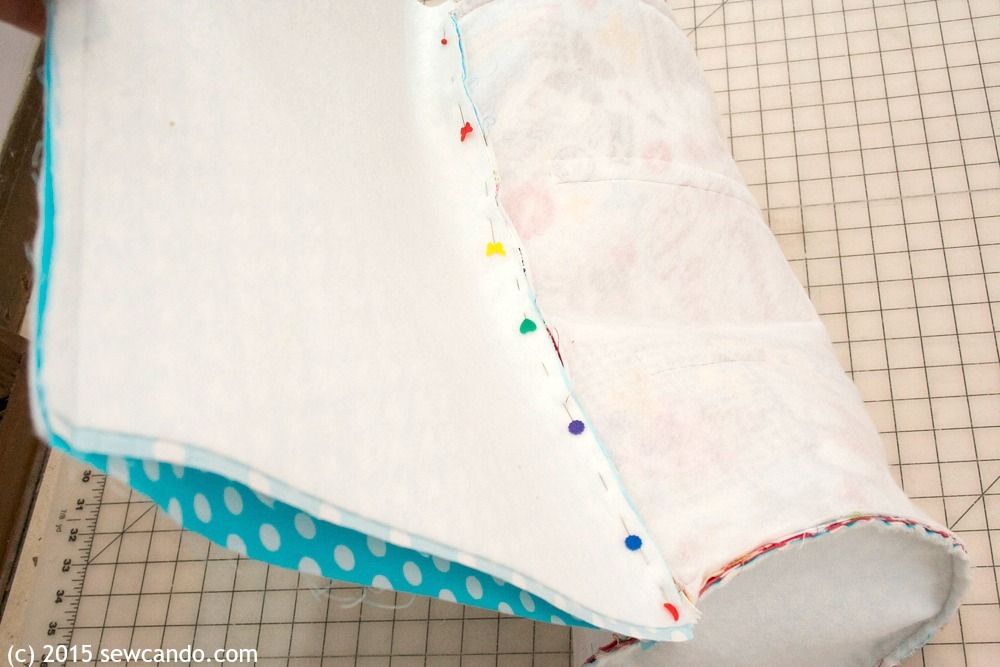
Attach side circles as done previously. It will now look like to bags connected at the zipper. Carefully pull the right sides out through the gap in the bottom of the lining.

Then slipstitch the gap closed by hand and push lining inside of the main bag.

Now the Bon Voyage Duffel Bag is ready for you to start traveling and looking glamorous!
Where would you carry the Bon Voyage Bag?

This is the CUTEST bag ever! That fabric is amazing! Thanks for the tutorial. Pinning it!
ReplyDeleteGina
Thank you very much Gina. The fabric totally inspired the design...it was whispering "We need to be turned into a bag." ;)
DeleteUmmmm this is super adorable! I have been having a serious lack of sewing inspiration lately (like almost depressing)--this is the first thing I've seen recently that I thought "Oh Ok! Yes that's happening!" so thank you!
ReplyDeleteBethany that is the ultimate compliment - thank you! I get like that myself and love when something gets me "back in the saddle". So glad my bag did that for you:)
DeleteBoth practical and very pretty. I would love to carry this to Paris. Great tutorial, Cheryl!
ReplyDeleteThanks - it's hard to resist the chic French print!
DeleteI just saw this on the Work It Wednesday Linkup and I am amazed! This is gorgeous. Beautiful work!
ReplyDeleteJacquelyn from www.diydesignmom.com
What a beautiful bag- thank you so much for sharing. Love it!
ReplyDeleteI love the Paris Pin-up fabric! This is such a lovely bag! I'm pinning it!
ReplyDeleteNavy Wifey Peters @ The Submarine Sunday Link Party
That's very appreciated - I've linked it up to your latest Submarine Sunday too.
DeleteThat is the cutest bag! I love the fabric you chose!
ReplyDeleteSo cute and creative! Thanks for sharing with the Thursday Blog Hop!
ReplyDeleteLove, love, love the bag! I'm pinning this for sure because I have to make one or a few of these.
ReplyDeleteThanks for the pin and so happy the bag has gotten so much love from my fellow crafties.
DeleteLove the bag love the fabric Thanks
ReplyDeleteThank you for sharing this wonderful diy at the Thursday Favorite Things blog hop. Watch for your feature on Monday xo
ReplyDeleteThanks so much Katherine - it's an honor to be featured:)
DeleteSupe cute! great tutorial!
ReplyDeleteYour construction technique of stitching the bottom over the pretty fabric is brilliant! I would have tried piecing them together and missed out on all the extra added strength.
ReplyDeleteI've learned through experience when it comes to making bags;)
DeleteI love this bag! Thank you for the tutorial!
ReplyDeleteFabulous Cheryl, and really great tutorial, thanks for sharing on craft schooling Sunday!
ReplyDeleteI always love linking to your party on Sunday Sara:)
DeleteThat is such a beautiful bag!!
ReplyDeleteLove the material you used too..
Thanks for sharing at Creative Mondays
I really appreciate you tweeting about it - thanks so much and for hosting Creative Mondays.
DeleteThat is one of the cutest things I've ever seen in my life! I love the fabrics, and the design is perfect! You are so talented. Saw your link at The Dedicated House.
ReplyDeleteMary
Aw, thanks Mary - I think you just made my day! Glad you saw me there:)
DeleteI love the fabric you've used. I'm curious about the bunting tape on your sewing machine!
ReplyDeleteIt's actually washi tape that I use as a measure marking for extra wide seam allowances.
DeleteThis is darling!
ReplyDeleteThank you for sharing this at Brag About It Link Party on VMG206.
~ Megin of VMG206
This is seriously the cutest bag ever! I'm a novice sewer, but this looks like a fun project to try!
ReplyDeleteIt's something a beginner could do for sure (and option to leave off the piping for an even easier assembly).
DeleteI love this duffle bag! If I win the giveaway, I'd make this duffle with it, I love that fabric!! I'd also make the Essentials Wallet from Crafty Gemini's Quilt Club! That fabric would be perfect! Time to add your Duffle to my project list! Thanks!!
ReplyDeleteI would take it to Paris...of course!
ReplyDeleteYour tutorial looks like making is bag is super easy. ! The red dot fabric is just adds so much pop to the wonderful fabric, fun, fun fun!
A fabulous bag, Cheryl - great style and gorgeous fabric!!! Polka dots and piping - perfect.
ReplyDeleteThank you for this awesome tutorial. This is such an awesome duffle bag and the fabric is fantastic. Well done! :)
ReplyDeleteIt's just lovely! The fabric choice is a delight!
ReplyDeleteI'm in love with this! Thank you for sharing this with us! Pinned and tweeted! I hope to see you at tonight's party. We are always so impressed with your creations and can't wait to see them! Lou Lou Girls
ReplyDeleteThis is amazing! Thank you for sharing. You are one of the features at the Make it Pretty Monday party at The Dedicated House! Here is the link to this week's party. http://www.thededicatedhouse.com/2015/06/make-it-pretty-monday-week-140.html Have a wonderful evening. Toodles, Kathryn @TheDedicatedHouse
ReplyDeleteHi Cheryl! The Weekly Feature Series is live which you are apart of. Here is the link so you can check out your feature. http://www.thededicatedhouse.com/2015/06/weekly-feature-series_26.html Hope you are having a lovely weekend. Toodles, Kathryn @TheDedicatedHouse
ReplyDeleteGorgeous bag, thank you for sharing
ReplyDeleteOh my! Gorgeous! Thank you for sharing!
ReplyDeleteI just finished making this bag for my daughter to use for dance. It turned out cute, but I had a hard time with it. This was my first bag, so I expected some of it to be hard, but the 1 yard cut of fusible fleece wasn't enough, and I had to piece scraps together to cover all the pieces. The other issue I had I never did figure out. HOW did you make such narrow straps, line them with fleece, and manage to turn them right side out? I finally cut 2 extra strips of the strap fabric and made the straps twice as wide. It was still hard to turn them with the fleece, but doable. I couldn't even get the narrower version in the pattern to start to turn, let alone do the whole length. Maybe there's a trick I don't know? I mostly sew quilts. :) Thank you for sharing this tutorial! My daughter is thrilled with the bag, and it gave me the confidence to try another zipper bag. Maybe without straps, though. :)
ReplyDeleteHi Helen,
DeleteIf you've never made a bag before, this is definitely a challenging project, so pat yourself on the back! There are a lot of details & techniques here that are not beginner level. I used fusible fleece that came 45" wide, which should give you enough. The strap pieces should turn ok if using something narrow like a pencil or knitting needle, but making them a little wider works too. I also have a similar bag tutorial here but using a single strap that would be much easier for a second bag try: http://www.sewcando.com/2016/04/tutorial-time-little-dancer-ballet-bag_27.html
I would never try to make straps that you have to turn. What would be easiest is to cut strips the length you need, but make them 5-6" wide. Fold in half lengthwise and press. Open up and fold each side in toward the center and press. Tuck a strip of fusible fleece under one of the flaps. Then fold the whole thing in half along the original center fold and stitch up the open side and the other side for symmetry. Easy peasy.
DeleteAnd you're free to do that Ashley. This is one way to do it, I've just presented another. Some machines can struggle sewing through that many layers with the folding, but whatever someone is most comfortable doing is fine as the finished result will look nearly the same.
DeleteI found it impossible to turn the narrow fleece-lined strips. I gave up and used Ashley's method. I used a 1" strip of batting tucked inside. Fusible fleece is not necessary. My walking foot made stitching easy.
DeleteI made it!! Turned out rather nice. Used webbing for handles. First time working with piping, I used 3/16" Dritz cable cord and wrapped with 1 1/2" fabric. My lining seem a bit large, I might try an inch less fabric for this.
ReplyDeleteAll in all very pretty. Thank you
Great to hear Cindy. Would love to see it!
DeleteIf I make the handles long enough I could wear this like a back pack!
ReplyDeleteIs there a printer friendly version of these instructions?
ReplyDeleteYou could export it as a pdf file or just printing from your browser.
DeleteI'm not finding this fabric.....
ReplyDeleteThis post is from 3 years ago, so that fabric collection is no longer in print from the maker. I'd say try searching for it to see if there are any small shops that might still have some available. Etsy too.
DeleteI want to make this bag but I need to be able to print out the instructions. I'm not able to have my computer at the sewing machine. Is there a PDF or print button?
ReplyDeleteHi Sharon, you could do a control-P to print it all. I'd recommend doing two sided printing to save on paper.
DeleteLove the free pattern as it's quick and easy to sew thank you
ReplyDeleteThank you Charmaine. I'd love to see your bag if you want to email any photos to cheryl@sewcando.com :)
DeleteThanks for your post. I made one up for my granddaughter and its amazing.
ReplyDeleteThat's wonderful to hear Debby! I'd love to see it if you want to email a photo to info@sewcando.com - I'd love to feature it!
Delete