


Today's project is one I've been dying to share! I'm getting a head start on my holiday crafts with these Gilded Reindeer Vases. I received a box of multi-surface craft goodies from Martha Stewart Crafts for making something special for the holidays and they got me inspired to try something totally new to me: gilding. And believe me, once you get the hang of it, it's pretty simple and addicting!
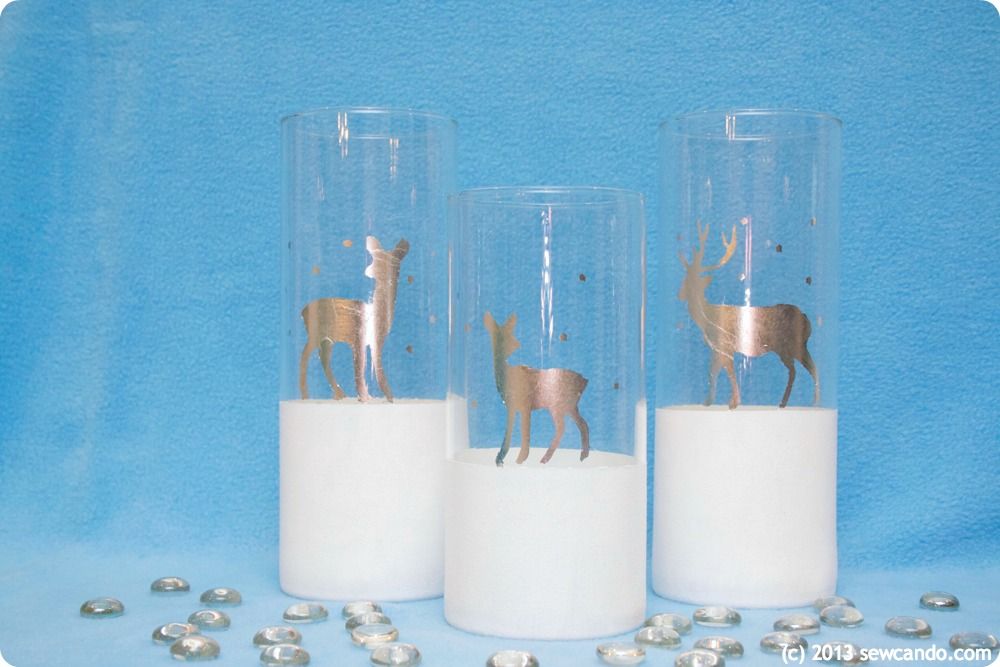
With a few key supplies I transformed some plain glass vases into a trio of snowy reindeer that look more like something from a fancy catalog than DIY from the dollar store. And they've got that special holiday sparkle thanks to the silver gilding on the reindeer:

As well as the glittery finish of freshly fallen snow below:

Now let's get started on the reindeer crafting magic!

Materials Needed:
- Glass vases (mine are from the dollar store)
- Martha Stewart Crafts Gilding sheets in Silver
- Martha Stewart Crafts Gilding Adhesive & Gilding Brushes
- Martha Stewart Crafts Paint in Wedding Cake White & Basic Brushes
- Martha Stewart Crafts Decoupage Medium in Glitter & Decoupage Brush
- Martha Stewart Crafts Christmas Icon Stencils
- Painter's tape
- Rubbing alcohol & paper towel
- Optional: Martha Stewart Crafts Gilding Gloves, razor blade
* You can find Martha Stewart Crafts line in-store at Michaels or in Plaid’s online store.
Critical first step: start by cleaning the surface of the vases with rubbing alcohol & a paper towel. This will remove any residues or oils that will prevent the paint & gilding from adhering. Tape around each vase at the point you want the snowy ground to start.

I like to work on a piece of waxed paper since it's an easy, disposable work surface. I just put a blob of paint right on it and work from there and then toss it when done. I brushed on a layer of paint in vertical strokes. When it dried I did the next two coats horizontally so the brush strokes wouldn't be as noticeable and there was good coverage.

Once all the painting was dry, I did the same layering job with my glitter decoupage medium and then peeled off my tape.

Then I taped on my stencils just above my snowy ground. It's a little tricky to use these stencils on a rounded surface, but I really loved these reindeer, so I was determined to make it work. The gilding brush set includes a brush for painting on the adhesive so I used that to carefully brush on the clear adhesive. A little goes a long way so don't be too generous or it could seep under the edges of your stencil (I learned that the hard way). To make it easier to avoid that around some of the edges, I pressed down the stencil in that area with one hand while I dabbed my adhesive with the other. Then remove the stencils and allow the adhesive to set for about 20 minutes. It should feel nearly try and a little tacky to the touch when ready.

I slipped on my cotton gilding gloves and took a sheet of gilding from the pack, careful to keep the tissue backing paper on, and laid it over my adhesive.

Then I smoothed the gilding down with my hands and pressed with a circular motion to make sure it adhered to the adhesive and let it sit for an hour. It was SO hard to be patient and wait to see the results!!!

Then came the fun part: the reveal. I removed the tissue and carefully brushed at the gilding with the fluffy, round gilding brush. Any bits that weren't glued to my design began to break and flake off. This is the part where the gloves really come in handy. The gilding is very fine and will definitely stick to bare hands, so cleaning up was much easier thanks to the gloves.

I used a razor blade to carefully scrape away any spots where adhesive snuck out of the stencil and make some of the edges look cleaner. They add some holiday style as they are, filled with seasonal greens or filled with candles and can be grouped together as a centerpiece or spread out on a mantel. Lots of decorating options!

- Follow Plaid on Facebook
- Sign up for Plaid's Newsletter
- Follow Plaid's Martha Stewart Crafts board on Pinterest
And check out more project tutorials made with some of these items:

I'm also sharing this with my FAVE LINK PARTIES.
Click HERE to check them out!
Beautiful!! I really love the way that these look. Great job, Cheryl.
ReplyDeleteI love that they work for the holidays, but are seasonal enough to keep out in January & February too.
DeleteThese are adorable!!!
ReplyDeleteThese turned out so great! I am loving everything reindeer this year. Nice Job.
ReplyDeleteTammy @ the colored door
Thanks Tammy. I feel the same way - I'm all about reindeer themed things too!
DeleteWow! These are super adorable. I'm super not crafty so I hadn't even heard of gilding before. I'm going to have to find out more because this these are adorable.
ReplyDeleteI'd only heard of the pricey kind that used real gold leaf, so I was thrilled to discover this stuff, which is very affordable and easy to use. I just instructions in the package and dived in!
DeleteCheryl, these looks awesome! I love how you combined techniques!
ReplyDeleteIt was a great way to maximize the holiday glam for minimal effort;)
DeleteHi Cheryl!
ReplyDeleteThose are adorable and I know will look lovely on your mantle or kitchen table this season and for years to come! Great tutorial too (and tips on keeping it clean!). Thank you so much for joining my party and sharing your craft!
Blessings,
Doni
Thanks so much Doni - my only problem is deciding where to put them because they work in so many places!
DeleteThese turned out fabulous!! Especially love the gilded reindeers! I've been wanting to give gilding a try. It's definitely on my to do list. Thanks for the tips!
ReplyDeleteYou'll love it when you try it Maysem. I always thought it was expensive and complicated, but it wasn't at all and it's a lot of fun too.
DeleteCheryl these are GORGEOUS!! Pinning and sharing everywhere - xo
ReplyDeleteTanya
twelveOeight
Thanks so much Tanya - I really appreciate that!!
DeleteThese turned out beautifully! Great work. Thanks so much for linking up to The DIY'ers!
ReplyDeleteSo pretty! I thought the white snow was a candle. I like the painted snow better though because as a candle burns down the deer wouldn't be standing on it anymore. Thanks for sharing at Gingerly Made's Show & Tell.
ReplyDeleteThese are beautiful! I absolutely love them!!! You wanna make me a set?? You are a Fabulous Feature this week darlin'! Thanks for sharing your amazing work with me :)
ReplyDeleteThose vases look sooo pretty Cheryl!
ReplyDeleteThanks for linking to a Round Tuit!
Hope you have a fabulous week!
Jill @ Creating my way to Success
http://www.jembellish.blogspot.com/
Absolutely beautiful. I've never tried Gilding but you make it look very do-able, thanks
ReplyDeleteI love these! Silver reindeer? Never even thought about it - but I love them!! Wish I wasn't boycotting Martha for dissing bloggers and hoping I can find the supplies elsewhere, LOL. Thanks so much for sharing!
ReplyDeleteKim @ {enjoy the view}
very pretty!!!
ReplyDeleteThese are gorgeous! I featured them on my Pink Hippo party.. hope you stop by at http://pinkapotamus.blogspot.com/2013/11/pink-hippo-party-four.html
ReplyDeletexoxo
Amie @ Pinkapotamus
Thanks so much for sharing with Wednesday's Adorned Link Party. Have a great Thanksgiving.
ReplyDeleteDebi and Charly @ Adorned From Above
http://www.adornedfromabove.com
I love these! Perfect for the holiday! Pinning! :)
ReplyDelete