Sunday, September 30, 2012

Craftastic Monday Link Party

Hey Crafty Friends.  Can I just say how much I need a fresh, new week right now?  You know the phrase "When it rains, it pours."? Well, I feel like I've had a bucket dumped over my head recently.  Unexpected setbacks on projects, stressful home renovations and some other troubling issues I can't go into right now have worn me down and out, so I'm sorry if I don't seem as together as usual for a little while.  I hope seeing all your wonderful ideas and sweet party comments will help me get re-charged and look positively at what's to come:)

Now let's see some of the fantastic links from last week:   

Easy Peasy Grandma shared her adorable pink pirate knit hat.  I just love the flower accent on the kerchief part:
Alderberry Hill showed this cute countdown to Halloween plaque:
Another great Halloween-themed idea came from Dresden Carrie with this festive glitter felt wreath tutorial:
For some cuteness overload check out this Minnie Mouse-themed Cozy Coupe at Little Corbin Hill:

And now for the Craftastic Blog of the Week:

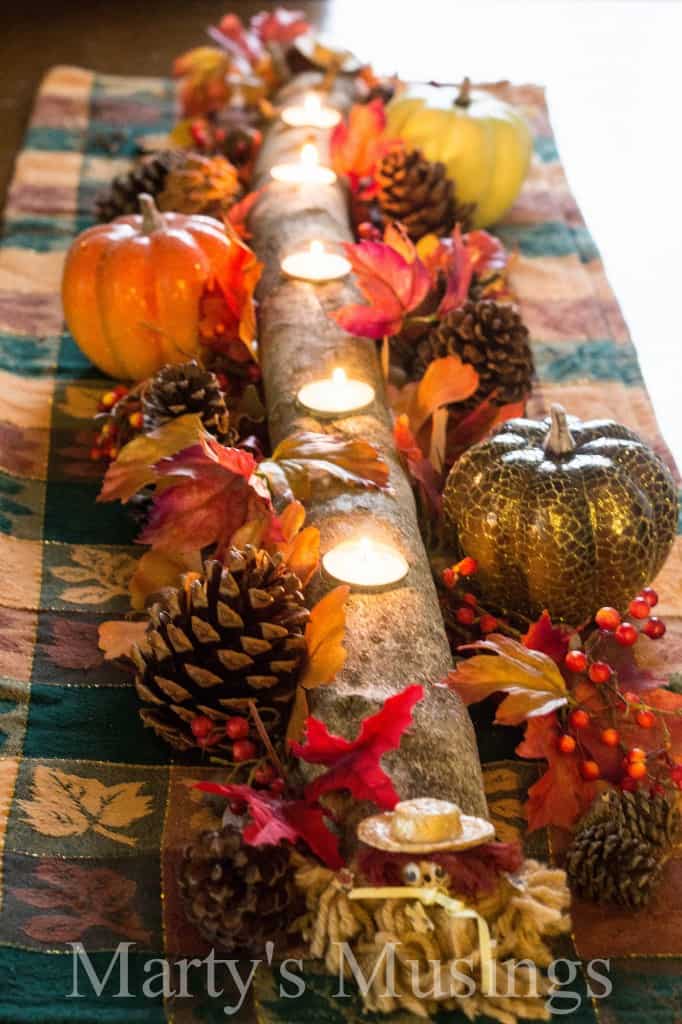
Marty's Musings is the blog home of Marty, a mom and lover of DIY and thrifty things.  She shares her experiences with scrapbooking, home projects, living frugally and raising her 5 adopted & biological children.  And she's been homeschooling for an amazing 18 years! You've got to check out some of her beautiful projects like her incredibly organized scrapbook room tour and lift-top coffee table made from a reclaimed window.  Last week she linked this gorgeous branch candle centerpiece.  Just lovely!

How can YOU be Craftastic Blog of The Week,
 get a special feature here 
& one week of FREE advertising on my sidebar?  
  • Link up a new project(s)
  • Include the Craftastic Monday Party button in your post(s) or on your sidebar (party pages don't count)
  • Leave a comment below telling me what you linked so I can check it out
One blog that meets the criteria will be selected each week.  More details can be found HERE.
  
Ready to link up your crafty creations?

Party rules are simple:
  • As long as it's crafty, and made by you, it's Craftastic (no links to giveaways, shops, link parties or other people's work).  Add the link to your specific post (not the main page of your blog).
  • Grab my party button & put it on your post or blog somewhere.  The code's on the sidebar -> 
  • Check out some of the other fabulous links and share some crafty comment love.  We all love getting comments!!


Friday, September 28, 2012

Crafty Gear 411: How To Make Your Own Appliqués


Appliqués are a great way to turn something drab into fab and make coordinating looks.  Give a basic tote new style or a plain shirt some extra flair.  It's easy and inexpensive too - especially when using scraps.  Earlier this week I shared my how-to for making lined pants with fold-over detailing (aka Ants In My Pants) using some darling Timeless Treasures Itsy Bitsy Ant print fabric.  

Today's Crafty Gear 411 gives a quick run-down of making appliqués from scratch and shows how adding an appliqué to a plain tee makes a totally custom ensemble:
Here's how to make your own custom appliqués:

You'll Need
  • Item to appliqué
  • Paper & pencil
  • Cotton fabric
  • Paper-backed Fusible Web and Sew-In Stabilizer 
  • Sewing Notions: shears/rotary cutter, disappearing marker/tailor's chalk, iron & ironing board, press cloth, pins, coordinating threads)
  • Optional: hand sewing needle for detailing

To start, create an appliqué design on paper and decide what will be the basic outline shape(s) for the applique (fine detailing will come later in the stitching).  I wanted to make an ant on a picnic blanket, so I drew a three-segment body for my little ant on paper and used that as the pattern to pin onto some Soho Solid Black fabric and cut out:
I also cut a curved triangle shape from some coordinating Itsy Bitsy watermelon fabric for the picnic blanket and cut matching pieces for each from my fusible web:
Paper backed fusible allows you to fuse to materials together in a two-step process.  First, fuse the rough side of the fusible to the backs of the pieces with a dry, hot iron and let cool. Then peel off the paper backing and fuse them onto the front of the shirt/bag/whatever using a damp press cloth between applique and iron set to the wool setting.
To make a nice finish, and avoid fraying, edging around the entire design with satin stitching is ideal.  This is how most store-made appliquéd items look.  Satin stitch is really just a fancy name for using a wide zig-zag set to a very small stitch length (close to zero).  The trick is to line things up so the right side of stitches go just past the raw edge of the fabric to enclose it under the stitching and go slow around corners and curves for a uniform look.
This stitch is nice for adding design details too.  I used it to make the legs, mouth, eye and antennae by drawing them on with disappearing marker & chalk and then stitch over the markings.  If there's any part where there's a gap between stitches, just stitch over that spot again.  Easy fix!!
It's also best to use a good stabilizer on the back if you're appliquéing on a thin or stretchy fabric.  The stitches tend to pull a bit and get puckery on these materials - especially when there's a lot of stitching close together.  My stabilizer of choice for these sorts of projects is the kind you can tear away because it gives a good, solid backing and just rips away when done.  

For the really fine details hand stitching is the way to go.  I added a couple of hand stitches in blue for some the tiny eye detail - little accents like that can really add personality.
Now the appliqué is all set and a custom-created-by-you look is complete.  Enjoy!


Tuesday, September 25, 2012

Who's Got Ants In Their Pants? A Lined Pants Tutorial


I can honestly say my kids have ants in their pants and it's not even an exaggeration anymore.  And these ants are the cute kind, (if you can consider ants cute that is).  I saw this tiny ant print fabric and a voice in my head cried out "Ants In My Pants! You NEED to make that a reality!!!"  So I did: 
Would you believe I had a HUGE ant phobia back in high school and now I'm raving about using ant print fabric?  Yeah, I know I'm a weirdo.  In my defense the phobia was more due to a carpenter ant infestation in a kitchen one summer, so the teeny weeny ants weren't really part of the phobia.  And all 3 of my kids love bugs - even my 3yr old daughter.  She couldn't wait to see these pants.  Maybe we're a total family of weirdos...but c'mon isn't this little guy more sweet than scary?
To make my Ants In My Pants I recycled an old pair of men's jeans and used a basic one-piece pants pattern for the design.  The fancy (p)ants fabric is the Itsy Bitsy Ants print from Timeless Treasures. The pockets are also lined and the fold over design makes a few little ants peek out over the tops:
The cuffs fold up so some teeny ants peek out there too:
For the outer fabric I started with an old pair of men's jeans of my husband's that had shrunk a bit and cut the legs open along the inside leg seam.
I folded the cut lining leg piece in half and place the fold along the remaining outside leg seam of the jeans and then opened that piece up to cut the outer pant legs.  This made sure those already-in-place side seam would be nice and straight when finished.
I cut out 2 pockets & matching linings with a tall, angled top.  Then I sewed them right sides together and left a small gap to turn them right side out.  A quick press to flatten, then folded the top portions outward and stitched them down.  Then I placed them on the back portions of the jeans and sewed them into place:
I sewed up the inner leg seams and crotch seams for the lining and outer pants so I had to separate pairs of pants.  Next I followed the same steps I used for making my insulated snow pants a while back.  All the details for sewing the layers together, turning and forming the waistband can be found HERE.  For the bottom cuffs I just folded the raw edges inward, pinned together and topstitched near the edge.  
Then we turn the cuffs up and are ready for getting a little antsy.  For daring days we can wear 'em full ants side out.  I like to think we're doing our part for the environment by recycling some old clothing and showing a little bug love at the same time:
And of course once I got going I had to make a matching ant applique shirt with some fabric scraps (a little tutorial on this is coming up next):
Now the next time my kiddos act crazy in public I can just point to the pants and say that's the reason.  Problem solved!  

Sharing this with my FAVE LINK PARTIES too-
Click HERE to check them out!

Sunday, September 23, 2012

Craftastic Monday Link Party is On!!

Happy Craftastic Monday!  Sorry to be a little late getting the party started - too much to do lately and not enough time to do it!  So here are a few fab features from last week to get us started and add your latest and greatest creations below to get things rolling this week!

Growing in Grace shared these adorable hoot owl peanut butter cookies:
Scattered Thoughts of a Crafty Mom showed a great tutorial for this fantastic girl's knit tunic top:
Pink Recipe Box gave a great idea for a tasty breakfast with these hash brown cups:
Yellow Spool had a great tutorial for turning scraps into this adorable fox pillow:

And now for the Craftastic Blog of the Week:
Cupcakes and Crinoline is the creative corner of Mary Beth, a longtime crafter and fellow homeschooling mom.  Like many of us, her loves include many things like sewing, gardening, baking and finding inspiring ideas.  She has some great things to share like homemade slushies, and a handy project gallery so you can find great ideas at a quick glance. Last week she linked up her burlap silverware caddy:

How can YOU be Craftastic Blog of The Week,
 get a special feature here 
& one week of FREE advertising on my sidebar?  
  • Link up a new project(s)
  • Include the Craftastic Monday Party button in your post(s) or on your sidebar (party pages don't count)
  • Leave a comment below telling me what you linked so I can check it out
One blog that meets the criteria will be selected each week.  More details can be found HERE.
  
Ready to link up your crafty creations?

Party rules are simple:
  • As long as it's crafty, and made by you, it's Craftastic (no links to giveaways, shops, link parties or other people's work).  Add the link to your specific post (not the main page of your blog).
  • Grab my party button & put it on your post or blog somewhere.  The code's on the sidebar -> 
  • Check out some of the other fabulous links and share some crafty comment love.  We all love getting comments!!


Friday, September 21, 2012

Kid's Pattern Review: Fall Sewing With Seamingly Smitten

Looking for a few quick & easy patterns to whip up some fall clothes for the kids? Seamingly Smitten has just what a busy sewing lover needs to fill up those closets in no time!

The Boy's Classic Fit Pants pattern fits 3 months to 8 years (perfect for clothing all the kids in the family!).  Use your favorite fabrics to make these great for all seasons and for making pajamas too:
Boy's Classically Cool Cargo Shorts are perfect for Indian Summer days of the season.  With their cargo pockets, faux fly, slanted front pockets, elastic waist and pocket flap button detail, these shorts are sure to be a staple in a little man's wardrobe. Give these shorts an extra preppy look by using a longer hem. 

Pick something for yourself or for the kids - there are loads of great choices.  And as always, all Seamingly Smitten patterns have:
  • Tons of detailed photos
  • Easy-to-follow, step-by-step directions
  • Photos for each step (no more guessing what the wording actually means!)
  • Tutorial-style directions
  • Sizing charts to get the right fit
  • No need for sergers, zippers or anything else that scares you away from sewing!

I got a chance to try out the Rory Bubble Romper pattern for myself.  This girly one-piece pattern has sizing for 6 months - 6 years and two styles of leg cuffs: bubble and ruffled.  
Since the warm weather is disappearing fast around here, I decided to put a little Fall spin on it and make mine out of corduroy and extend the legs to make full length pants:
I LOVED how quickly this came together - just a single pattern piece and the directions were in an book-like format so they were easy to follow.  I liked how there was a real picture for every step and all the instructions were written simply. There was no guessing on what something meant or how it looked.  For someone brand-new to sewing these details make it goof-proof and for someone more experienced it makes it super fast to pick up what to do and jump to it.
I'm so happy with how this turned out. It's comfy and cute and with a long-sleeved shirt underneath it's perfect for Fall.  Being able to make it in under 30 minutes made it fun too.  I also like how easy it is to add some extra touches like the longer legs - I think I'm going to do some embroidery and maybe add some pockets on my next one.  Patterns that give lots of finishing options always get a big thumbs-up from me.  This one definitely got one from both of us:)
Check out Seamingly Smitten Patterns and let yourself have some sewing fun too!


LinkWithin

Related Posts with Thumbnails